WooCommerce is an open-source plugin for WordPress and allows merchants to easily set up an eCommerce store. This has made it a popular shopping cart choice among sellers.
When wanting to increase their sales, merchants may decide to start advertising their products on platforms like Google Shopping. In this case, they can use their product data from WooCommerce to set up their Google Shopping ads.
In this article, we’ll be covering how to properly optimize your product data to create successful product ads on Google Shopping. You can use it as a cheat sheet for Google Shopping for WooCommerce merchants.
- Gain even more visibility for the products housed in your store by advertising them on Google Shopping.
- By using a feed marketing solution, you’ll be able to easily copy your product data from WooCommerce to Google Shopping and translate the data in a way that meets all requirements to ensure your ads are approved.
- Learn how to further optimize your product data so that your campaign performance is as successful as possible.
What is the importance of feed optimization?
A product feed is a document that contains all the data and information about the items you have listed, such as titles, availability, and descriptions. If you have a WooCommerce store, then all of your product data is there, but you can export it to advertise in other places online.
However, this data might be messy, or at the very least, not organized in the way that the platform you want to sell on requires. It’s not that your data is wrong (although it might contain errors), but rather WooCommerce and Google don’t always talk about product data in the same way.
Google has very specific requirements for how the data for Shopping ads needs to be presented, which is where feed optimization comes in. Plus, beyond simply meeting Google’s requirements, there are enhancements and optimizations you can apply to help your ads perform even better on Google Shopping.
With a ruled-based feed solution like DataFeedWatch, you can set up IF/THEN equations to enhance, fix, and supplement your product data. That way your product data will be exactly the way Google likes it and you’ll be able to serve Shopping ads that outperform your competitors.
What is a WooCommerce Google Ads feed?
A WooCommerce Google product feed is a data feed that allows you to seamlessly synchronize your WooCommerce product information with your Google Shopping campaigns. It enables you to send accurate and up-to-date product data to Google, ensuring that your products are displayed correctly in search results and ads.
By utilizing a WooCommerce Google feed, you can effortlessly manage and optimize your product listings, ensuring that your inventory is easily discoverable by potential customers. This powerful tool eliminates the need for manual data entry and automates the process of updating and maintaining your product information.
With a WooCommerce Google feed, you can streamline your eCommerce operations, saving valuable time and effort. It simplifies the complex task of managing large amounts of product data, even if you don't have extensive technical expertise. Choose a WooCommerce Google Shopping feed integration to unlock the benefits of effortless product synchronization and increased visibility for your online store.

How to set up a Google product feed for WooCommerce sellers
The following instructions will tell you how to connect WooCommerce to Google Shopping and create your Google Shopping product feed:
- Set up a Google Merchant Center account. This account will serve as a hub for managing and submitting your product data to Google Shopping.
- Install a WooCommerce Google product feed integration plugin. There are several plugins available specifically designed to connect WooCommerce with Google Shopping. Installing and activating one of these plugins will make it easier to generate and manage your product feed. In the feed mapping instructions below, we’ll show you how it works with DataFeedWatch.
- Configure the plugin settings. After installing the integration, you will need to configure its settings according to your specific requirements. This typically involves mapping your WooCommerce product attributes to the corresponding Google Shopping attributes.
- Generate and submit your product feed. Once the plugin is set up, you can generate a product feed that includes all the necessary information about your WooCommerce products, such as title, description, price, and availability. This feed will be in a format that Google Shopping can understand, like XML or CSV. We’ll go into more details about each of these attributes below.
- Link your Google Merchant Center and Google Ads accounts. To start showing your Shopping ads, you'll need to link your Google Merchant Center account to your Google Ads account. This will allow you to create Shopping campaigns and allocate budgets for advertising your products.
- Optimize your product data: It's essential to ensure that your product information is accurate, up to date, and meets Google's requirements. Take time to review and optimize your product titles, descriptions, images, and other attributes to improve their visibility and performance on Google Shopping. You can do this with DataFeedWatch, which will also check your feed for errors before sending it to Google.
By following these steps, you can establish the connection from WooCommerce to Google Merchant Center, enabling you to showcase your products to a broader audience and potentially drive more sales.
WooCommerce fields vs Google Shopping attributes
Instead of creating a Google product feed from scratch, you can use the product data you already have stored in your WooCommerce shop. When creating your product listings in WooCommerce, you may have uploaded your products individually or uploaded them in bulk with a pre-existing CSV file. But either way, you’ll be able to export all the product data currently there.
There are two ways you can get your product data to DataFeedWatch.
- Export your product data to a spreadsheet and then upload it when creating your shop. You will need to make sure that this spreadsheet is up-to-date with the information on your store, which is why we suggest going with the second option.
- Connect your store with the DataFeedWatch WooCommerce API so that you don’t need to worry about it again.
Feed mapping is the process of transforming the data from your feed and aligning it with Google’s standards. In DataFeedWatch, it will look like this:

Attributes are pieces of data within a product feed. They are specific details and characteristics of a product that help make it more visible and easier for customers to find. For example, IDs, titles, and product links, color, and price are all attributes.
The name of the Google Shopping attribute is in the blue box on the left (highlighted in red) and the text box in the middle (highlighted in blue) is where you’ll be pulling the information from your WooCommerce data.
Let’s begin!
Required attributes
Creating a Google product feed for WooCommerce shop owners that gets your listings approved is the first step. Google Shopping required attributes are those that you must include in order for your ads to be listed. While simply having them will get your products approved, it’s important to optimize them as much as possible so Google knows who to show your ads to, which will make them perform even better.
ID → ID
Product IDs are unique identifiers given to your products
Luckily, Google and WooCommerce refer to them by the same attribute name, so all you’ll need to do is use the rename rule to match the attributes. It will probably already be the suggested option for you, so you won’t actually need to set it at all.

However, if your product IDs are located under the attribute SKU, then choose it instead of ID.
💡 Keep in mind: Google relies on your product IDs to maintain a record of transaction history and ad quality. Any changes made to your IDs will result in the loss of all associated product history. While other attributes can be optimized and modified on a regular basis, it is important to exercise caution and choose wisely when it comes to altering the product ID.
Name → Title
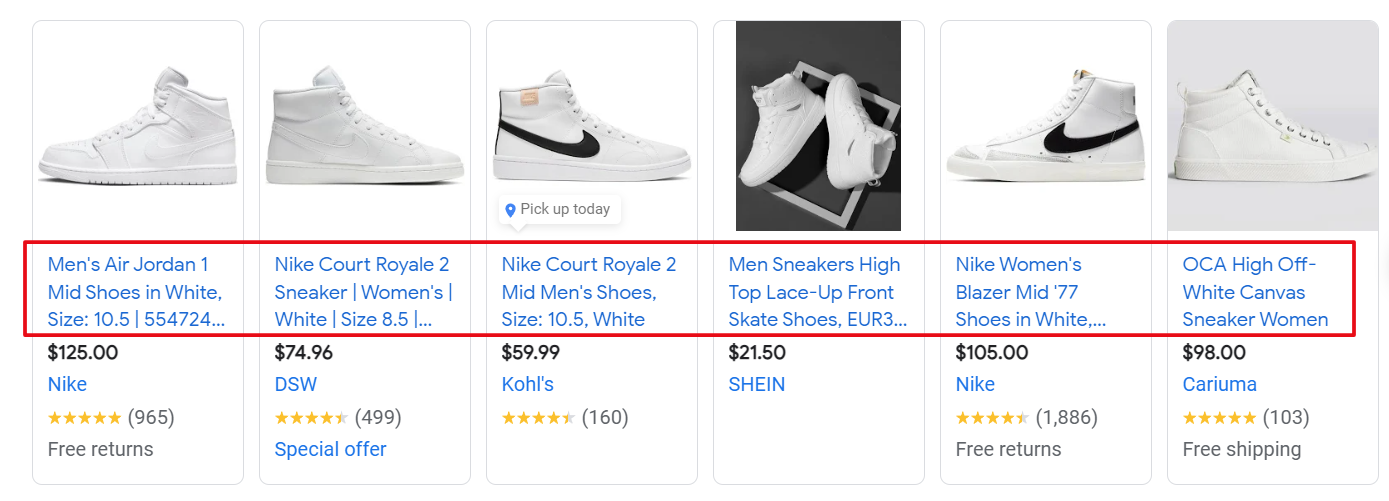
Your product titles are what appear immediately below the product images, and let shoppers know what your product is. WooCommerce refers to this as the product’s ‘Name’.
You can simply use the ‘rename’ function to directly map your product’s name as it is in your WooCommerce store.

But the better option is to draw information from other areas of your product feed in order to create an optimized title. Here are the recommendations based on the type of product you're selling.
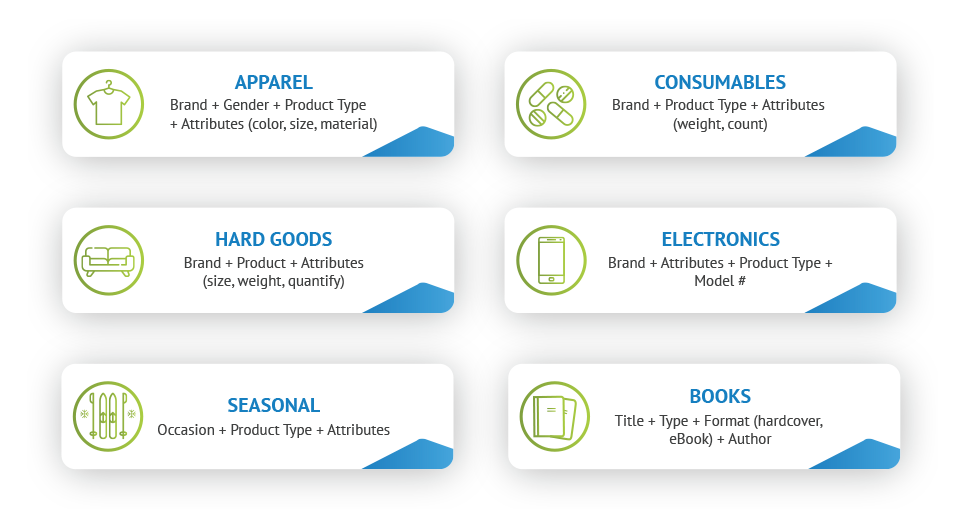
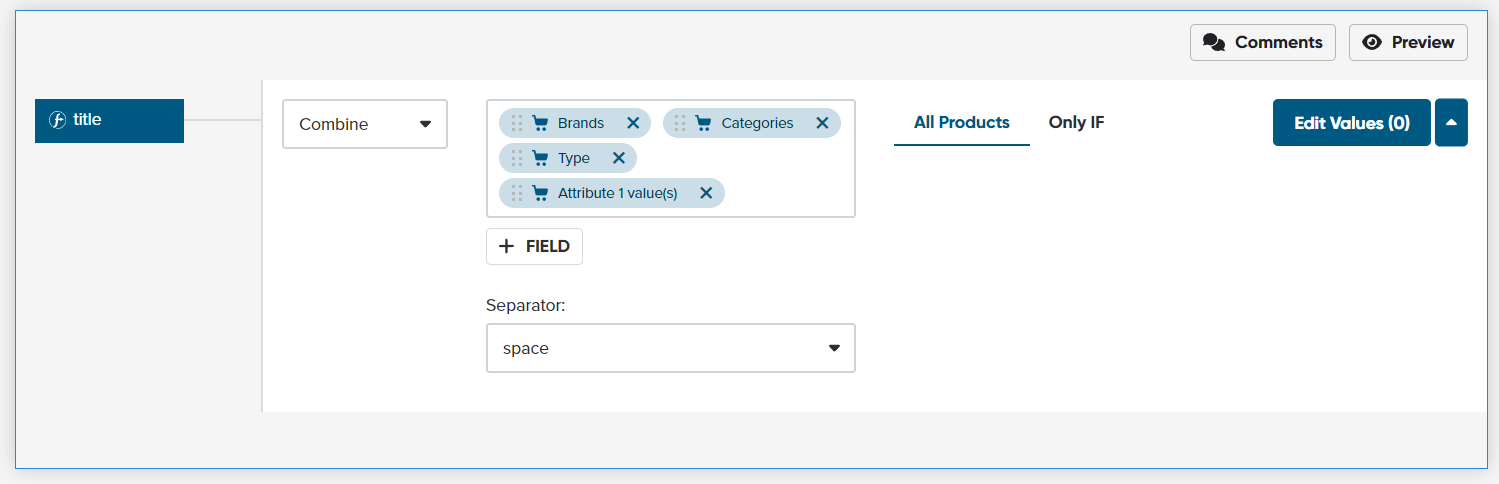
To create an optimized title, use the ‘combine’ function. Let’s say you’re selling apparel. When you finish mapping this rule, it should look something like this:
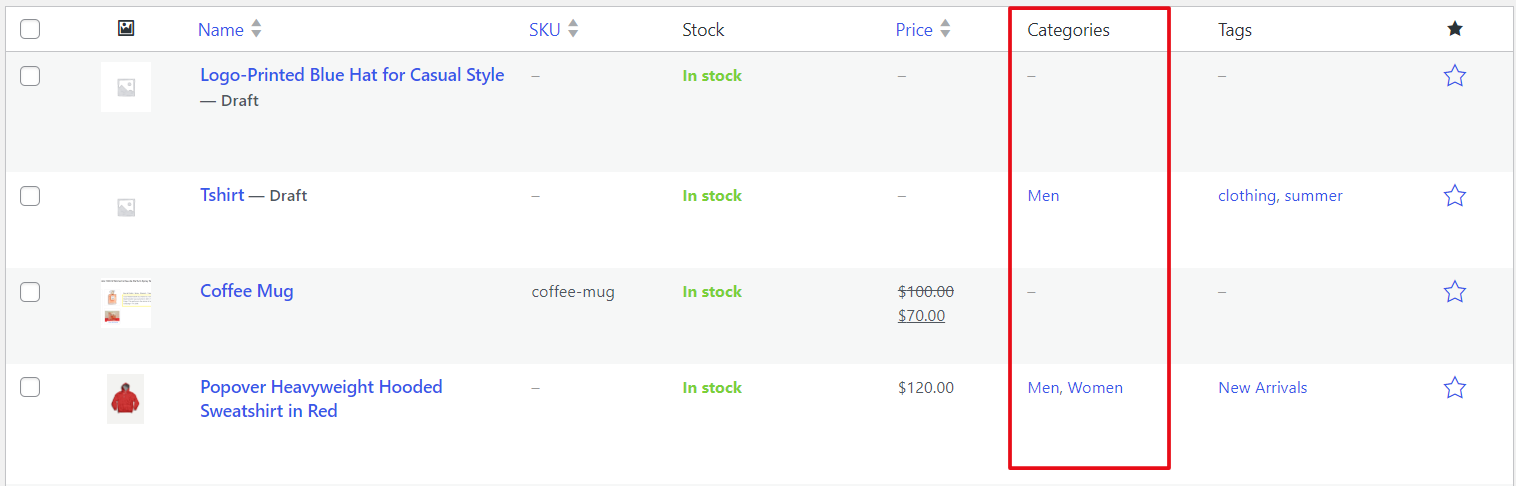
Note that the information about your products might be connected to attributes that aren’t intuitive. For example, the product’s gender might be under the categories field rather than one named gender, and things like color might be labeled as attributes 1.
You can check how your product data is labeled by going to your WooCommerce store, or checking the product feed file if you’ve exported it.
Description or short description → Description
You may have two different fields that contain product descriptions. They will be labeled as description and/or short description. You’ll want to take advantage of the character limit you’re allowed, so using the short description alone probably isn’t your best bet.
Google description requirements and best practices
These are some of the minimum requirements you should adhere to with Google Shopping product descriptions:
- Ensure that each product has a description.
- Limit your descriptions to only talking about the product itself, and not other items. Don’t include comparisons to competitive products.
- Check for any grammar or spelling errors.
- Remove any promotional text or words capitalized for emphasis (e.g. AMAZING headphones).
Follow these best practices for your Shopping descriptions to boost your ad performance:
- Give as many specific details about your product as possible.
- Anything after the first 160-500 characters will be truncated, so be sure to include the most important details first, like any special features, the size of your product, or any technical specifications.
Removing code in your description
You may find that there are HTML or formatting symbols in your description, which shouldn’t be included in your Google Shopping descriptions.
You won’t need to do anything to remove it, since DataFeedWatch will automatically take care of it before sending your products over to Google.
External URL → Link
This attribute tells Google exactly where your product is located on your website.
You can just use the rename rule, as there’s nothing to be optimized. But keep in mind that if you have product variants that they’ll need to have their own specific URL so that you’re not sending shoppers to the wrong item. For example, if they wanted a blue shirt, but your link sends them to a red shirt then that will diminish their shopping experience and can lead to Google disapproving your item.
Images → Image_link
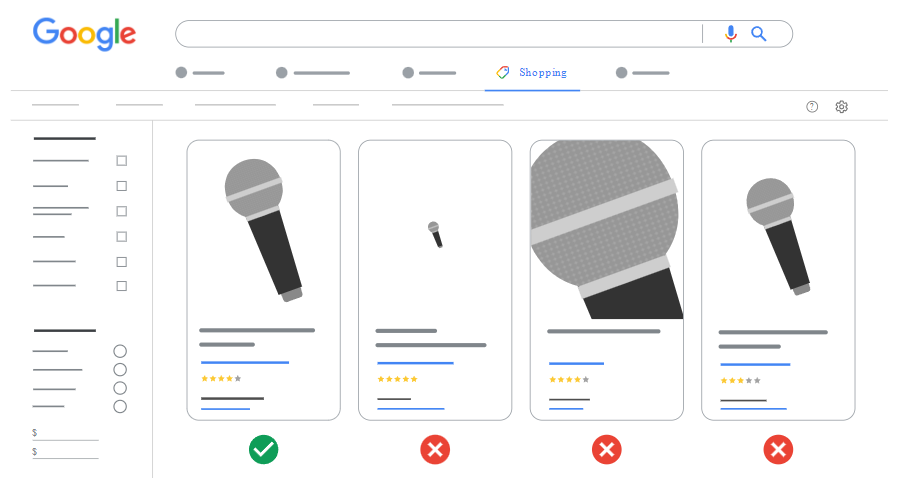
Images are the star of the show for Google Shopping, so make sure your product images pulled from your WooCommerce store meet Google’s requirements. You’ll need to provide at least one image per product.

Requirements for Google Images
It's important to use the largest version of the image you have, and ensure that it meets the size requirements set by Google to get your images approved. These requirements can vary depending on the type of product being sold.
- Apparel images need to be at least 250x250 pixels while non-apparel items should be at least 100x100 pixels.
- In general, images cannot exceed 64 megapixels in size and 16 MB in file size.
- Remove any images that don’t show your products or are acting as a placeholder.
- Always include images of your actual products for the image_link attribute. Other kinds of images can be submitted using the additional_image_link attribute.
- Remove any promotional text and image overlays.
Google images best practices
Follow these best practices to help your images stand out from the competition.
- Have your product take up about 75-90% of the frame.
- Choose either a solid white or transparent background.
- Use images that are at least 1500x1500 pixels.
- Use lifestyle images to help shoppers envision your products more realistically.
Variant images
When it comes to variant images, it's common for merchants to forget about them and instead rely solely on the default image. But it’s considered a best practice to utilize variant images whenever available, particularly for products that come in multiple colors or options.
For instance, let's say you sell a bicycle with two variants - one in red and the other in yellow. When submitting the first variant (red), make sure to include an image of the red bicycle. Similarly, when submitting the second variant (yellow), include an image of the yellow bicycle.
Regular price → Price
This is another attribute where you can simply use the rename rule.

Sale price
If you know that you already have discounted products, or that they’ll go on sale in the future, you can set up rules so that this sale price shows automatically when the sale begins. There are two different ways you can go about this.
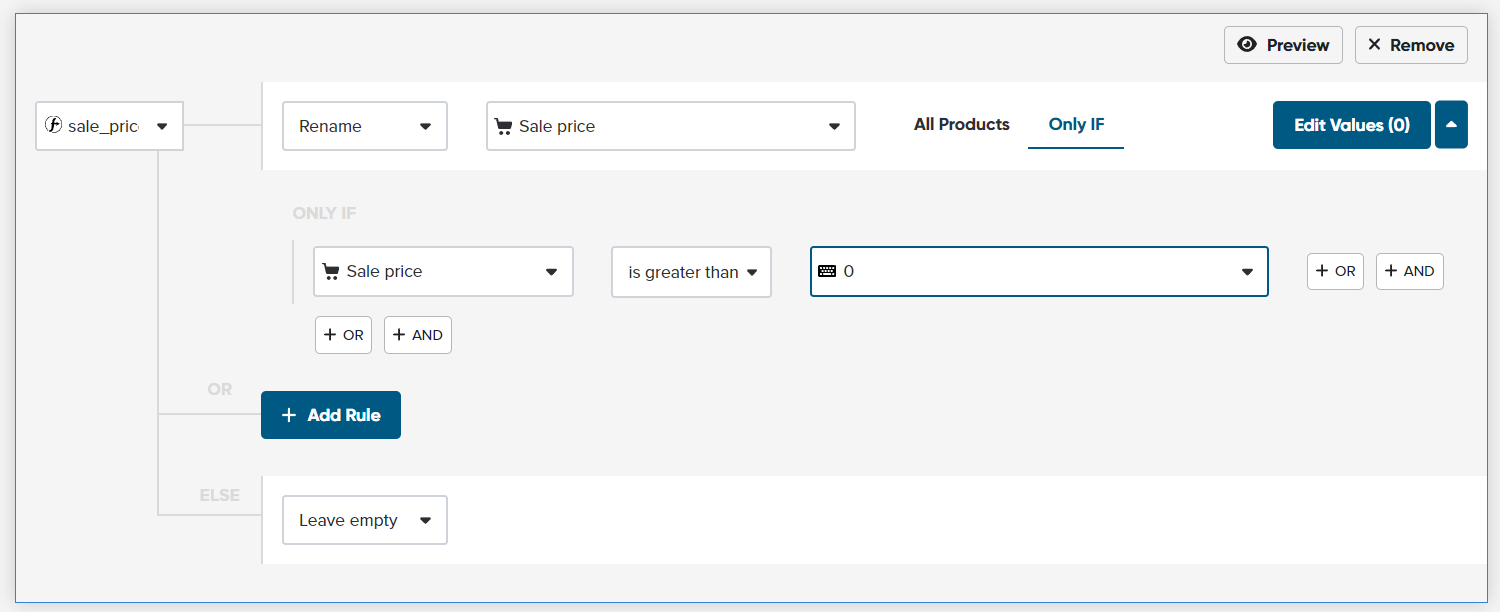
The first is by letting Google know that you want to show the sale price when it’s there, but default to the regular price when it’s not. In order to do that, you can set up a rule like this:
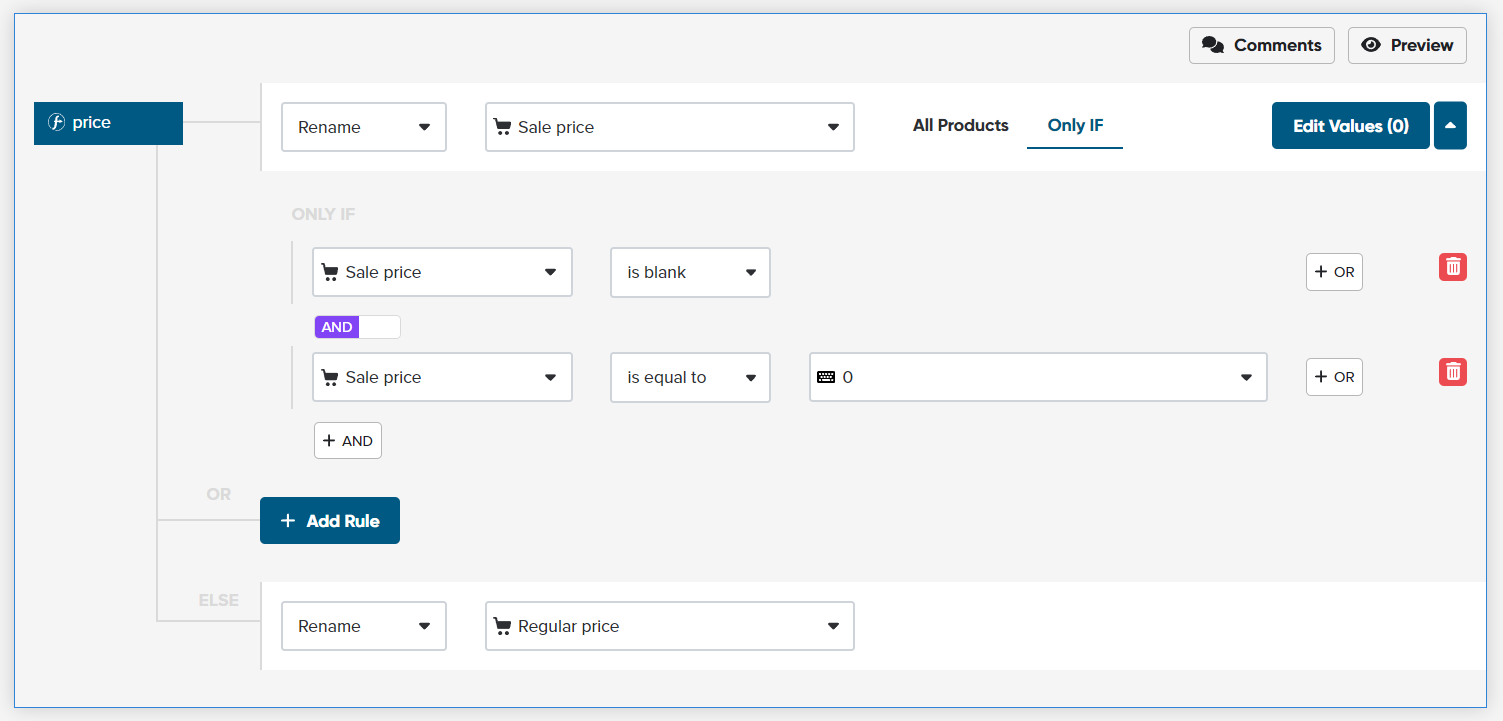
This can work just fine, but we recommend using the second method (adding the sale_price attribute) which will be explained in the optional attributes section. This second option allows you to take advantage of Google’s strikethrough pricing.
Brands → Brand
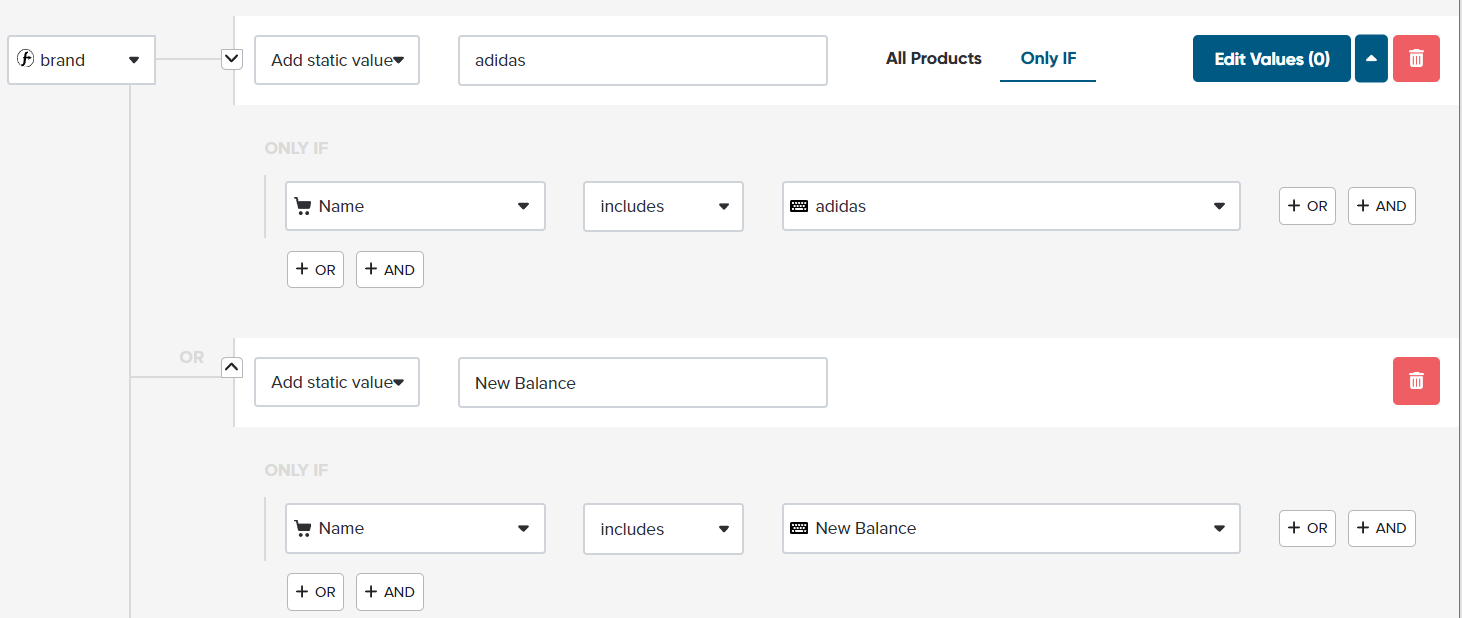
If you have the brand listed for your products already, then you can create a 1 to 1 rule with ‘rename’.

If you don’t have your brand name in its own field, but it is located somewhere in your product data, then you can set up a rule to pull it from other locations. Here’s an example:
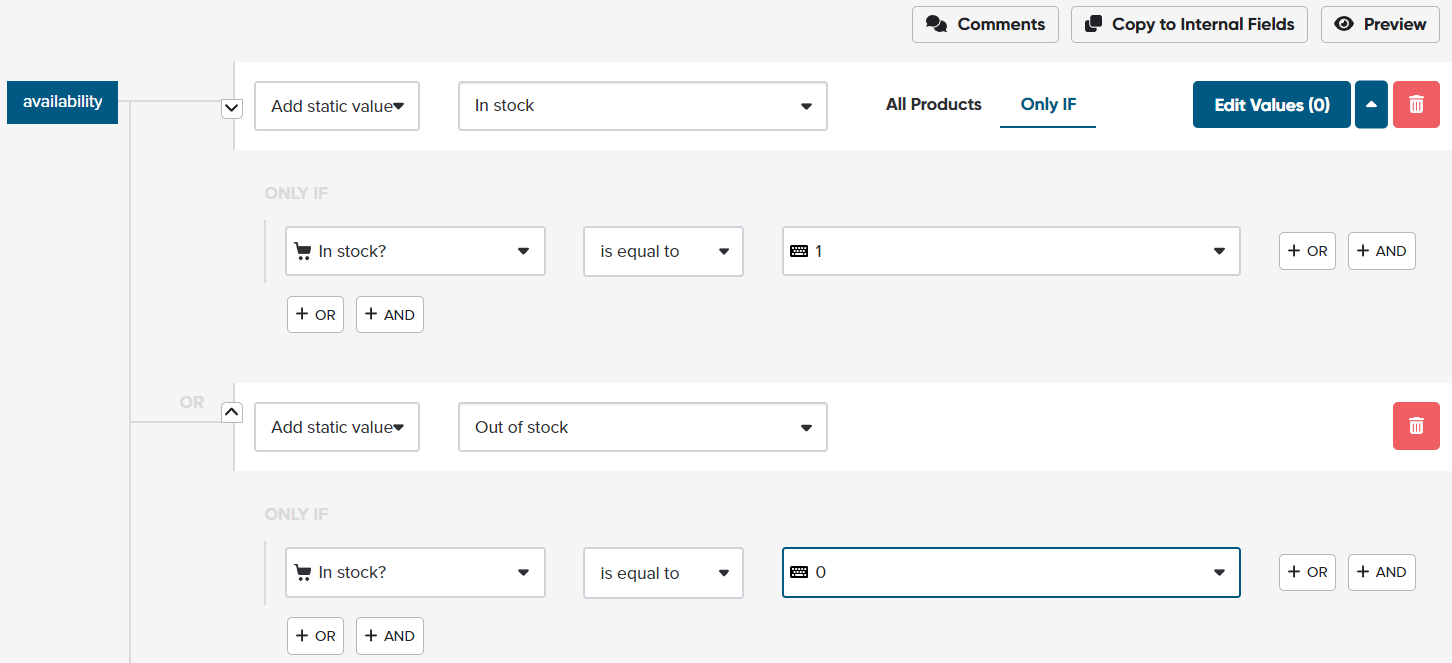
In Stock? → Availability
In Google Shopping, the availability attribute has preset conditions that you’ll need to choose: in stock, out of stock, preorder, or backorder.
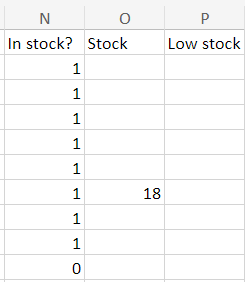
The corresponding WooCommerce attribute is In Stock? and will show a value of 1 for in stock, and a value of 0 for out of stock. The stock attribute in WooCommerce refers to how much of the product you have available.
Here’s how you can map it in your internal fields:
Optional attributes
These are fields not required to list your products on Google Shopping, but you should consider including them anyway when applicable to boost the performance of your ads.
Sale price → sale_price
By adding the sale_price attribute to your feed, you’ll create a rule that triggers the sale price to appear for your ads when your products are discounted. Just remember that whatever price shows on Google Shopping needs to match what’s on your website so that your product doesn’t get disapproved.
As we mentioned earlier, adding the sale_price attribute rather than configuring the price attribute will create strikethrough pricing.
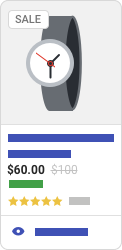
This is beneficial because it adds an eye-catching element that will interest shoppers who are scrolling through multiples of the same product.
GTINs
GTINs are a numerical unique identifier for your product, usually given by the brand of the product.
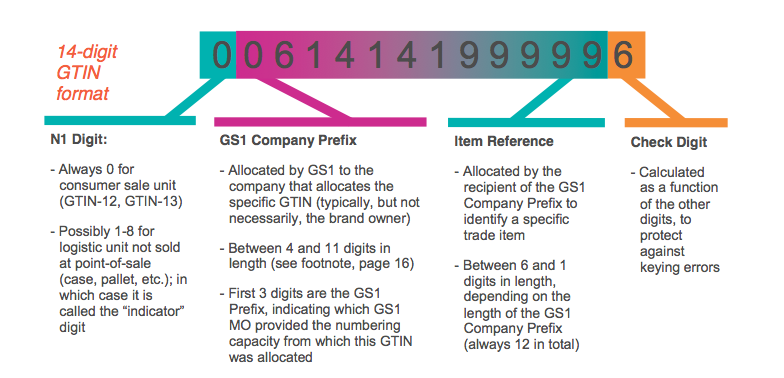
While they’re not required, Google has made it clear that its algorithm will give preference to product listings that contain the number. If you have GTINs for your products already, then you can just create a rename rule like you did with the other attributes.
If not, then you have a few options for how to go about populating the field.
- If you have the GTINs located somewhere else (like in a different file) then you can use a feature called ‘look-up table’ in order to add them. You’ll just need to add the file, for example a Google Sheets file, and then specify which column you want to pull the GTINs from.
- If you don’t have them for your products at all, then go check out our article about how to find GTINs for your products and follow the steps there.

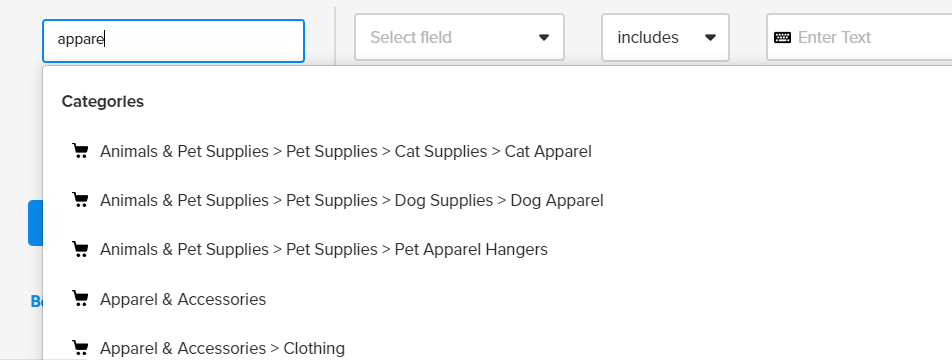
Google_product_category
Google has its own taxonomy system and assigns a product tree to your products automatically. But in order to avoid any errors, you have the option to override the assigned category by using the attribute google_product_category.
It’s highly recommended to optimize your results by matching your product types with the most specific category available in Google's taxonomy. To achieve this, select the deepest sub-category level that applies to your product. Putting in the effort to ensure this alignment can greatly enhance your results.
You will also have the chance to do this with DataFeedWatch.
Additional_image_link
Do you have multiple images for each of your products? Use them! The more the merrier applies for Google Shopping images because you want to give shoppers the best possible idea of your product.

This can help push them from the consideration to the decision stage, resulting in more conversions for you. When you add more images, a carousel like this will appear when a shopper clicks on your ad.
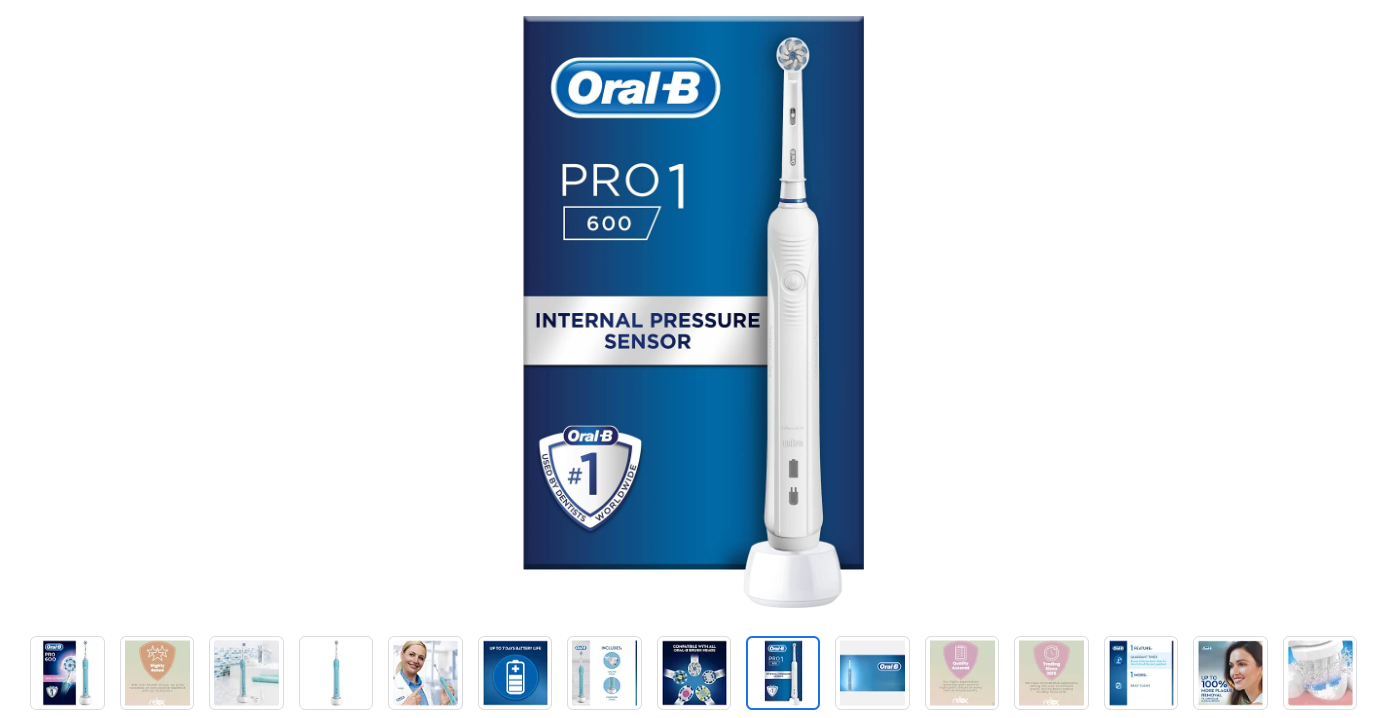
As you can see, the seller of this toothbrush has provided a main image that showcases the product fully, and then provided additional images to add even more visual information for shoppers.
Custom labels
Custom labels are one of the handiest tools in any advertiser’s toolbox. They allow you to segment your products in any way you’d like, which in turn gives you more control over where your advertising budget is going. You have the ability to create up to five custom label fields and assign your own values to each custom label.
You can create custom labels based on any of the fields located in your WooCommerce feed. Here are some examples:
- Upsells
- Cross sells
- Season
- Tags
- Attributes
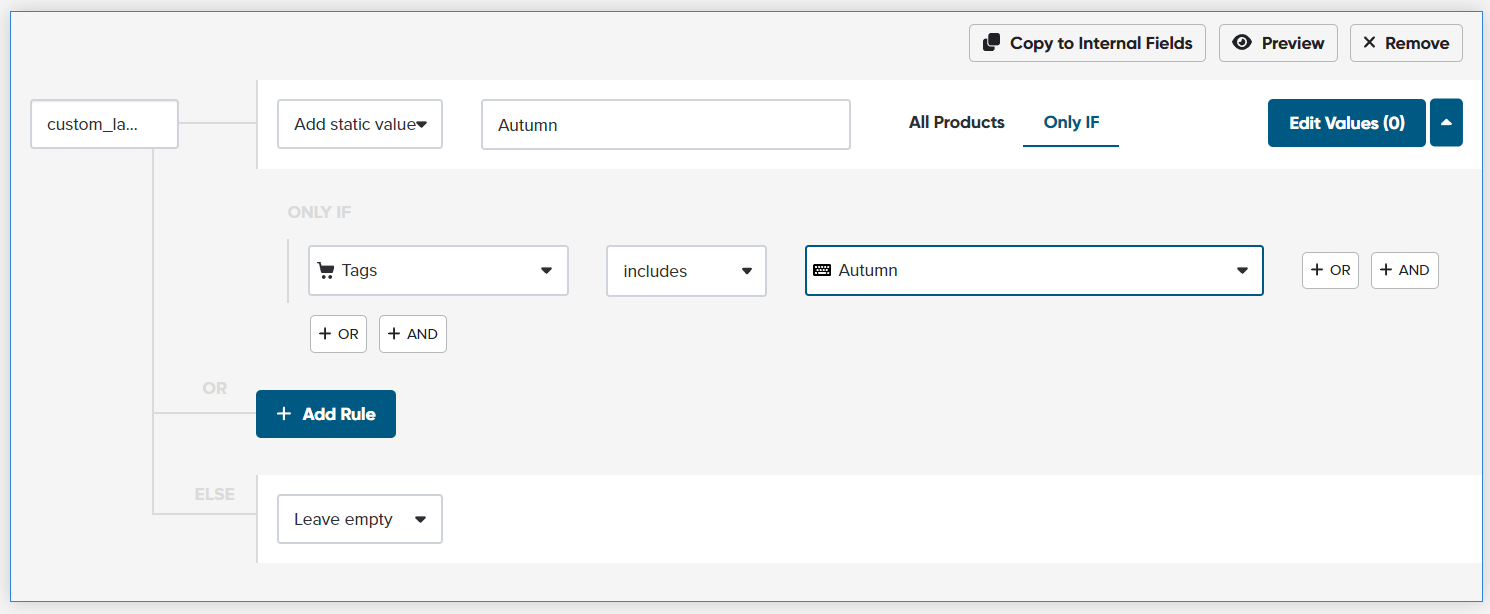
Use the “Add static value” rule to set up the label for the group you want to create. In this example, we want to create a group of products that are popular in autumn. In our product feed, all the information about seasonality was stored under the Tags field. So any product that has autumn in its tags will be added under this custom label.
Want to discover some more ways in which you can use custom labels? Check out our article 12 Powerful Custom Labels to Consider for Google Shopping Campaigns.
Conclusion
This guide aims to demystify Google Shopping for WooCommerce sellers. By following these steps, you will be able to successfully map WooCommerce fields and Google Shopping attributes. This unlocks the next crucial step of your Shopping campaigns - more in-depth feed optimization. You can check out our article 8 Must-Try Google Shopping Feed Optimization Tips next for help on what to do next.
Using your product data from WooCommerce also provides you with an advantage over merchants who are starting their Google product feeds from scratch, as you already possess all the necessary data. Using a feed optimization solution like DataFeedWatch during this process will not only save you time and money, but also ensure your campaigns are run with automation in the future.