More and more people are researching the cars they're interested in online before buying one. In fact, the Auto Gearshift Study showed that almost 90% of people looking for their next car use the internet to research it.
Moreover, the covid-19 pandemic has given a huge boost to the car eCommerce market, and buyers are no longer just researching their potential next car online - they're buying them online as well. According to a report by Market Research Future, between 2024 and 2027, the Automotive eCommerce market has the potential to grow at a compound annual growth rate (CAGR) of 19.67%, resulting in expected USD 202.15 billion by 2030.
While searching for a new car online, buyers expect the easiest and most convenient experience possible. Your role as a car dealer and online car advertiser is to present the right and comprehensive information and inventory to the shoppers.
Get your own copy of 8 Steps to Run Vehicle Ads on Google
What are Google Vehicle ads?
Google Vehicle ads are a marketing solution offered by Google that allows you to showcase your car inventory online and target potential customers who are actively searching for vehicles. This ad format shows new cars that are located nearby and are for sale.
It’s important to highlight that you can only promote vehicles and cannot use vehicle ads to advertise and sell vehicle parts, tires, accessories or services.
Also the vehicles that you wish to promote must be non-commercial, meaning they must be passenger vehicles, for example cars or pickup trucks.
You cannot use Google’s vehicle ads to advertise RVs, airplanes, buses, boats or trains.
Who can use Vehicle ads?
Vehicle listing ads on Google can be used by vehicle advertisers and car dealerships. According to Google's vehicle ads policies, vehicle advertisers can participate by uploading their vehicle feeds to Google Merchant Center and running Performance Max campaigns in Google Ads.
As for now, Google Vehicle Ads are only accessible to dealerships located in the United States. However, Canadian and Australian advertisers have the opportunity to participate in Google's limited beta program to potentially gain access to this advertising feature.
Google Vehicle Ads upgraded to Performance Max
Google in September 2023 revealed a change in its approach to vehicle marketing, aiming to improve the automation of Google Vehicle Ads, expand customer reach and increase conversions.
Now all existing Vehicle Ads campaigns created through Smart Shopping campaigns are upgraded to Performance Max.
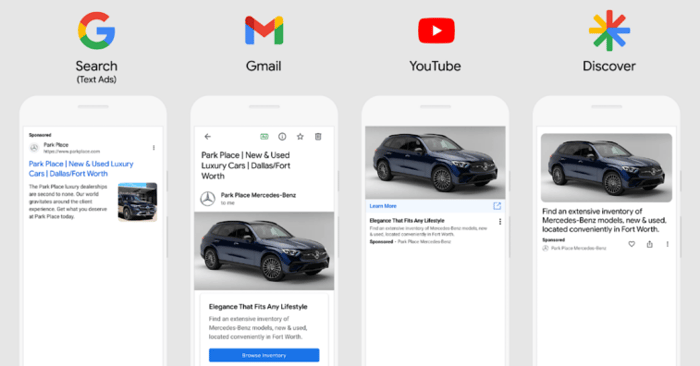
The transition to Performance Max brings additional benefits such as increased inventory and formats, allowing advertisers to reach a wider audience across various touchpoints and channels:
- Search
- Gmail
- Youtube
- Discover
- and more!
This upgrade aligns with Google's strategy of providing more comprehensive advertising solutions and maximizing performance for advertisers.
Source: SearchEngineLand
With Performance Max, advertisers can harness the power of Google's advanced algorithms and machine learning capabilities to optimize their campaigns and drive better results. The automatic upgrade process eliminates the need for manual migration and ensures a seamless transition for advertisers.
All aspects of the campaigns, such as configurations, layout, audience information, product feeds, and creative resources, will be transferred to the new platform.
How Google vehicle ads work
After clicking on a vehicle ad, the potential customer is being redirected to the vehicle description page on your website. There, they can read more about the specific car, fill out a form and get your dealership’s contact information.
Google matches users’ search queries with Google vehicle ads by using the product details included in your vehicle inventory data feed. Therefore it’s important that your feed is well-optimized since it’s the core of car advertising. Then, you need to upload it in Google Merchant Center.
You will also need to have an active Performance Max campaign on Google Ads to use vehicle ads.
To make it more clear, we can describe this process in 4 steps:
1. A user clicks on your vehicle ad.2. Google passes the Business Profile store code where the vehicle is available
OR
In case you use the store feed - Google passes the store code from your store feed.
3. Your landing page, showing a vehicle's price and availability at the location associated with the store code, is being generated for the user.4. On your dealership’s website, the customer then has the option either to buy a car right away (and wait for it to be delivered) or reserve it online and pick it up at your dealership that is located nearby.
What does a vehicle ad look like?
Google vehicle listings typically include a prominent image or video of the vehicle, accompanied by relevant details such as:
- Image of the vehicle
- Make
- Model
- Price
- Mileage
- Condition
- Advertiser’s name
These ads can appear in various formats across Google's advertising network, including search engine results pages, Google Maps, YouTube, and Google partner websites. The exact appearance of a Google vehicle ad may vary depending on the platform and ad format being used. The goal of these ads is to provide potential buyers with essential information and entice them to click through to learn more or take further action.
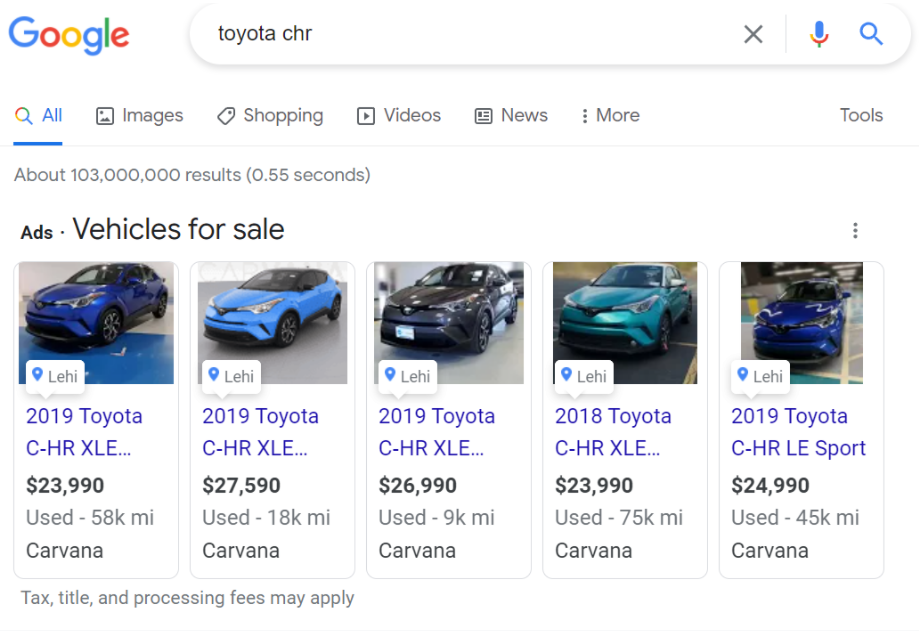
In an example above someone searches for a Toyota C-HR. The several vehicle ads appear and the users can either purchase a car of their choice (which is located nearby) or they can get it delivered.
If you're interested in expanding your car sales online, you can also read our article on how to advertise your car inventory on Facebook.
Benefits of using Google vehicle listing ads
Vehicle ads allow you to show ads of cars to auto shoppers online in response to their search queries with the right information to take them further in their customer journey (closer to a decision stage). We can highlight a few benefits of using vehicle ads by car dealers.
- Big range
With vehicle ads, you can reach more car buyers searching for cars online if you have matching models on your listings. Moreover, Performance Max introduces additional ad placements and inventory, leveraging audience signals to gain a deeper understanding of advertisers' most valuable audiences.
- More accurate leads
By showing key information and well-made visuals about the car in your vehicle ads, you can improve the relevance of your offer and get more qualified leads.
- Enhanced conversion rate & Improved omnichannel strategy
Vehicle ads will help you optimize for both online and offline conversions (qualified leads and store visits) within a single campaign.
- Fully automated targeting = less work
Vehicle listing ads are now a Performance Max campaign, so there’s not much work with them. The relevant vehicle ads will automatically be shown for a related search query on relevant channels.
- Valuable Analytics
The Insights page for Performance Max provides fresh data on audience demographics and current search trends, offering valuable insights to advertisers.
8 steps to get started with ads for automotive industry on Google
To be able to show your vehicle ads on Google, you must provide information about your business and dealerships to Google. You also need to upload a vehicle data feed, that contains all the relevant information about the vehicles you’re selling: for example makes, models, prices, mileage (more about that in the next chapter).
Below you can read our step-by-step guide to creating vehicle ads on Google:
Step 1: Create and set up 3 accounts (if you don’t already have them)
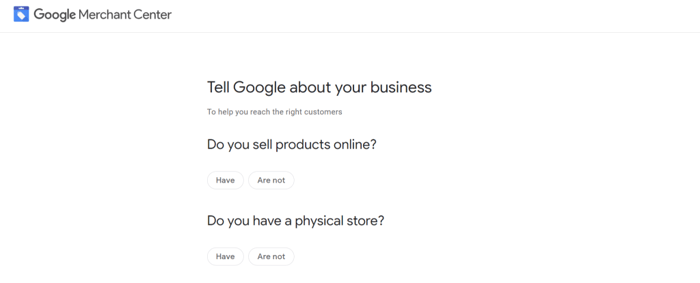
If you want to show your vehicle ads you need to have 3 separate accounts connected to Google. These are a Google Merchant Center account, a Google Ads account and a Google Business Profile.
After creating these accounts, you need to link them to each other to bring all information together across sources. This means you need to connect your Google Ads account and Business Profile with your Google Merchant Center account.
- Set up your Google Merchant Center account
- Set up your Business Profile
- Set up your Google Ads account
Step 2: Request to enable the vehicle ads program
The next step is to fill out the Google form asking for enabling the vehicle ads program. Google will check if your location qualifies and let you know the outcome in a few days.
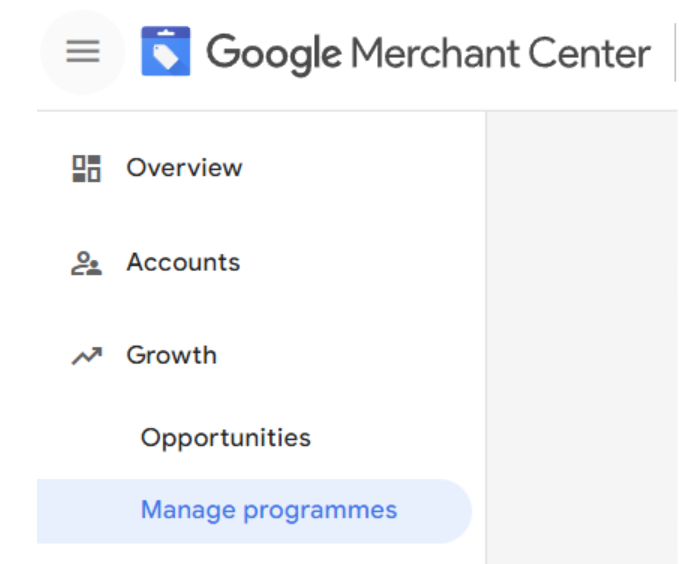
When you get a confirmation email from Google, you need to log in to your GMC account, navigate to Growth, then Manage programs and click Get Started as well as choose the country where your dealership is located.
Step 3: Add your store name (+ other business information)
On each vehicle ad there’s space for your store name. That's why you'll be asked to add your store name when you create your account. There are specific guidelines for what your store name should look like and you can read about them here.
Fill in your business address and phone number and verify your phone number for extra authenticity.
Step 4: Create your primary vehicle ads feed
Your vehicle inventory feed is a list of all your vehicles with descriptive attributes. It’s also Google's one and only source of information for your vehicle ads. That means, that information you submit in your Google vehicle inventory feed is exactly what appears to users that search for cars such as yours.
You can use an automation tool to get your vehicle listing ads feed ready and optimized in no time with a pre-set template. We have described in detail how to create it in our solution in the next chapter in the next chapter.
The attributes are divided into:
- Those that are required for all vehicles in your data feed
- Those that are required for certain types of vehicles in your data feed
- Those that are optional for all vehicles in your data feed (but highly recommended)
Please note that if you do not provide any of the required attributes, this may result in the particular vehicle ad not appearing in Google search results. Recommended attributes are also important, so not providing them may also affect the ad's performance in a bad way.
Your vehicle feed needs to be created as a delimited text file (spreadsheet) or an XML file (or you can use API).
Below you can see which attributes are required, and which are recommended for your vehicle data feed.
Required attributes:
- Google product category
- Vehicle fulfillment
- VIN
- ID
- Store code
- Image link
- Link template
- Link
- Price
- Vehicle MSRP
- Condition
- Brand
- Model
- Year
- Mileage
- Color
Recommended attributes:
- Title
- Product Type
- Additional image link
- Mobile link template
- Mobile link
- Ads redirect
- Certified pre-owned
- Trim
- Vehicle option
- Body style
- Engine
- Description
- Custom label
- Included destination
- Excluded destination
Step 5: Submit your feed
In order to submit your feed to Google (through GMC) you need to first register it in your Google Merchant account (only the first time you submit the particular feed). This will create a place in the account where GMC will know to place the file.
Then you just need to upload your feed to your Merchant Center account.
If you want to find out more about these processes read this article.
Step 6: Link your Google Business Profile to GMC and select your location group
If you haven’t already done it, the next step is to link your Business Profile to your Google Merchant account. Then select your location group (physical business locations).
This connection will allow Google to customize your listings for local searchers and prominently display your location in the ads.
It’s important to mention that if you don’t own or manage the Business Profiles for your dealer locations, you will also need to create a store feed with additional specifications.

Step 7: Pass the Google’s website policy test
A. If you want to show vehicle ads on Google you must also meet some requirements for your website. On your landing page, the following information must be displayed:
- dealership name
- dealership location
- vehicle price
- MSRP (if listing a new vehicle)
- VIN
- mileage (if listing a used vehicle)
- availability information
- price
All of this information must be displayed PROMINENTLY on your page, so users have no doubts about their importance.
B. You also need to make sure that all the required attributes are included in your feed and submitted.C. Once you've made sure your landing page meets all requirements and you've finished updating your feed attributes, Google will review your website's landing pages to make sure they're compliant.
Step 8: Create a Performance Max campaign and set up your vehicle ads
At this point you should make sure that your Merchant Center account is linked to your Google Ads account (step 1). If that’s the case only the last step is left.
To show your vehicle ads you need to create a Performance Max campaign in your Google Ads account. Make sure you select the vehicle feed from your Google Merchant Center account as your source for the campaign.
- Open your Google Ads account and click on the Campaigns icon.
- Navigate to the Campaigns drop-down menu in the section menu.
- Select Campaigns.
- Click on the plus button and choose New campaign.

- Choose your campaign objective from options like Sales, Leads, Website Traffic, or Create a campaign without goal guidance. Select the one that aligns with your main goal.
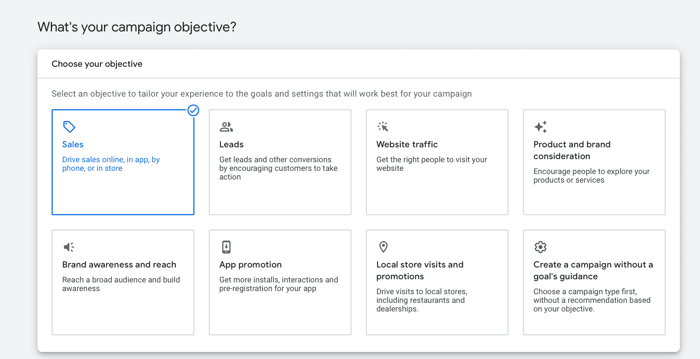
- Consider your conversion goal carefully. If your campaign objective is Sales, choose between goals such as Purchases, Contacts, Qualified leads, Store visits, and Submit lead forms. Add multiple relevant goals if applicable.
- Opt for Performance Max as your campaign type.
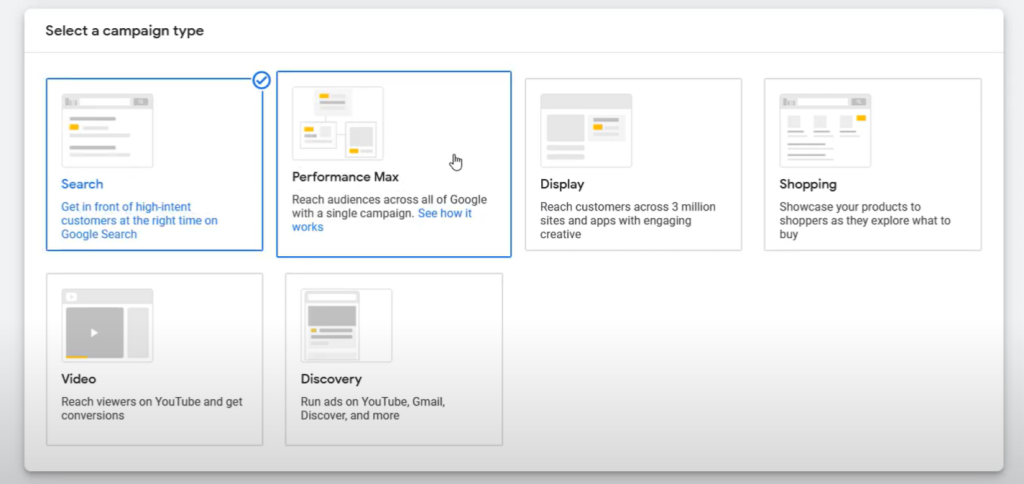
- When you select Performance Max as your campaign type, the Add vehicles to this campaign section will appear.
If your Merchant Center account is enabled for vehicle listing ads and you have chosen a compatible campaign objective, the box Advertise vehicles from a Merchant Center account will be pre-selected by default.
On the Select campaign settings:
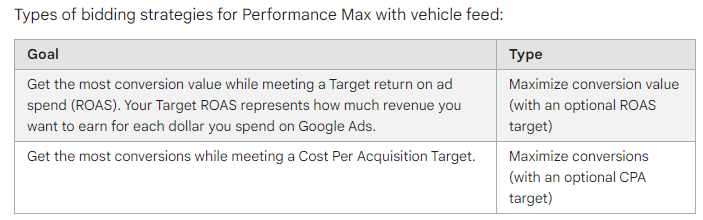
- Select your bid strategy in the Bidding section
Choose between: Maximize conversion value (with an optional ROAS target) and Maximize conversions (with an optional CPA target).
- Enter an individual daily budget or set a custom budget in the Budget section.
On the Campaign settings page:
- Locations: choose the location you want to target. You can select a very specific place by clicking on "Enter another location".
- Languages: Select the language in which you want your ads to be displayed. You can select multiple languages to reach specific customer groups.
- More settings: Here, you can configure ad scheduling, campaign start and end dates, and URL settings.
Enabling Final URL expansion allows Google AI to select the most suitable landing page based on customer intent, increasing the potential for your Performance Max campaign to participate in auctions.
- Create an asset group and choose your target audiences
- Publish your campaign
Create your Google vehicle ads feed using DataFeedWatch
Creating your vehicle ads data feed is veryy easy when you use a feed management software like DataFeedWatch. The process of creating your feed and uploading it to Google Merchant Center looks like this:
- Connecting your product data to DataFeedWatch
- Adding a Google Vehicle Ads feed
- Matching your data with Google’s required fields
- Reviewing your feed
- Uploading your feed to GMC
The great part about creating a feed in such a solution is that you don't need to know all the requirements of the specific channel. The DataFeedWatch feed template will guide you through the feed creation and will come with some pre-filled suggestions as well. It will be a quick and pain-free experience.
We described all the steps in detail below:
Connecting your product data
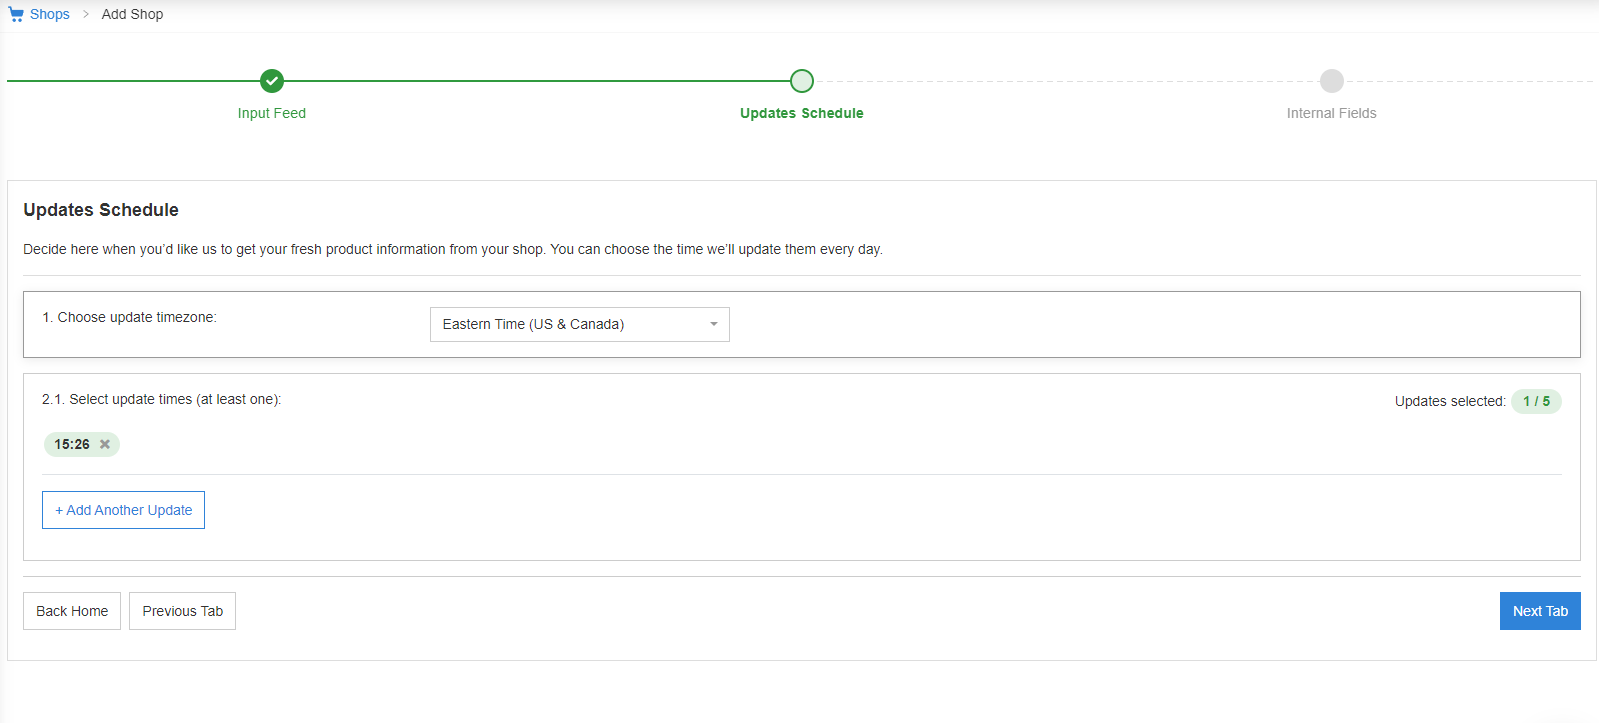
1. Log in to your DataFeedWatch account and click “add shop” to create a space for your vehicle ads feed

3. Decide how often and what time you’d like us to download your fresh product data.
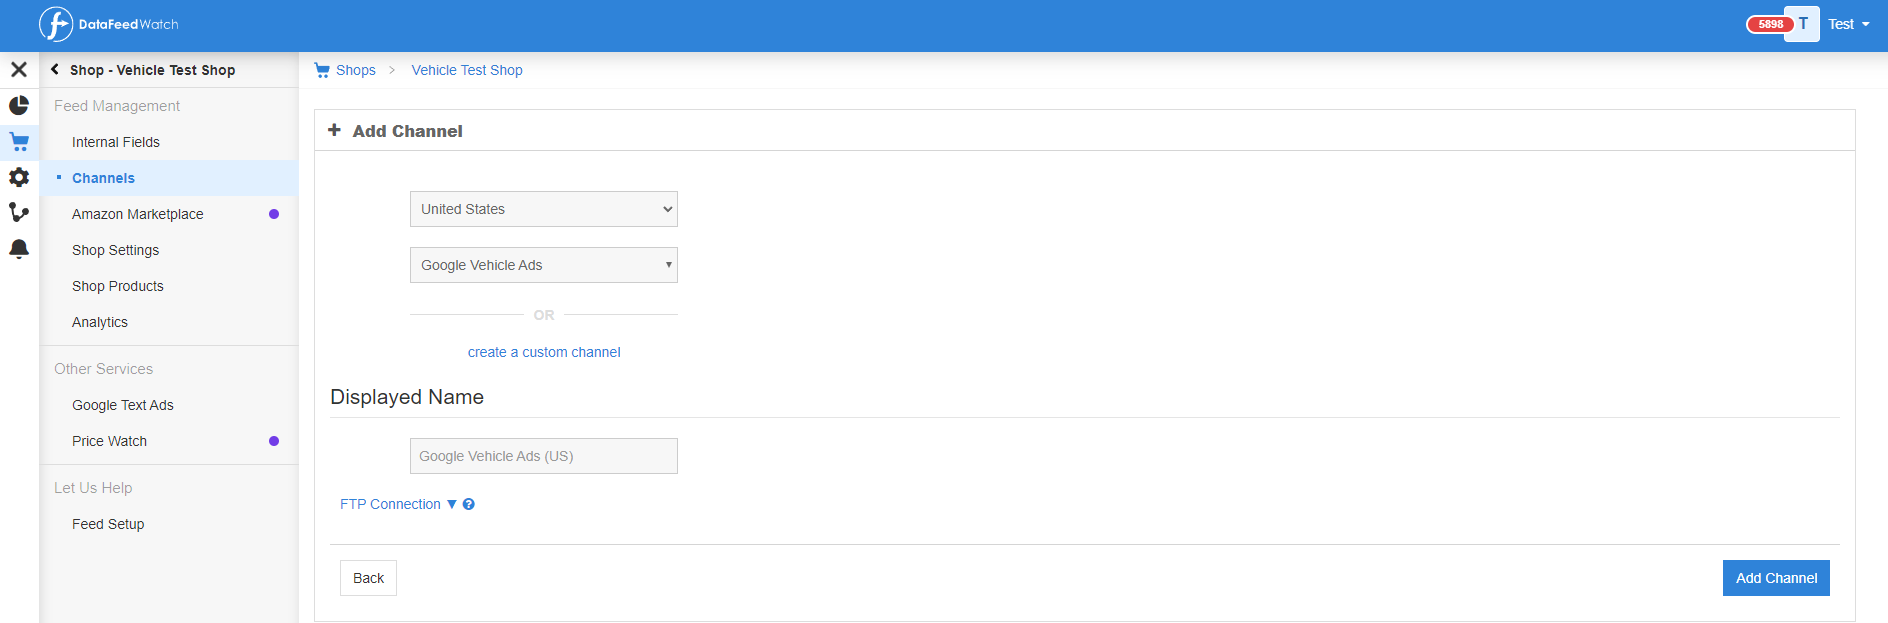
Adding a channel
On the left panel choose Channels and then click “Add channel” on the bottom of the page. Select the country and pick Google Vehicle Ads as the channel you will advertise your products on.
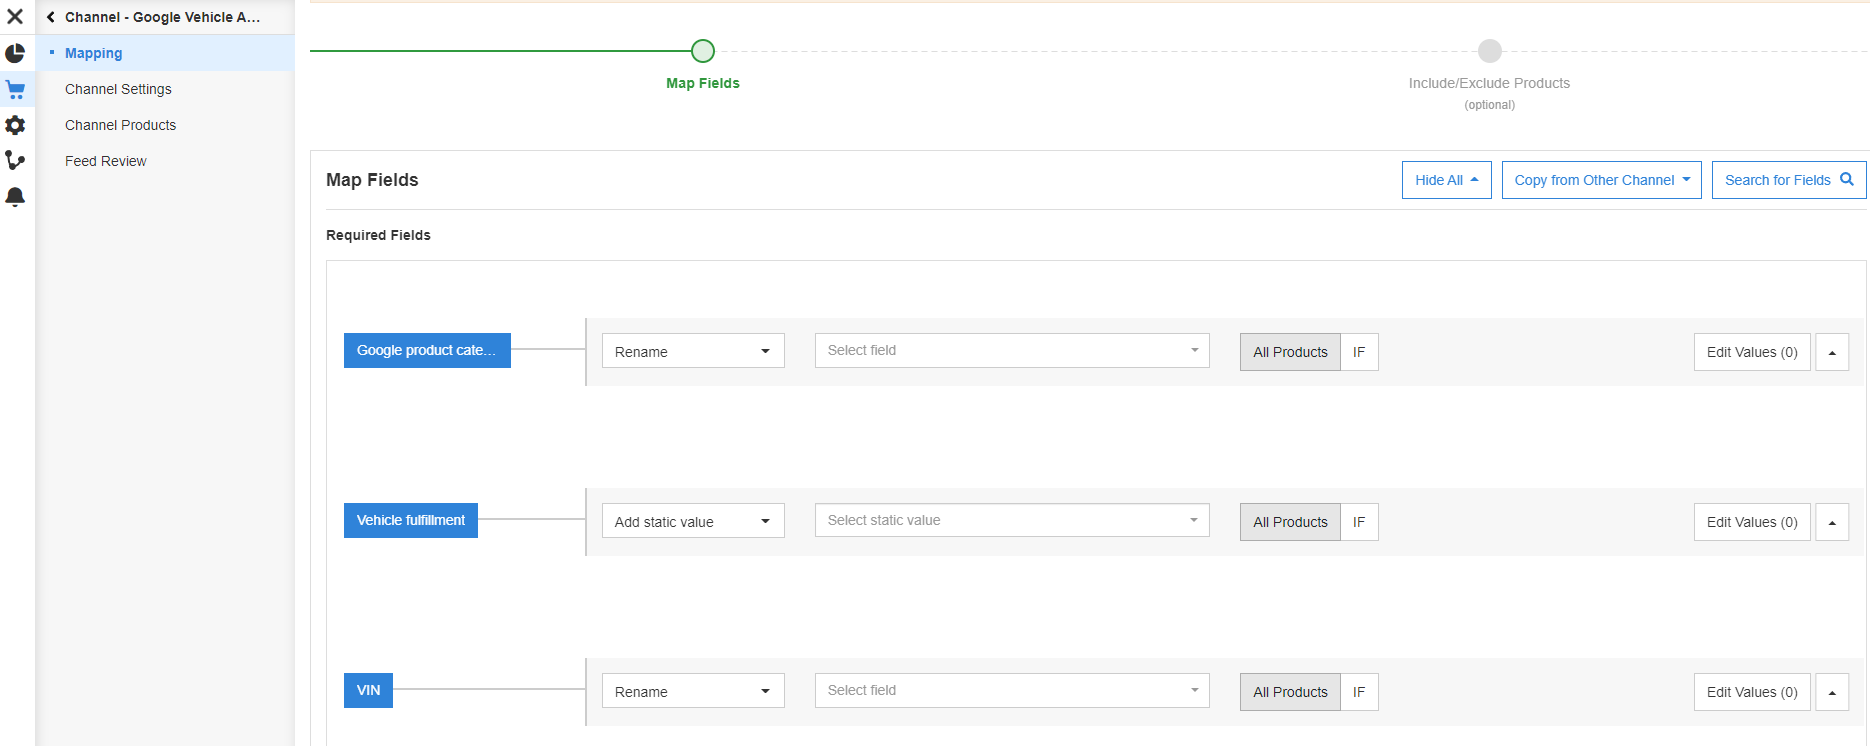
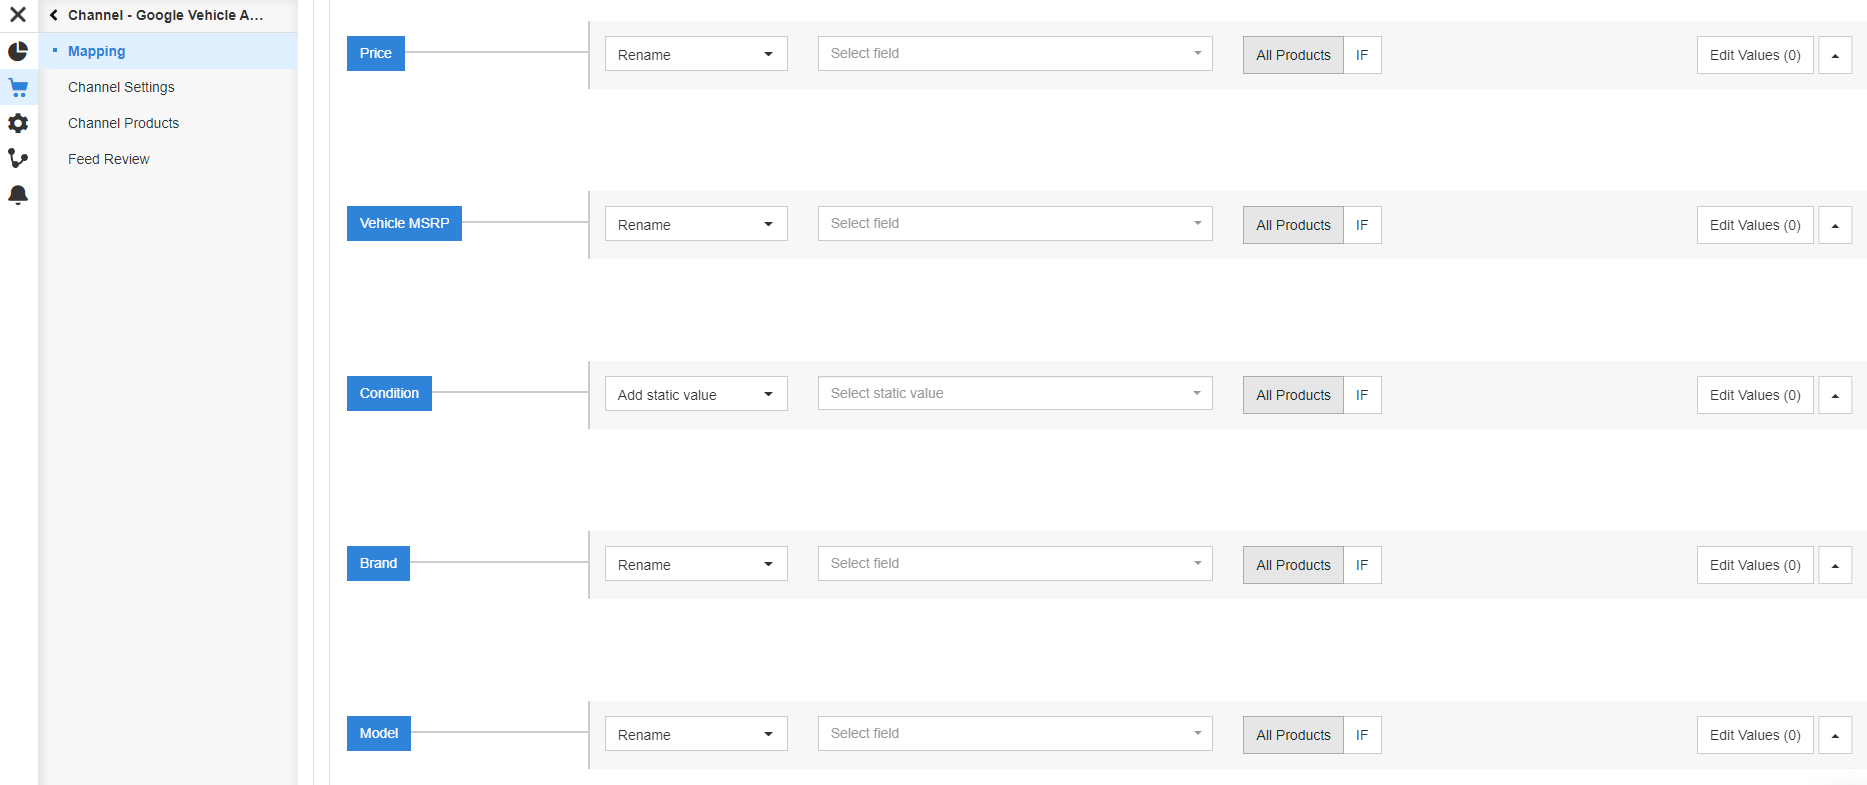
Mapping your fields
To create your vehicle ads data feed you need to map your fields. Remember to map all the fields required by Google. Don’t worry! All of them will be listed in the template so you will clearly see which ones are a must-have and which are recommended.
Many fields are already pre-configured by the system, or at least are partly pre-configured, so you will not have to choose all the details.
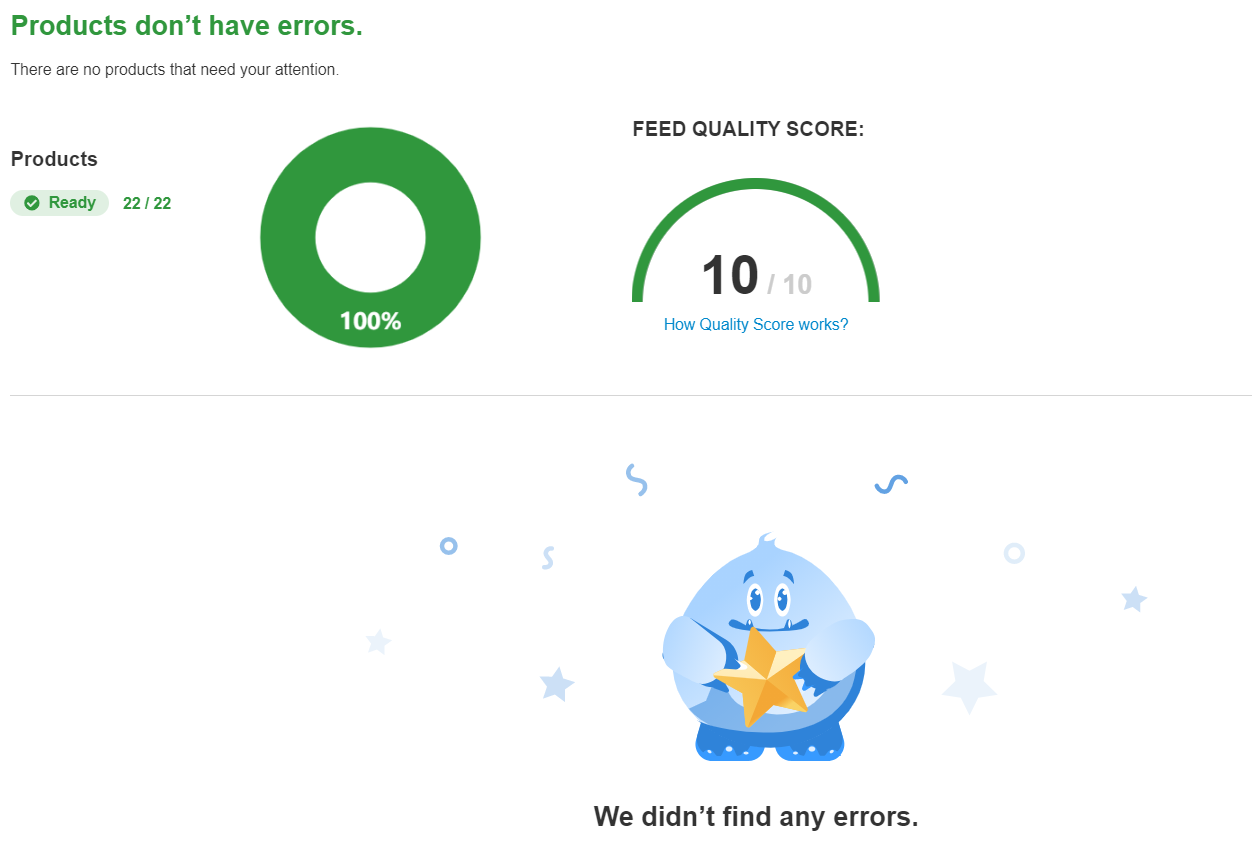
Reviewing your vehicle ads feed
When you’re done mapping your feed, you can check with our Feed Review if everything is correct and ready to go.
If not, the system will show you the errors that you need to fix before uploading your feed to Google Merchant Center.
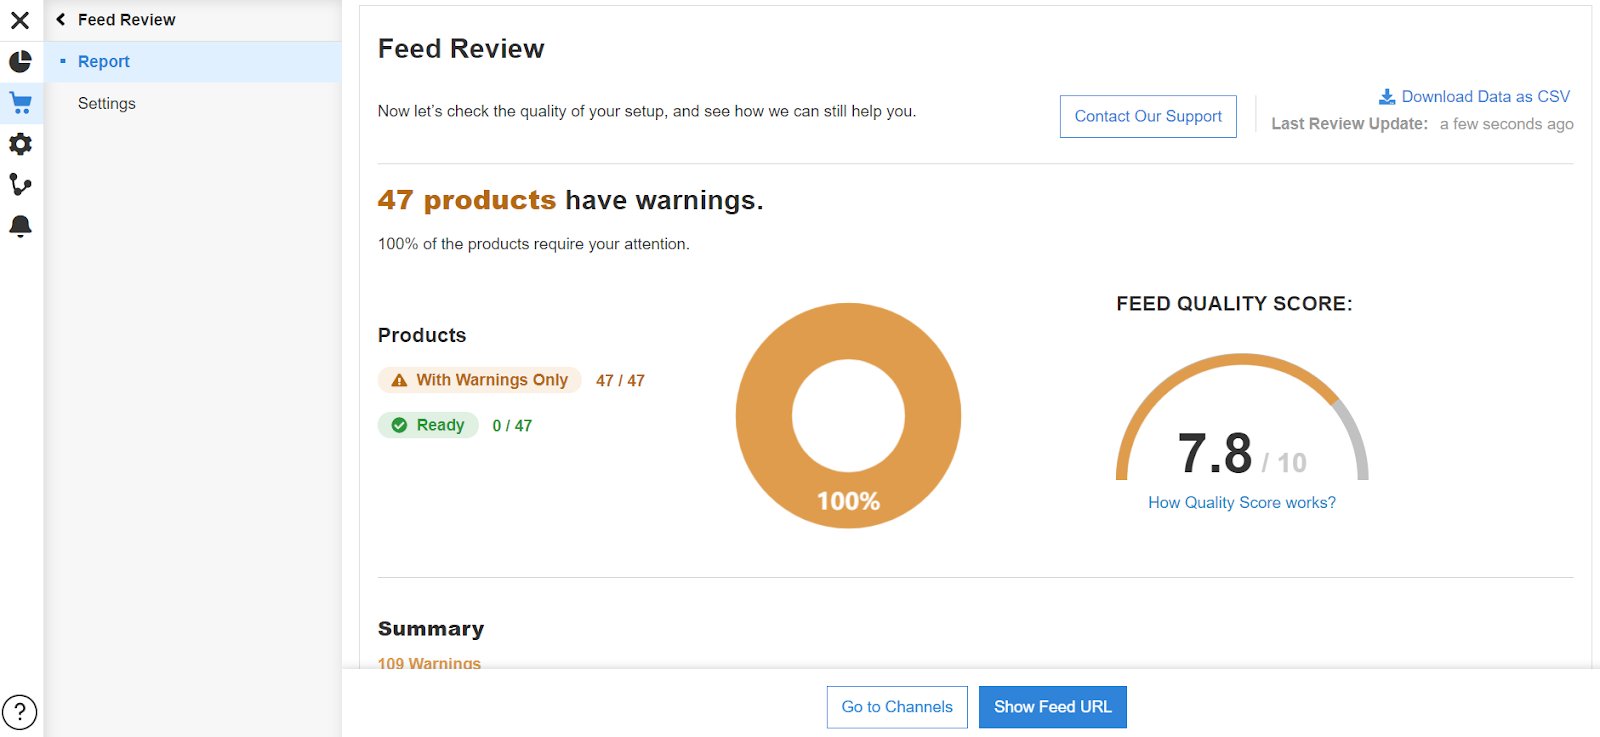
After you have fixed all the errors, the system will tell you that your feed has no errors.
Now it’s the time for the last step - uploading your vehicle feed to Google Merchant Center.
Uploading your feed to Google Merchant Center
You can choose to upload your feed via FTP, HTTP, or download it from your Local Drive. We have prepared guides to all these ways of uploading it and you check them out under the following links:
No matter what way you choose you will need to:
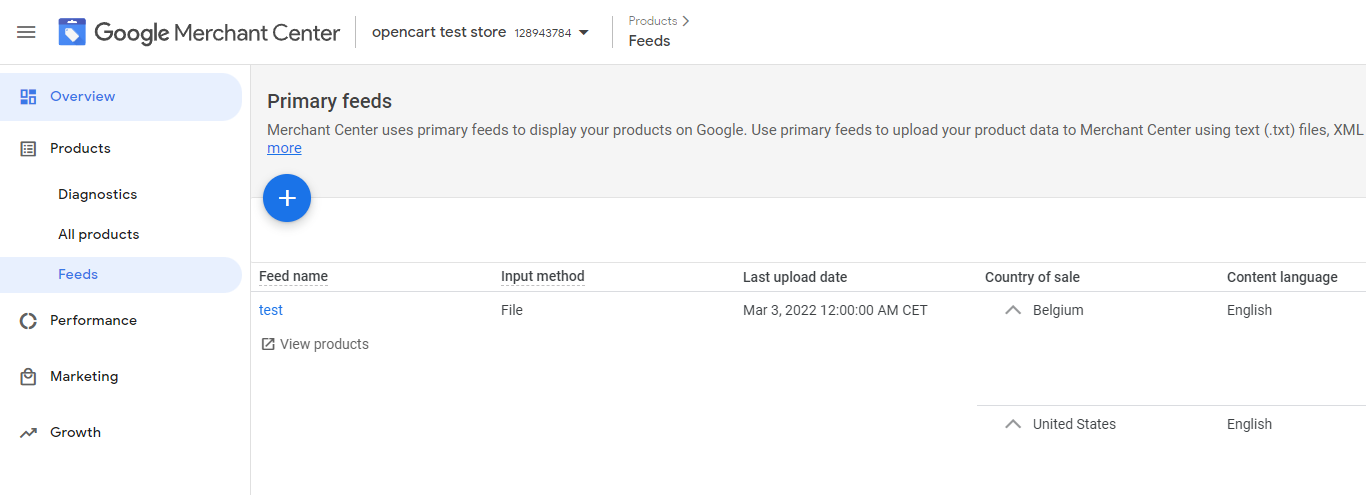
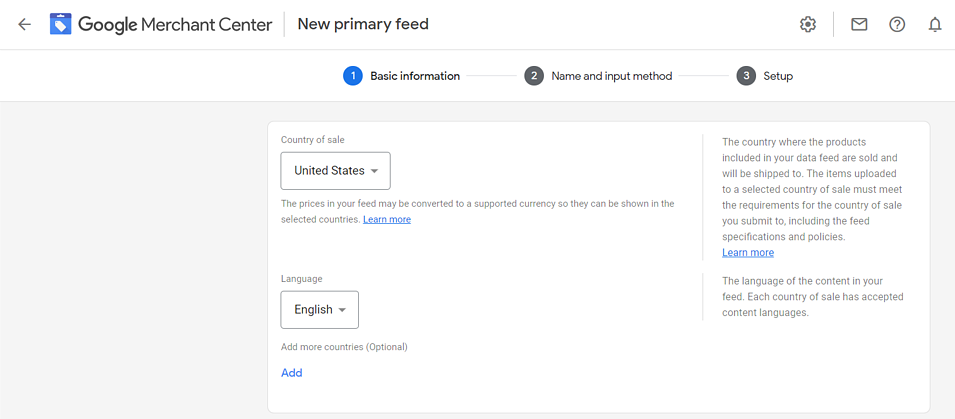
1. Log in to your Google Merchant account and go to Products -> Feeds
2. Click the plus button3. Choose your target country and language
4. Provide a name of your feed and select one of the available setup options (in our example - scheduled fetch)
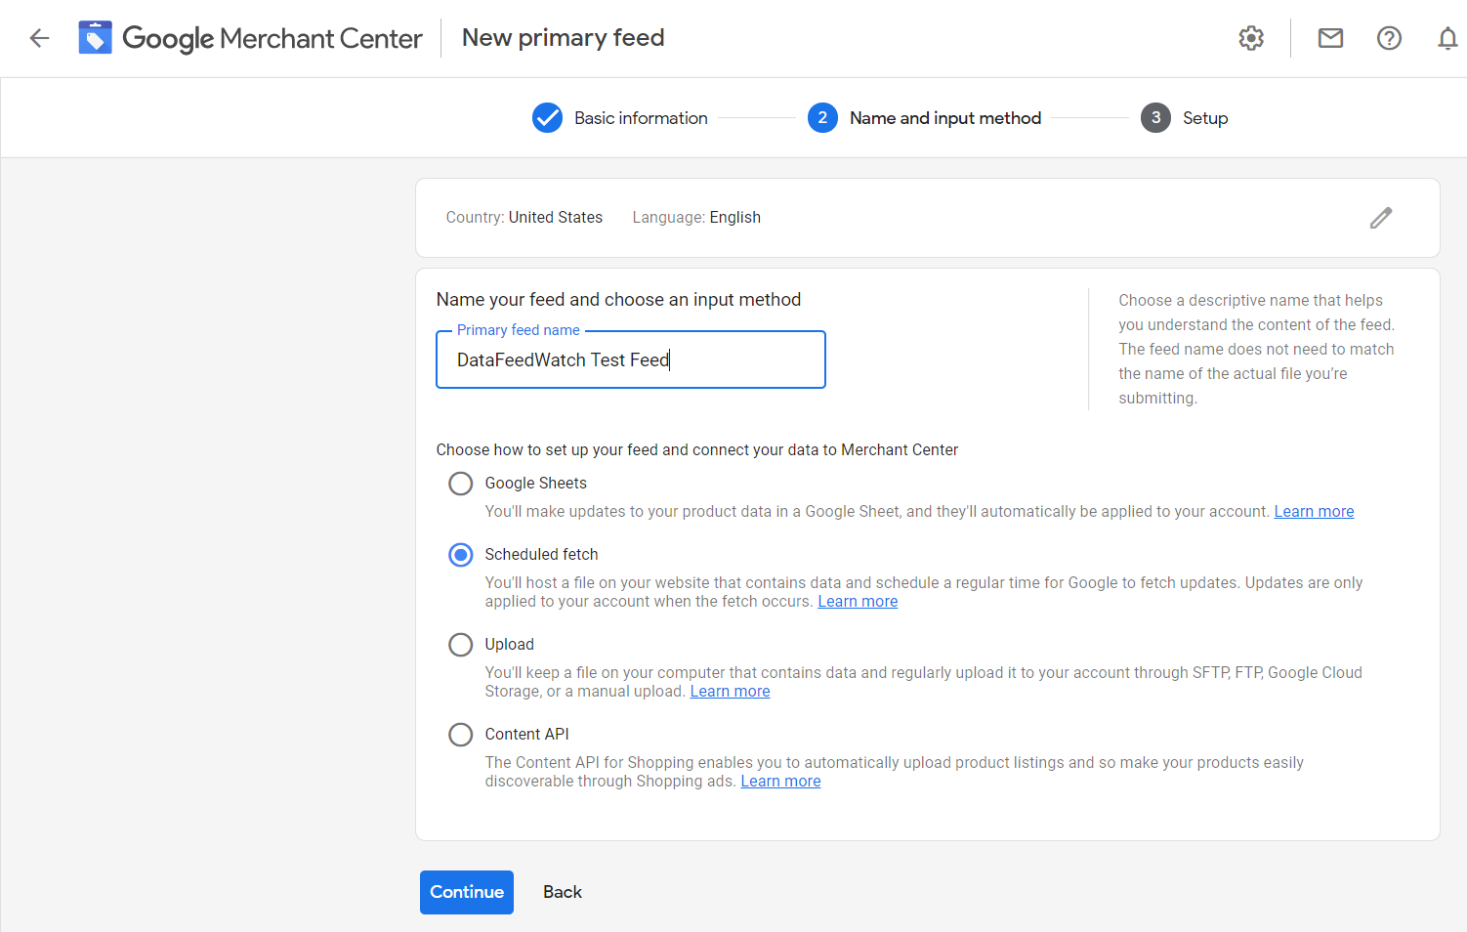
When running vehicle ads, it is recommended by Google to choose the Scheduled fetch option as for example stock information tends to change very fast in the automotive industry.
5. Enter the name of your feed file and fill in fetch details (if you have chosen this option)
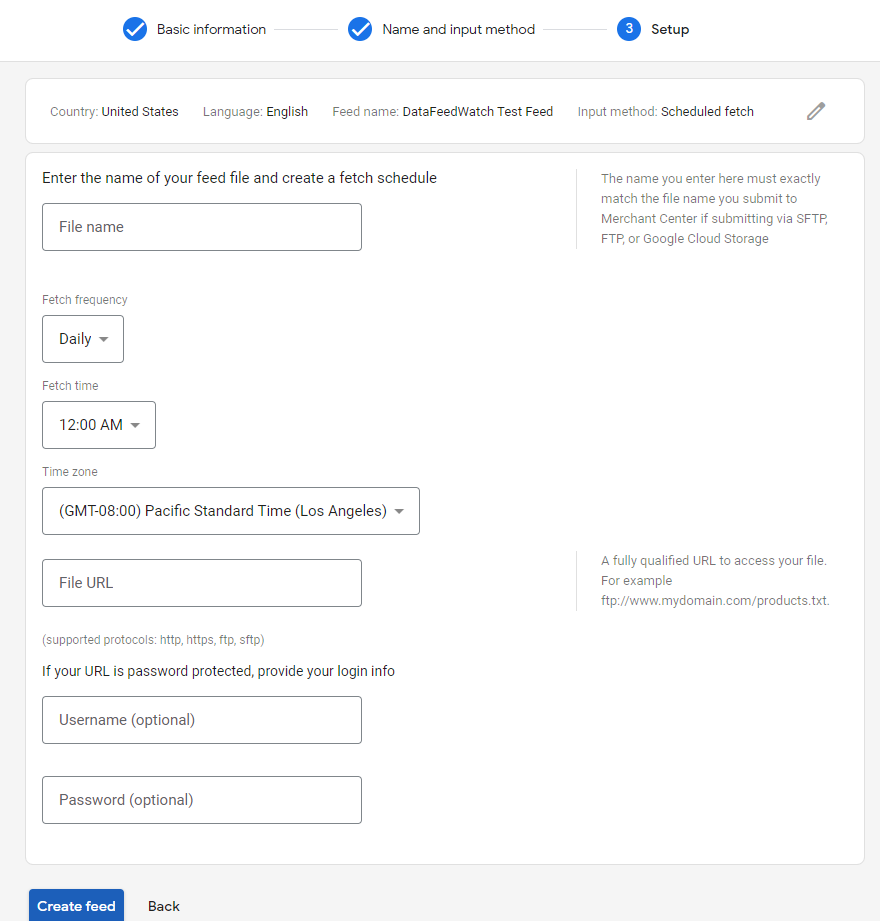
The rest of the steps differ depending on the selected upload method: FTH, HTTP or Local Drive.
Vehicle ads image specs
The image guidelines set by Google Merchant Center for all products, including cars, are very strict. It is highly important to comply with these guidelines in order to advertise vehicles successfully.
When submitting vehicle images, you should avoid using:
- watermarks
- superimposed text
- extra logos
- "coming soon" images with placeholder
It is essential to display the complete vehicle in the images and not show partially visible cars. Additionally, dealerships should limit their image submissions to a maximum of 10 images.
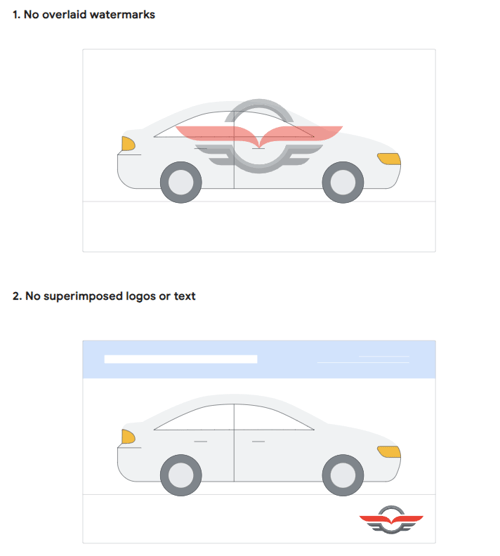
Source: Google
When it comes to image formats for uploading, Google Merchant Center supports various file formats, including GIF (.gif), JPEG (.jpg/.jpeg), PNG (.png), BMP (.bmp), and TIFF (.tif/.tiff). The maximum file size allowed for images is 16 MB. As for the dimensions, it is recommended to have a minimum image size of 100 X 100 pixels, but a more preferable size would be 800 X 600 pixels. On the other hand, the maximum image size permitted is 64 megapixels. Lastly, it is recommended to maintain an aspect ratio of 4:3 for optimal display.
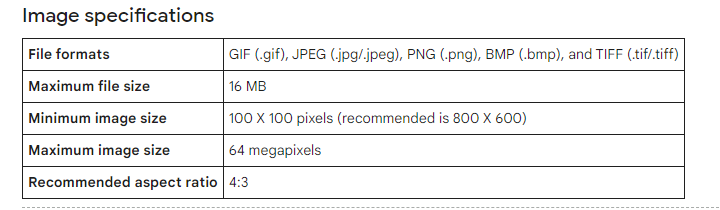
Source: Google
How much do vehicle ads cost?
The pricing for Google vehicle listing ads varies depending on your budget and needs. Typically, the cost is calculated as a percentage of your monthly allocation. According to Google's recommendations, local dealerships are advised to allocate a daily budget of $100 for their vehicle ads campaign, which translates to a monthly expenditure of $3,000.
For Enterprise users, the starting price for vehicle listing ads begins at $80.00 per location per month, but this can vary depending on the dealership's location.
It's important to mention that some intermediaries may charge a flat-rate management fee of $399 per month.
Vehicle ads best practises
Effective vehicle advertisements can make all the difference in attracting potential buyers and driving conversions. By implementing proven best practices, you can maximize the impact of your vehicle ads and stand out from the crowd
Add videos
According to digital marketing experts, incorporating videos of your products, including vehicles, on your site can boost overall conversion and increase time spent on site by up to 88%. To make your videos more engaging, it is recommended to include soundtracks and walk-arounds. Integrating YouTube Embeds and directly uploading video files such as MOV, MPEG4, or MP4 formats works effectively.
Update your vehicle feed multiple times a day
Consistently updating your inventory feed is crucial to maintain accuracy and demonstrate to Google that your listings are current and relevant.
Ensure that you avoid advertising products that are currently out of stock or any other changes in your product data that may occur. It is essential to promptly reflect these updates in your displayed ads.
You can drastically simplify the task of keeping your product data updated by implementing automatic feed updates. This way, you can schedule automated updates at specific intervals.
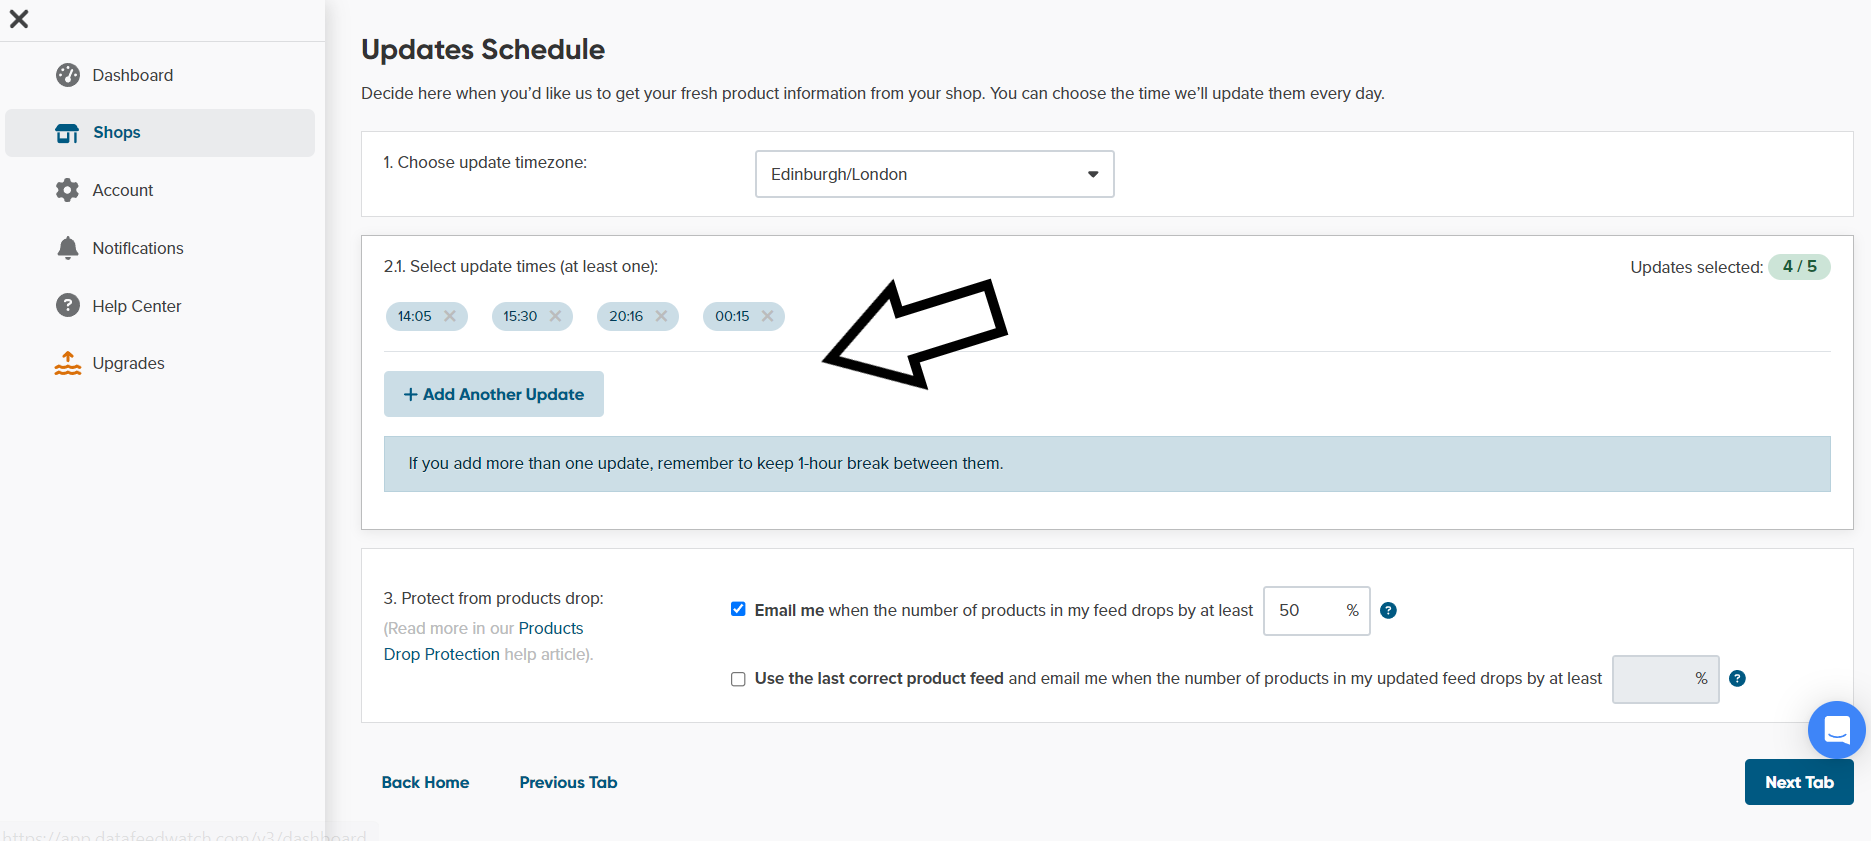
Using DataFeedWatch, you can customize the timing and frequency of feed updates according to your preferences - even up to 5 updates per day.
Create captivating ad copy
Go beyond providing basic information and develop compelling ad copy that not only informs but catches attention of potential buyers. Highlight unique selling points, special offers, or exclusive features to create a narrative that sets your vehicles apart from your competitors.
Track performance metrics
Stay informed about how your Google Vehicle Listing Ads are performing through Performance Max campaigns. Monitor key metrics such as impressions, clicks, conversions, and cost per acquisition to gain valuable insights into what resonates with your audience. Use this data to refine your advertising strategy and achieve better results.
Optimize campaign structure
Tailor your Google automotive campaign structure to align with the diverse inventory goals of your dealership. Instead of running a single campaign for all inventory, segment your campaigns based on attributes such as new/used/CPO, make, model, or price. This approach allows for better control over budget allocation and optimization for profitable conversions.
Summary
Google Car Ads are first and foremost a great way to get your car inventory in front of your potential customers and increase the number of visits to your website. Now, the new version of automotive ads using Performance Max could start a whole new era for car dealers and boost the online car sales even more than covid-19 pandemic already has. The automotive industry is changing and car retailers need to keep up with it.
Read also other articles and case studies connected to the topic:
Inside The eCommerce Automotive Industry Landscape In 2021
[Case Study] 620% Increase in Conversions with Automated Text Ads
Vehicle ads overview by Google