There are many important settings in Google Merchant Center that you need to remember about in order to start and run a healthy Google Shopping campaign. In this article, we present the 6 most relevant Merchant Center settings that will cause errors if you don't set them correctly or that will help you significantly improve your performance. We explain each setting in detail so you can stay on top of them all and not risk campaign launch delays.
Get your own copy of Google Merchant Center Next: What is it & What’s New?
Google Merchant Center account
A Google Merchant Center account is an essential tool for businesses looking to advertise and sell their products online. It acts as a central hub where merchants can upload their product data, manage inventory, and showcase their offerings on Google platforms like Google Shopping and Google Ads.
With the ability to create product listings, set pricing, and optimize campaigns, a Google Merchant Center account empowers businesses to reach a wider audience and drive more sales.
Connecting Google Merchant Account
Connecting your Google Merchant Center account with your Google Ads account and other external platforms can offer many benefits for managing and promoting your products effectively.
When integrating with the Google Shopping API or other third-party applications that interact with the Google Merchant Center, you often need to use your Merchant ID. This ensures proper synchronization and communication between systems.
Linking Merchant Center with Google account
Linking your Google Ads account with the Merchant Center enables you to streamline your campaign management. You can conveniently manage all aspects of your advertising from a centralized platform. You can easily monitor and optimize your campaigns, adjust bids, and track performance.
Linking your Google account with the Merchant Center also allows you to access and utilize the product data you have in Google Merchant Center. This means you can easily incorporate your product listings into your Google Shopping campaigns, ensuring that your ads are relevant and up-to-date.
Moreover, the linking process provides valuable insights into the performance of your ads. By linking your accounts, you gain access to analytics data, such as impressions, clicks, conversions, and more.
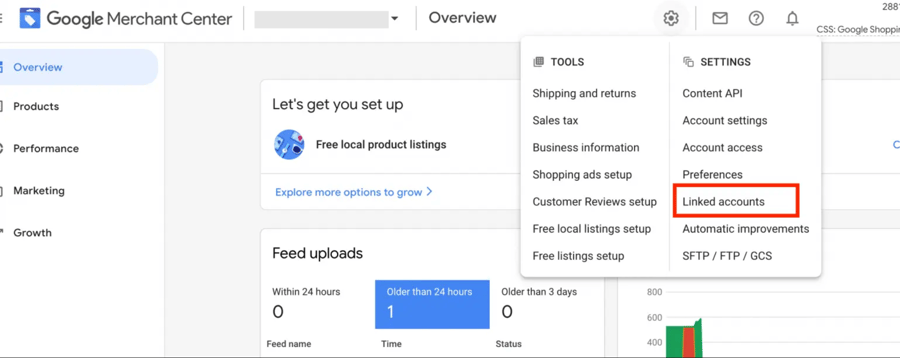
To link your Google account with the Merchant Center account, follow these steps:
- Sign in to your Merchant Center account.
- Click on the tools and settings icon.
- Select Linked accounts under the Settings section.
- Click on the Business Profiles tab.
- If you have multiple profiles, select the one you want to link with your Google account.
- Follow the prompts to complete the linking process.
Linking Merchant Center with third-party platform
You have the option to partner with a third-party platform to display, promote or sell your products on Google. You can connect your Merchant Center account with an account on the third-party platform you use.
Third-party platforms offer a range of functionalities, such as e-commerce platforms like Shopify and payment gateways like PayPal, that can be seamlessly linked with a Google Merchant Center account. This integration facilitates the synchronization of product listings, inventory updates, order management, and other essential tasks, reducing manual efforts and ensuring accurate and up-to-date information across platforms.
Connecting a Google Merchant account with third-party platforms enables merchants to leverage the features and capabilities provided by these platforms. For example, integrating with a feed management platform allows businesses to optimize and customize product feeds for better performance in Google Shopping listings.
It's important to note that the process of linking accounts may vary depending on the specific platforms involved. However, Google provides resources and guides to help businesses navigate the setup process.

1. Website URL verification & business information - important campaign setup steps
The first settings we will mention are perhaps more a part of the general setup of Google Merchant Center than extra settings, but many advertisers forget about them. We'd like to highlight their importance.
These are: providing business information and confirming ownership of the store. Initially, you have the option to skip these steps, but for a fully operational Google Merchant Center account, both of these steps must be completed.
Verify Website URL for Google Merchant Center
One of the crucial steps in setting up your Google Merchant Center account is verifying and claiming your website URL. Verifying your website URL helps protect your brand and website from unauthorized use or misuse. It ensures that only authorized users can manage and make changes to your website's information within the Google Merchant Center.
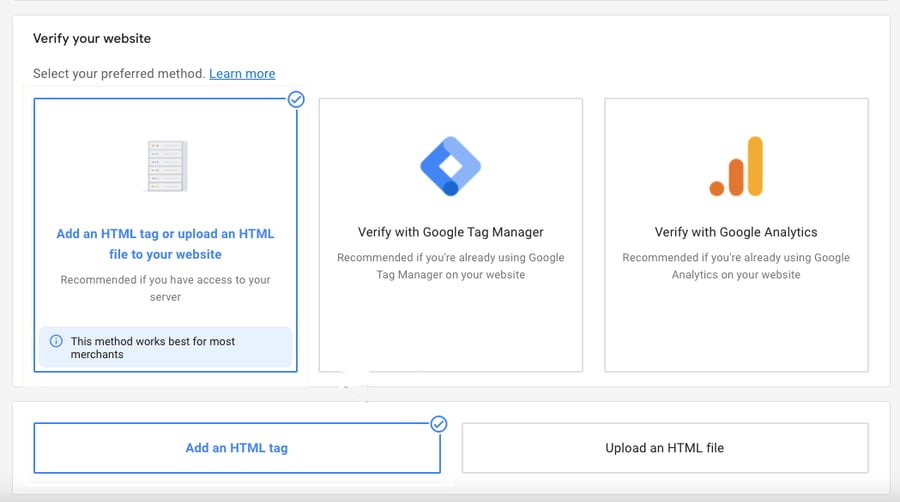
Verification is a straightforward process and involves proving the ownership of your website by adding a snippet of code or a meta tag to your website's HTML. Here are the steps to verify your website URL in the Google Merchant Center:
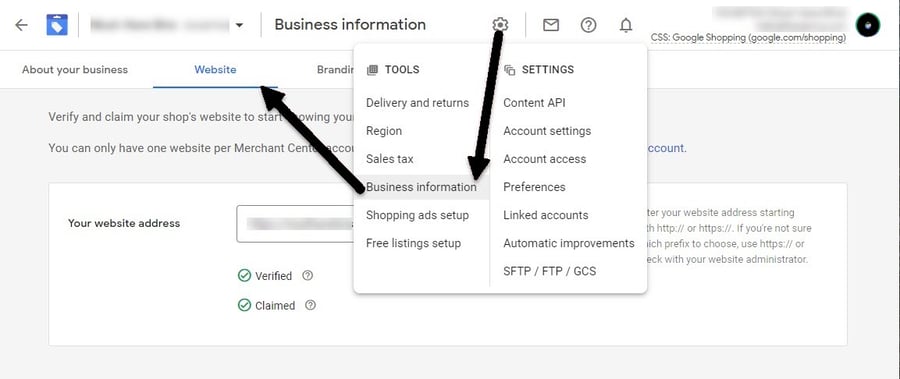
- Sign in to your Google Merchant Center account.
- Click on the three-dot menu in the top-right corner and select "Business information" from the dropdown.
- Navigate to the Website section and click on the edit icon next to your website URL.
- Choose the verification method that works best for you: HTML file upload, HTML tag, Google Analytics, or Google Tag Manager.
- Follow the instructions provided for the chosen verification method.
Verifying your website URL is a requirement for participating in Google Shopping ads. By completing the verification process, you become eligible to showcase your products in Google's shopping results, increasing your visibility and potential for conversions.
Add business information
Adding business information to a Google Merchant Center account is another essential step for businesses looking to promote their products online. By providing accurate and comprehensive business details, merchants can enhance the visibility and credibility of their listings across Google platforms.
To add your business information to the Google Merchant Center account, follow these general steps:
1. Fill in the necessary details: Access your Merchant Center account and navigate to the Business Information section. Enter your business address, phone number, and other relevant information as prompted.2. Verify your information: Depending on the verification process set by Google, you may need to verify certain aspects of your business information, for example phone number. This verification helps ensure the accuracy and legitimacy of your listings.
By completing these steps and adding your business information, you enable potential customers to find and engage with your products more easily through Google searches and shopping experiences.
It's important to note that the specific process and requirements for adding business information may vary. Therefore, it's recommended to refer to official Google resources, such as the Google Merchant Center Help page, for detailed instructions tailored to your specific situation.
2. Shipping settings
One of the most important information you need to provide to Google Merchant Center when you submit your products is shipping settings. Google needs to know how much you charge for shipping and what’s delivery time for orders from a customer.
You should always double check that your shipping is set up and that it is correct and up to date. This is especially important because shipping cost and speed are the most common reasons why customers abandon the checkout process without buying.
All features across Google will use your shipping settings: Shopping ads, free product listings, and Buy on Google.
When you need to set up shipping
To run ads of your products in a particular country or region, you must provide shipping information and correctly set up shipping costs for that area.
Provide shipping settings if:
- you want to run Shopping campaigns in these countries: Australia, Austria, Belgium, Canada, Czechia, France, Germany, Ireland, Israel, Italy, Japan, Poland, South Korea, Spain, Switzerland, the Netherlands, United Kingdom, United States.
- If you want to run Shopping campaigns in another country than your product’s primary country of sale.
In case you want shipping to be configured on a product-level (set shipping cost and time for each product individually) and you want to charge for shipping based on weight, label or dimensions, you should include relevant attributes in your product feed.
The following attributes can be used:
- shipping label [shipping_label]
- shipping weight [shipping_weight]
- dimensions (shipping length [shipping_length], shipping width [shipping_width], shipping height shipping_height)
- transit time label [transit_time_label]
You can read more about it on Google's helppage.
If you want to charge for shipping based on your shopping cart in total (configure account-level shipping services) or you want to use any advanced settings, you can set up shipping directly in your Google Merchant Center account.
Note that if you set up shipping in Google Merchant Center and add shipping related attributes in your data feed, the data in your feed will override account-level settings for the matching location for that item. Also the shipping [shipping] attribute isn't available for Buy on Google.
Important!
If you provide many shipping services for one product in the same country, Google will calculate the lowest shipping rate for the product for a given situation and this rate will be shown to customers.
Also the shipping costs that you submit to Google Merchant Center must match the shipping costs that you charge for buying through your website (there’s a risk that your listing will be rejected if Google’s reviewers see a higher shipping cost on your website after clicking on your ad with a lower one).
How to set up account-level shipping in Merchant Center
You need to configure your shipping services on account level either in Google Merchant Center or via the Shipping Settings API if you don’t want to get any shipping related errors. Shipping services can be set either for all products or for groups of products ([shipping_label] attribute will help you specify groups of products if you choose this option).
You can configure many settings for each shipping service (shipping cost, delivery speed etc.)
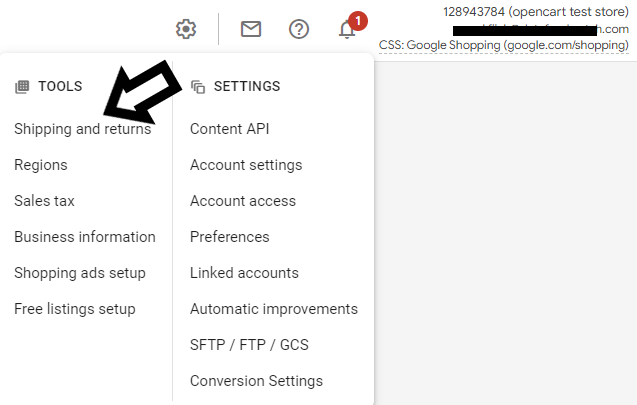
A. Create a new shipping service in Merchant CenterStep 1: Log in to your Google Merchant account
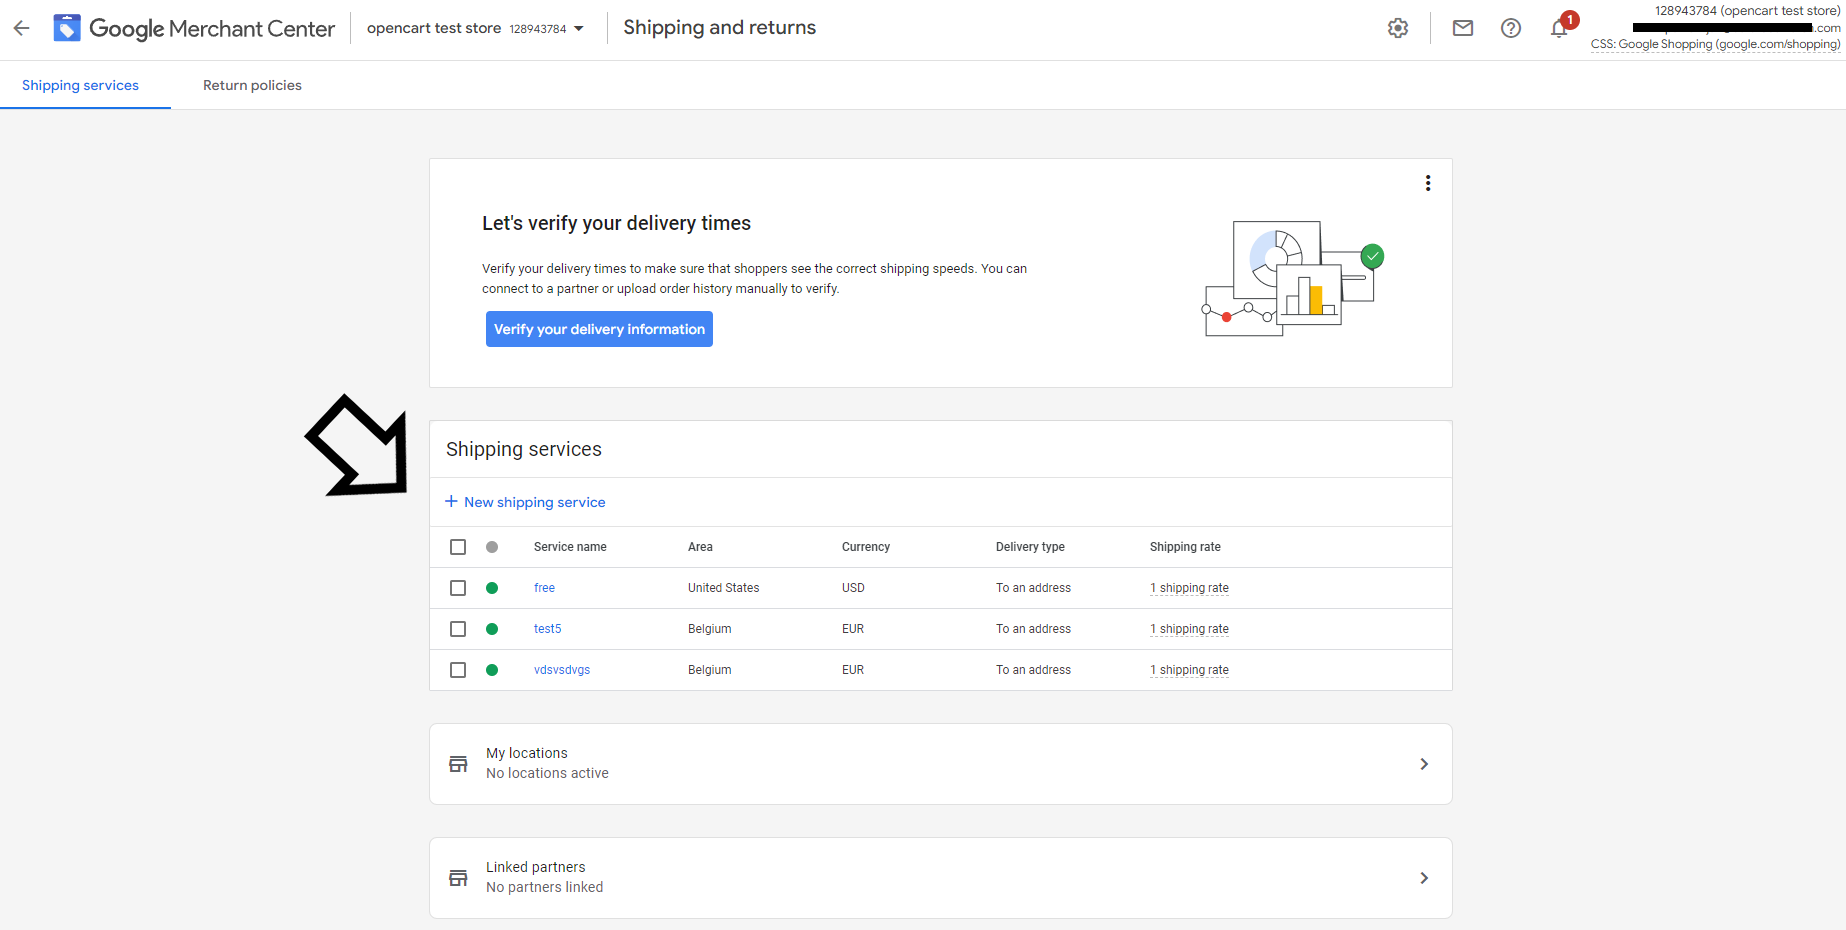
Step 2: Navigate to the tools icon and select “Shipping and returns” - now you are in the “Shipping services” tab.
Step 3: Click + New shipping service, which will let you create a shipping service
B. Set up your shipping services
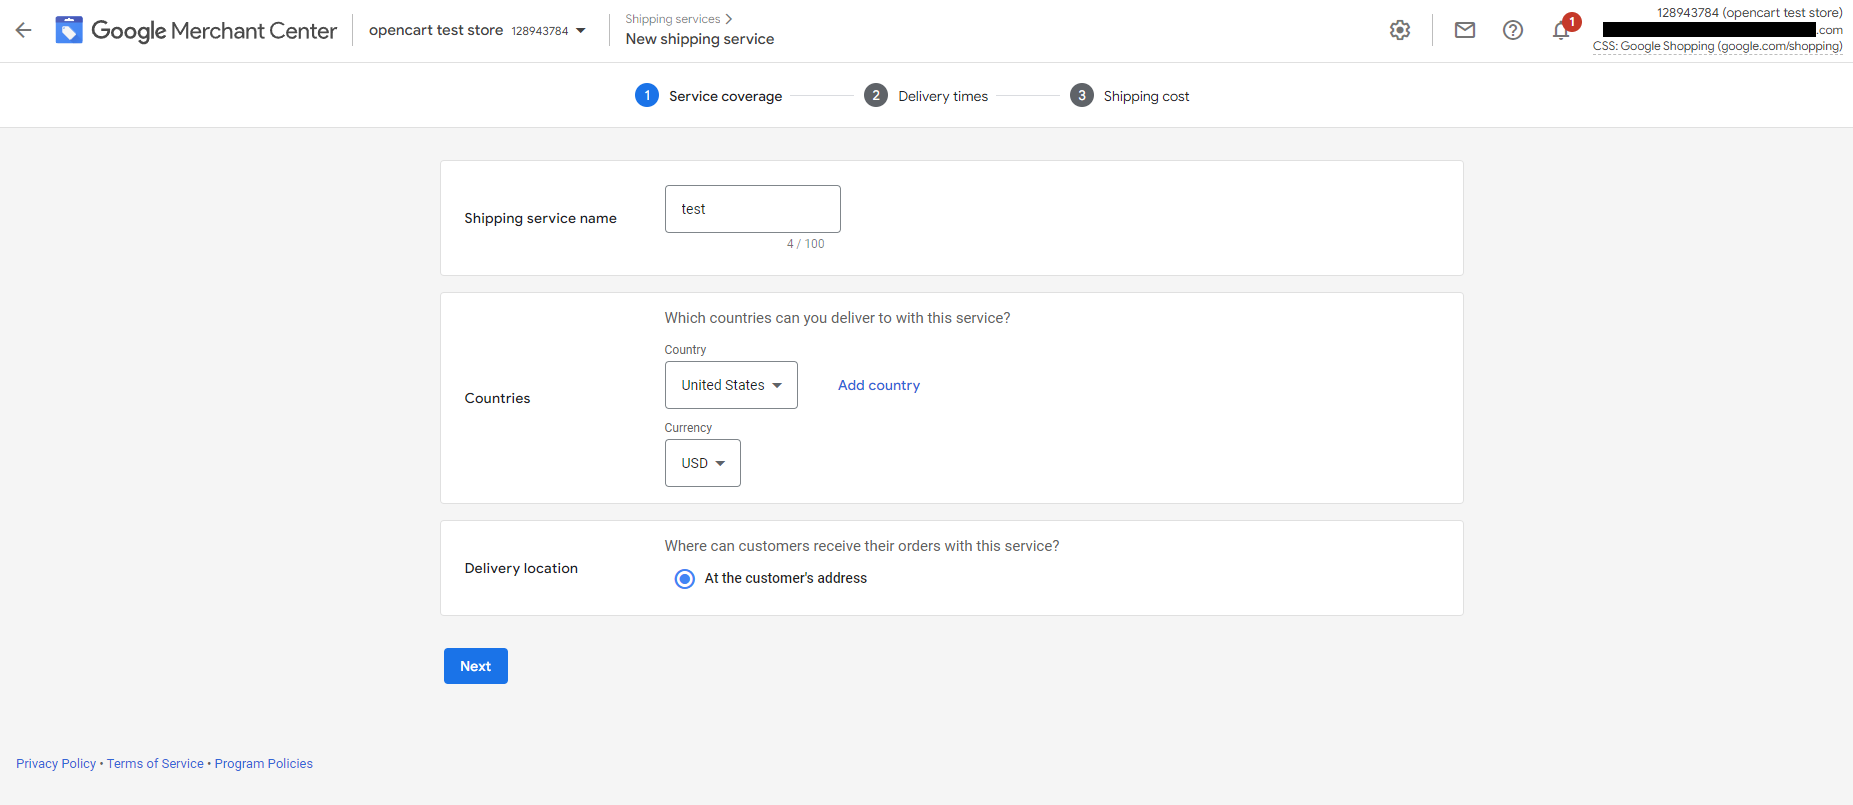
Step 1: Name your shipping service
Step 2: Choose the shipping service area - where your products are purchased and delivered (should be the same country as the target country of the feed, not necessarily be where your company is based or the products are shipped from)
Step 3: Select the right currency (the same as in your feed)
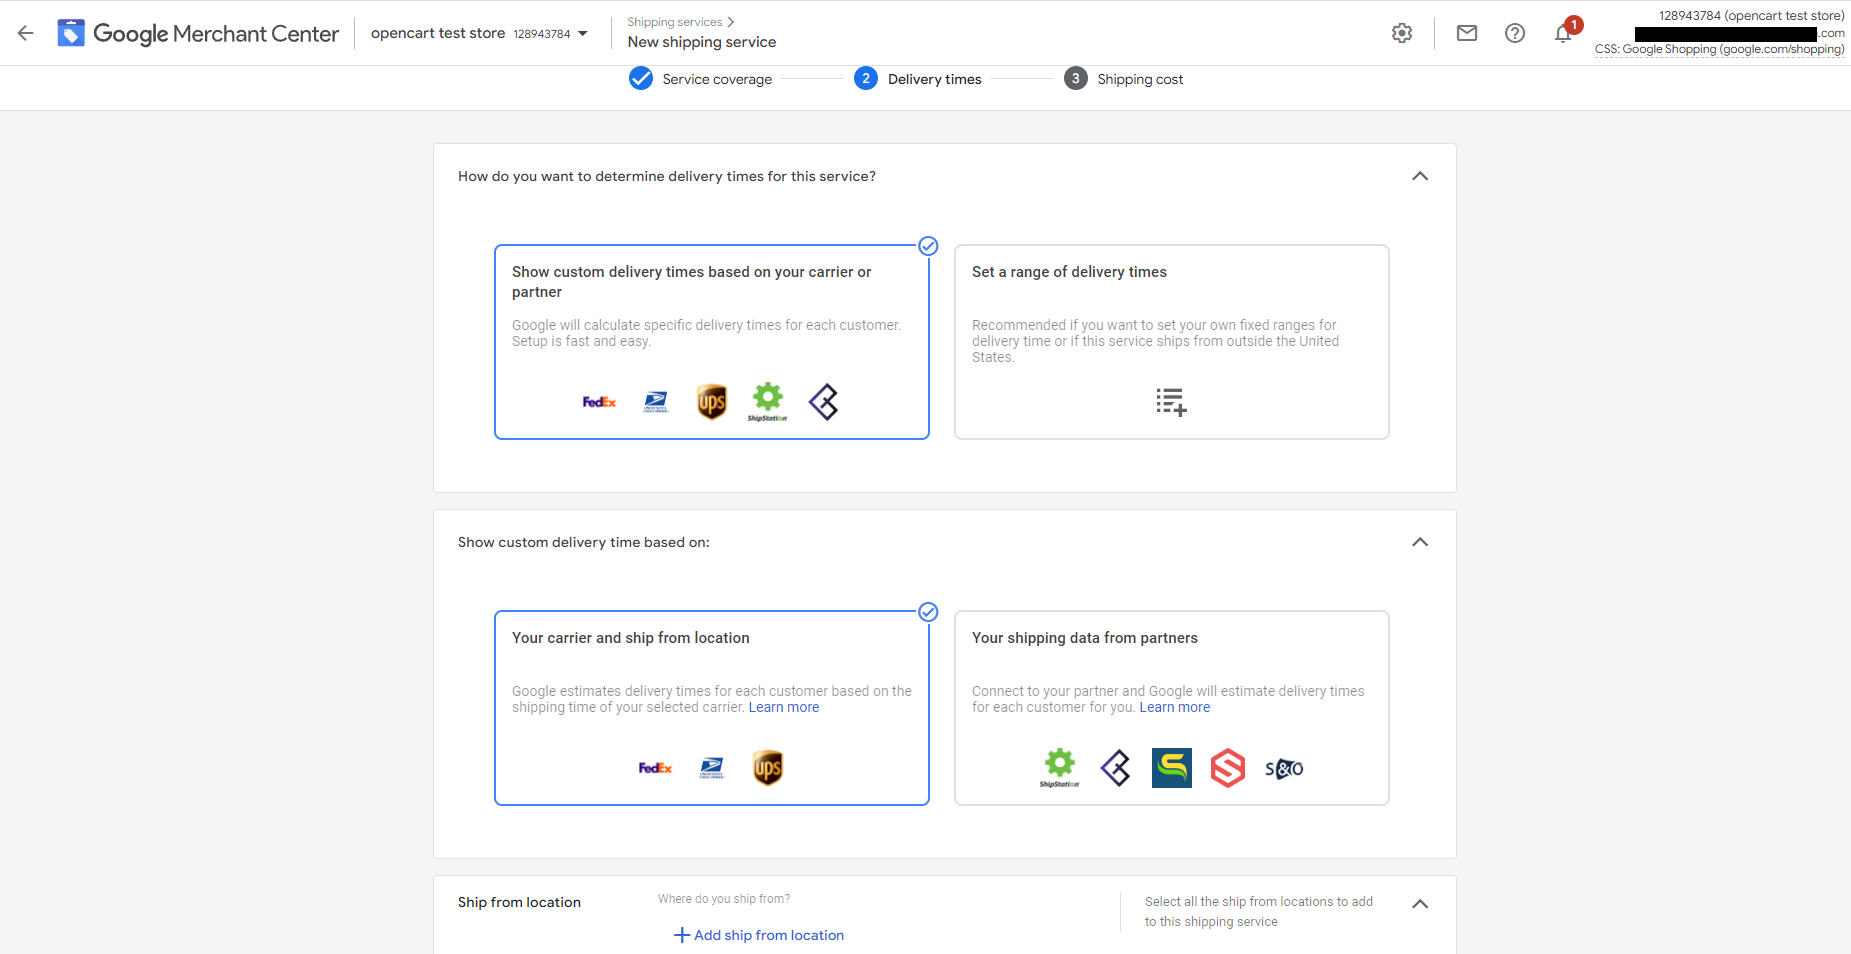
Step 1: Choose if you want to show custom delivery times (based on your carrier/partner you work with), or set a range of delivery times (Google estimates it for you).
Step 2: Choose the time of day by which a new order must be placed in order to start being processed the same day (it’s called cutoff time)
Step 3: Enter the minimum and maximum number of business days required for processing a new order (it’s called handling time).
Step 4: Add the number of business days the whole service possibly can take (it’s called transit time).
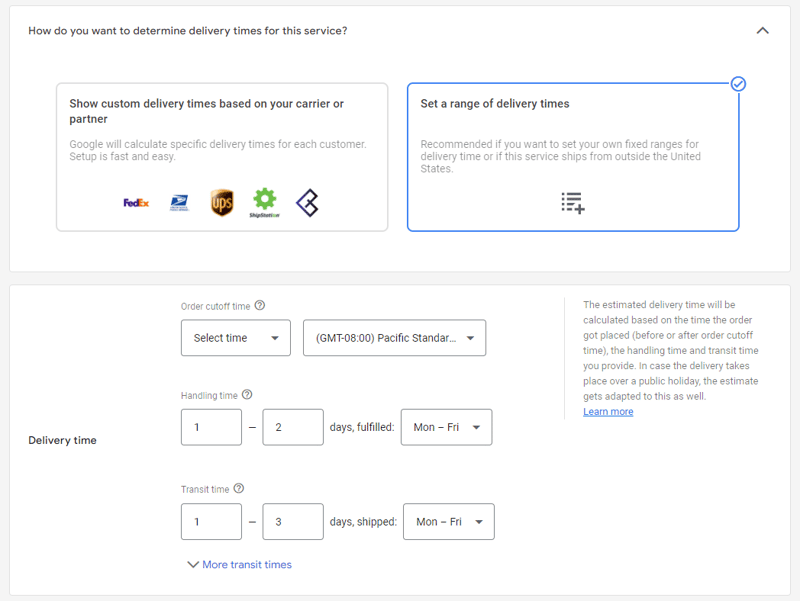
Step 5: Only in the US, France and Australia you can set the transit time based on regions. You can do it by clicking on “More transit times”
Step 6: It’s totally optional but you can group products that share the same transit times by including the transit time label [transit_time_label] attribute in your feed and providing values for it.
D. Set optional advanced settingStep 1: You can enter a minimum order value for the shipping service.
It is generally optional but required if you have minimum order value on your website!
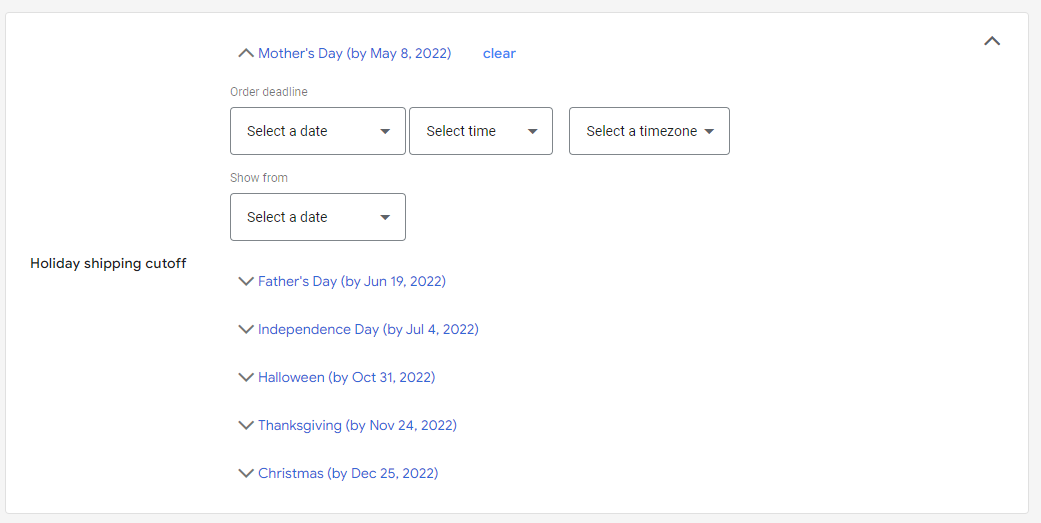
Step 2: You can set a holiday shipping cutoff for your orders if you require that they are placed before a specific date in order for them to be delivered by a certain holiday.
You can either set the same shipping cost for all your items or set ranges of shipping costs.
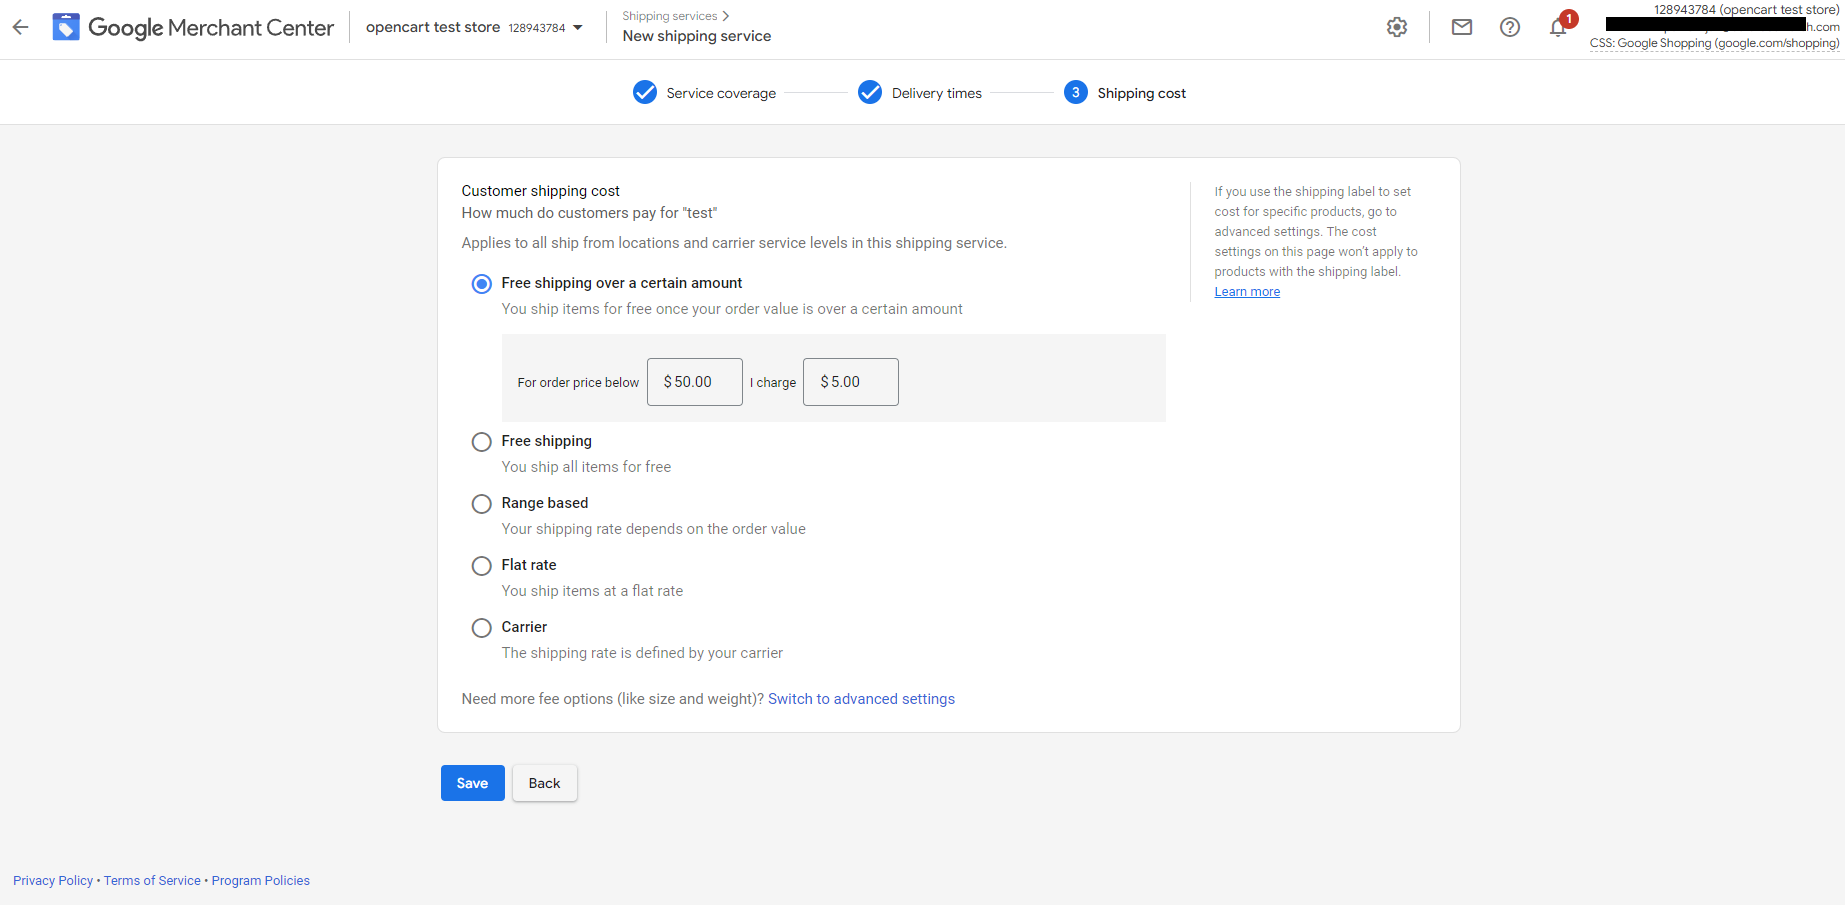
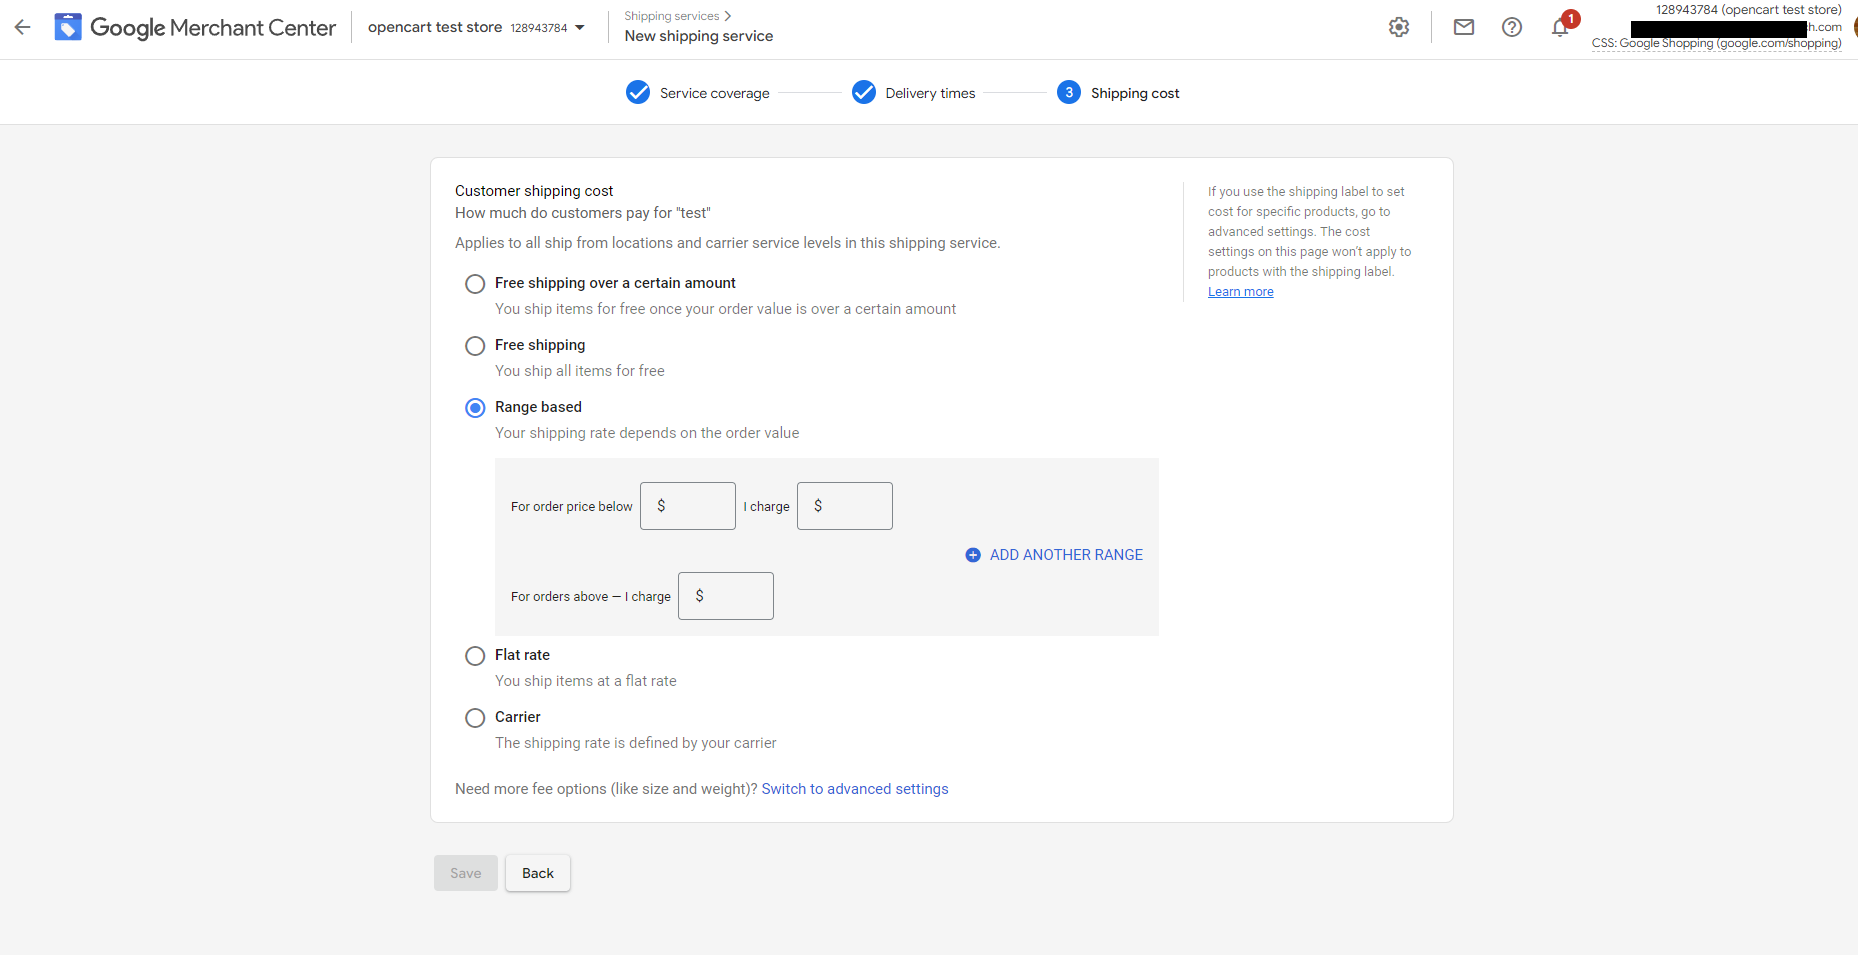
F. Advanced shipping cost settings: Set shipping rate (optional)
Step 1: Add a new shopping rate for the shipping service by clicking plus button +
Step 2: Select if this shipping rate should be applied for all products or just some of products. You can do it under “Affected products”. If you choose the second option, select “Filter products by shipping label” and type the values that you’ve provided for the [shipping_label] attribute in your product feed.
Step 3. Name your table under “Shipping rate name”.
Step 4. Work on creating your table by defining either a single rate for all orders or creating rules based on one or two dimensions: price, destination (only US, Australia or Japan), weight, or number of items.
Step 5: Add your shipping cost.
3. Return policy settings
Before you start running your ads, it is recommended to check if you have a return policy set up in your account in the Merchant Center.
Return policy is another very important factor for customers who are making a purchasing decision. Showing information about return and refund policies on your shopping ads (or free listings) can boost your products' performance.
Ways to set up return policies in Merchant Center
You can create return policies in your Google Merchant Center account. It’s important to highlight that they can be associated either with all products or specific groups of products. In case you want to have the same return policies for almost all of your items with few exceptions - you can create a standard return policy and an exception policy for the exceptions.
If you have experience in web development, you can also share your return policy via the Content API.
You can configure a number of settings for each return policy.
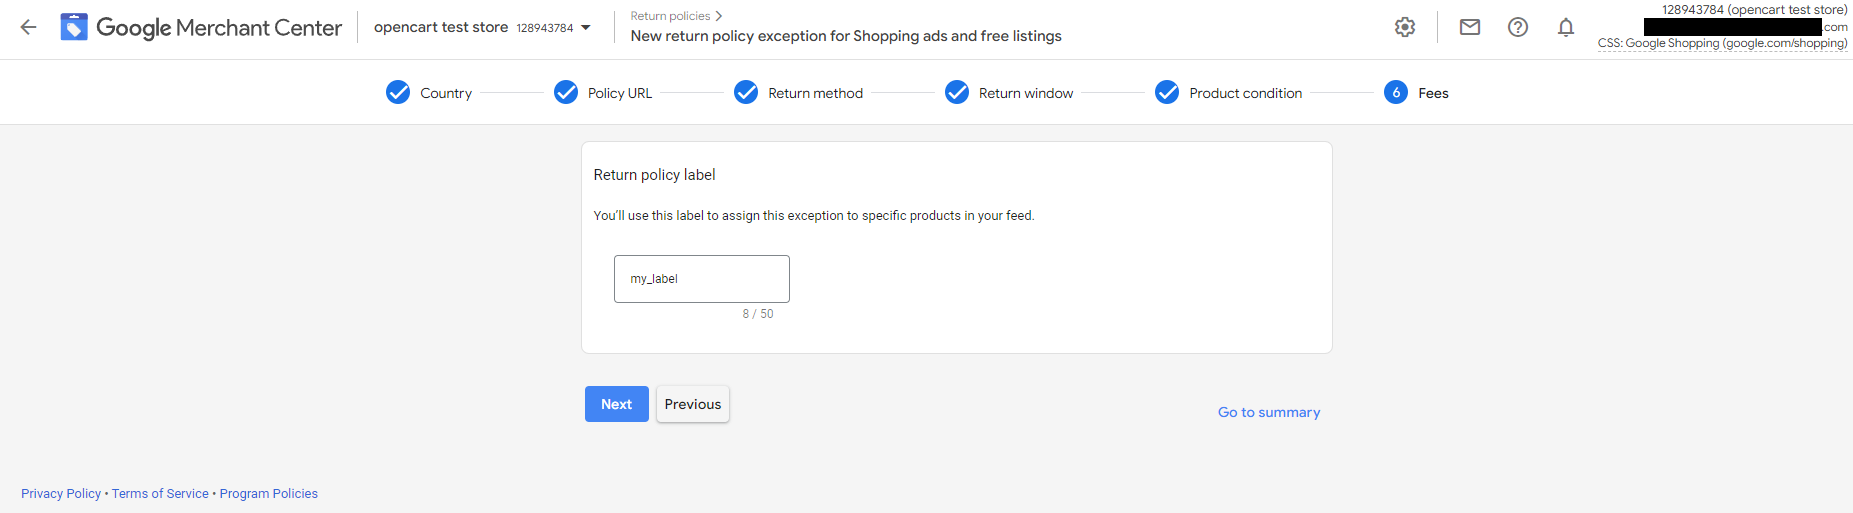
How to create a return policy in Merchant Center
1. Log in to your Google Merchant Center account.
2. Choose Shipping and returns for the page menu and click the Returns tab.
4. Select the program your return policy should apply to - Ads and free listing.
5. Select the country your return policy should apply to.
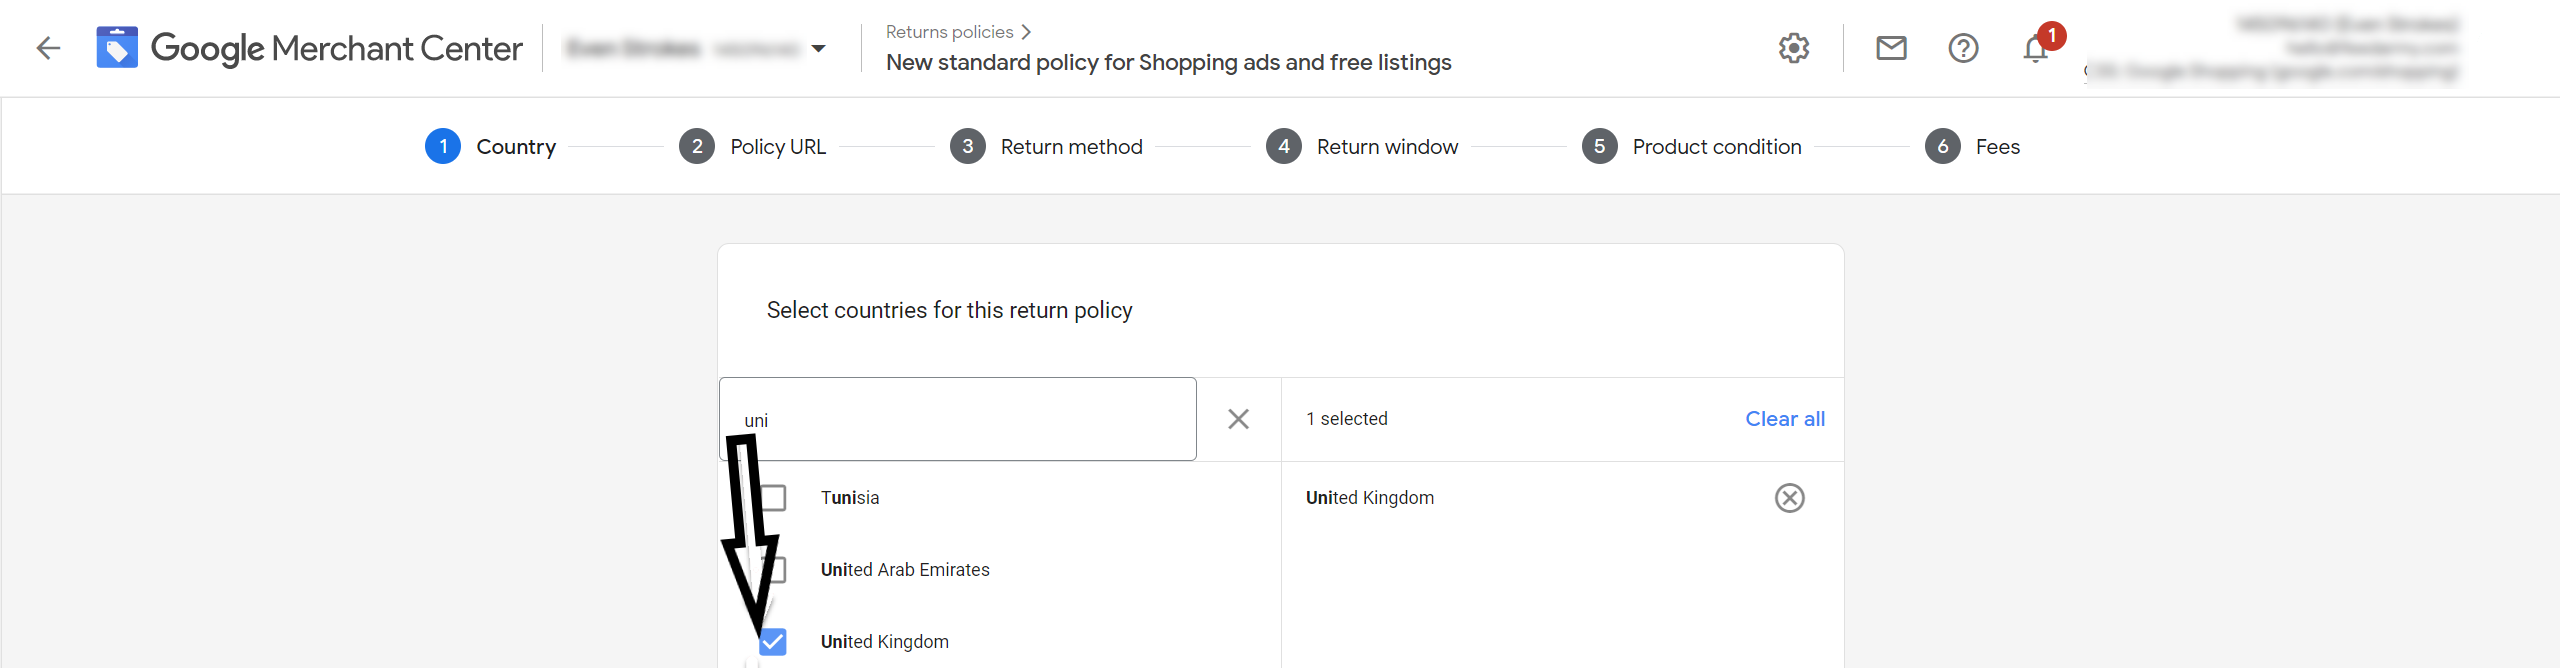
7. Select the available return methods, e.g. in store, by mail.
8. Decide on the number of days your customer has to return the product and set a seasonal override for products if necessary.
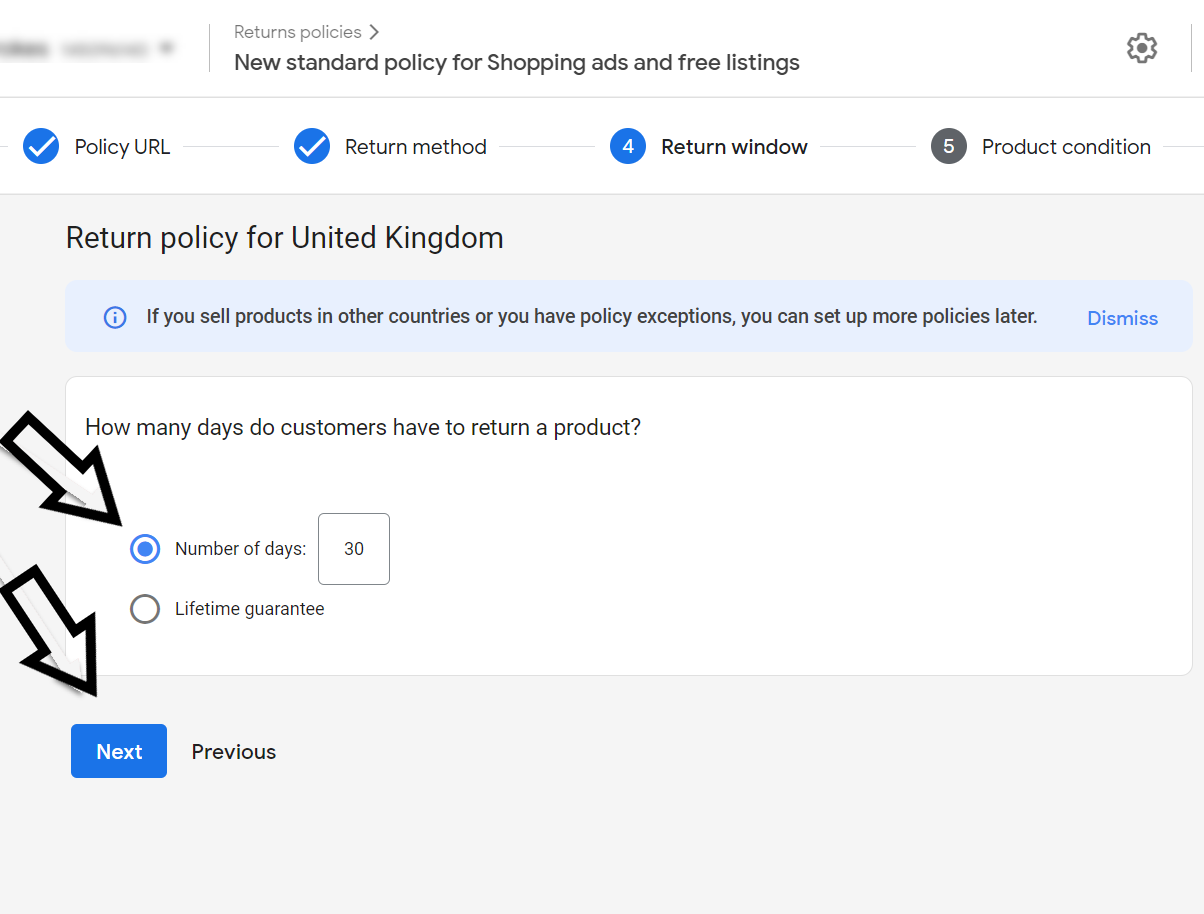
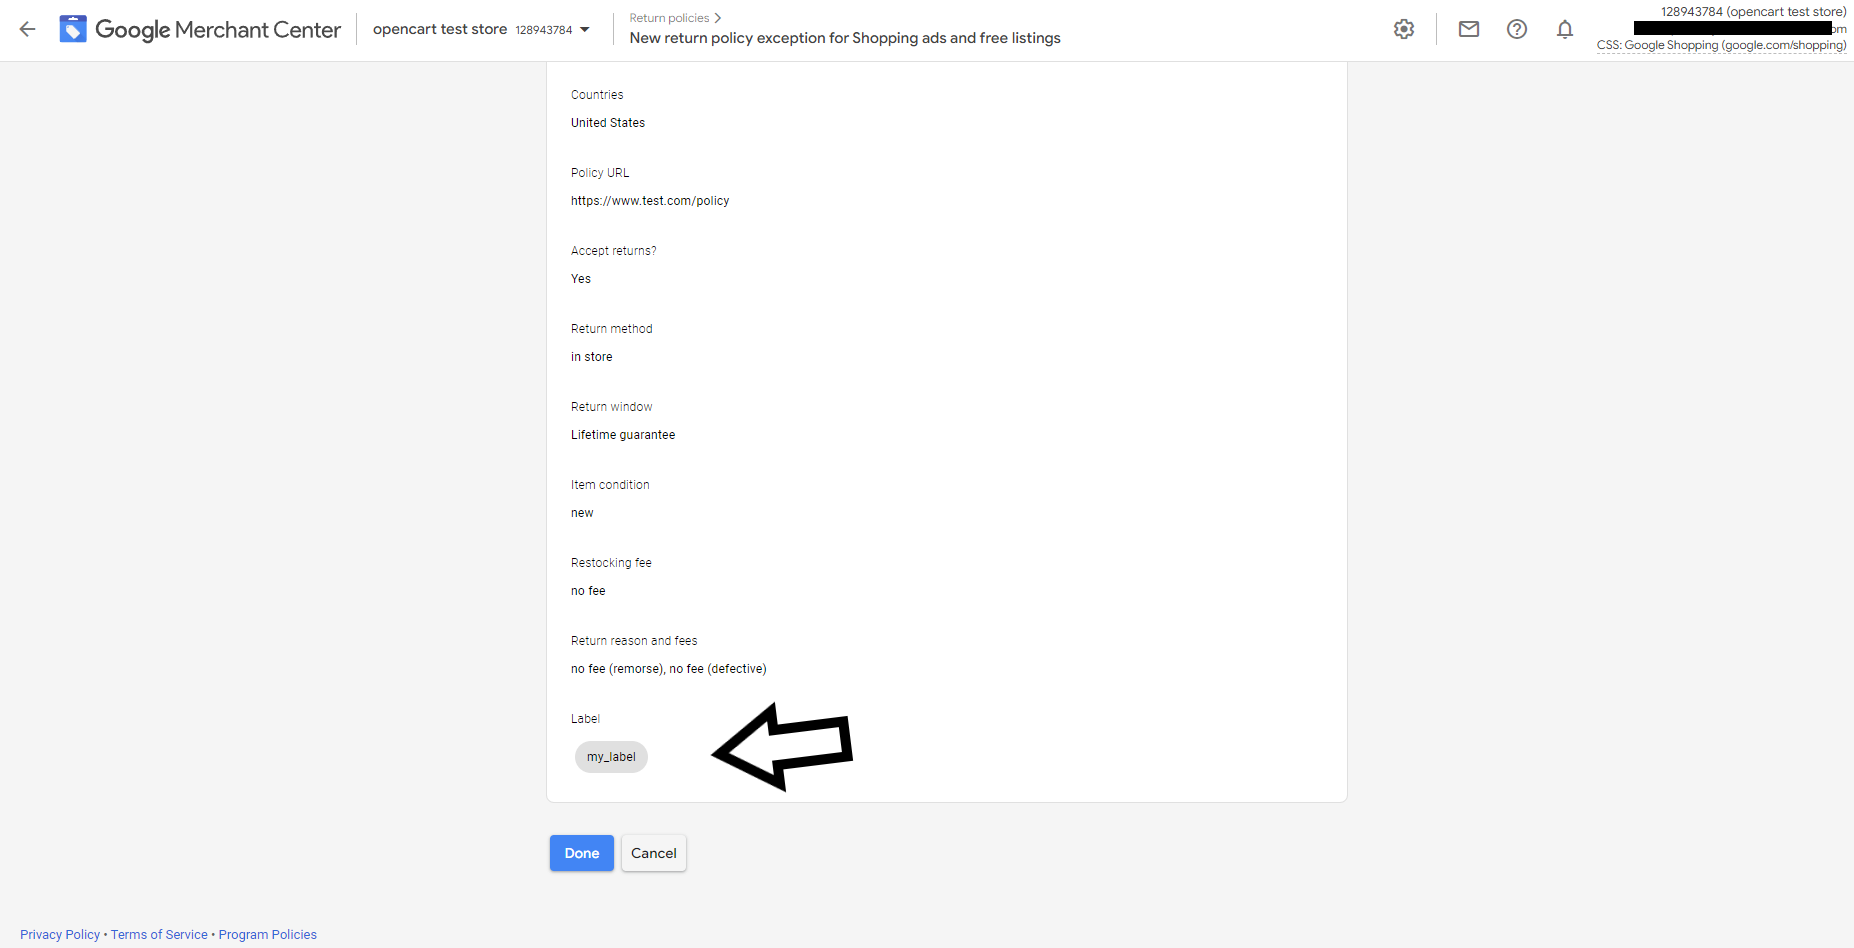
10. Select and enter return fees: currency, restocking fee, return shipping costs etc.
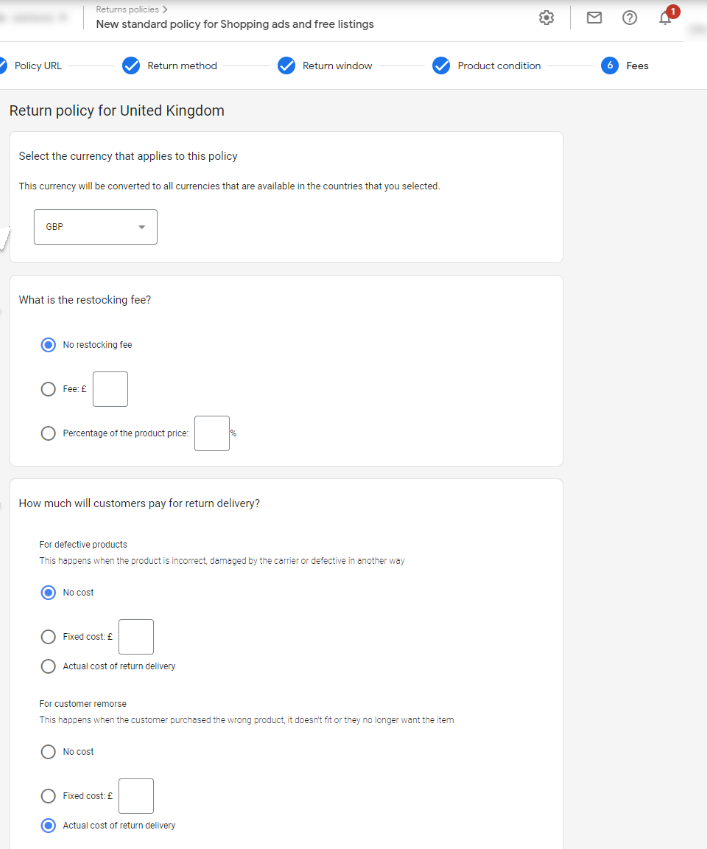
12. To each return policy you can add en exception
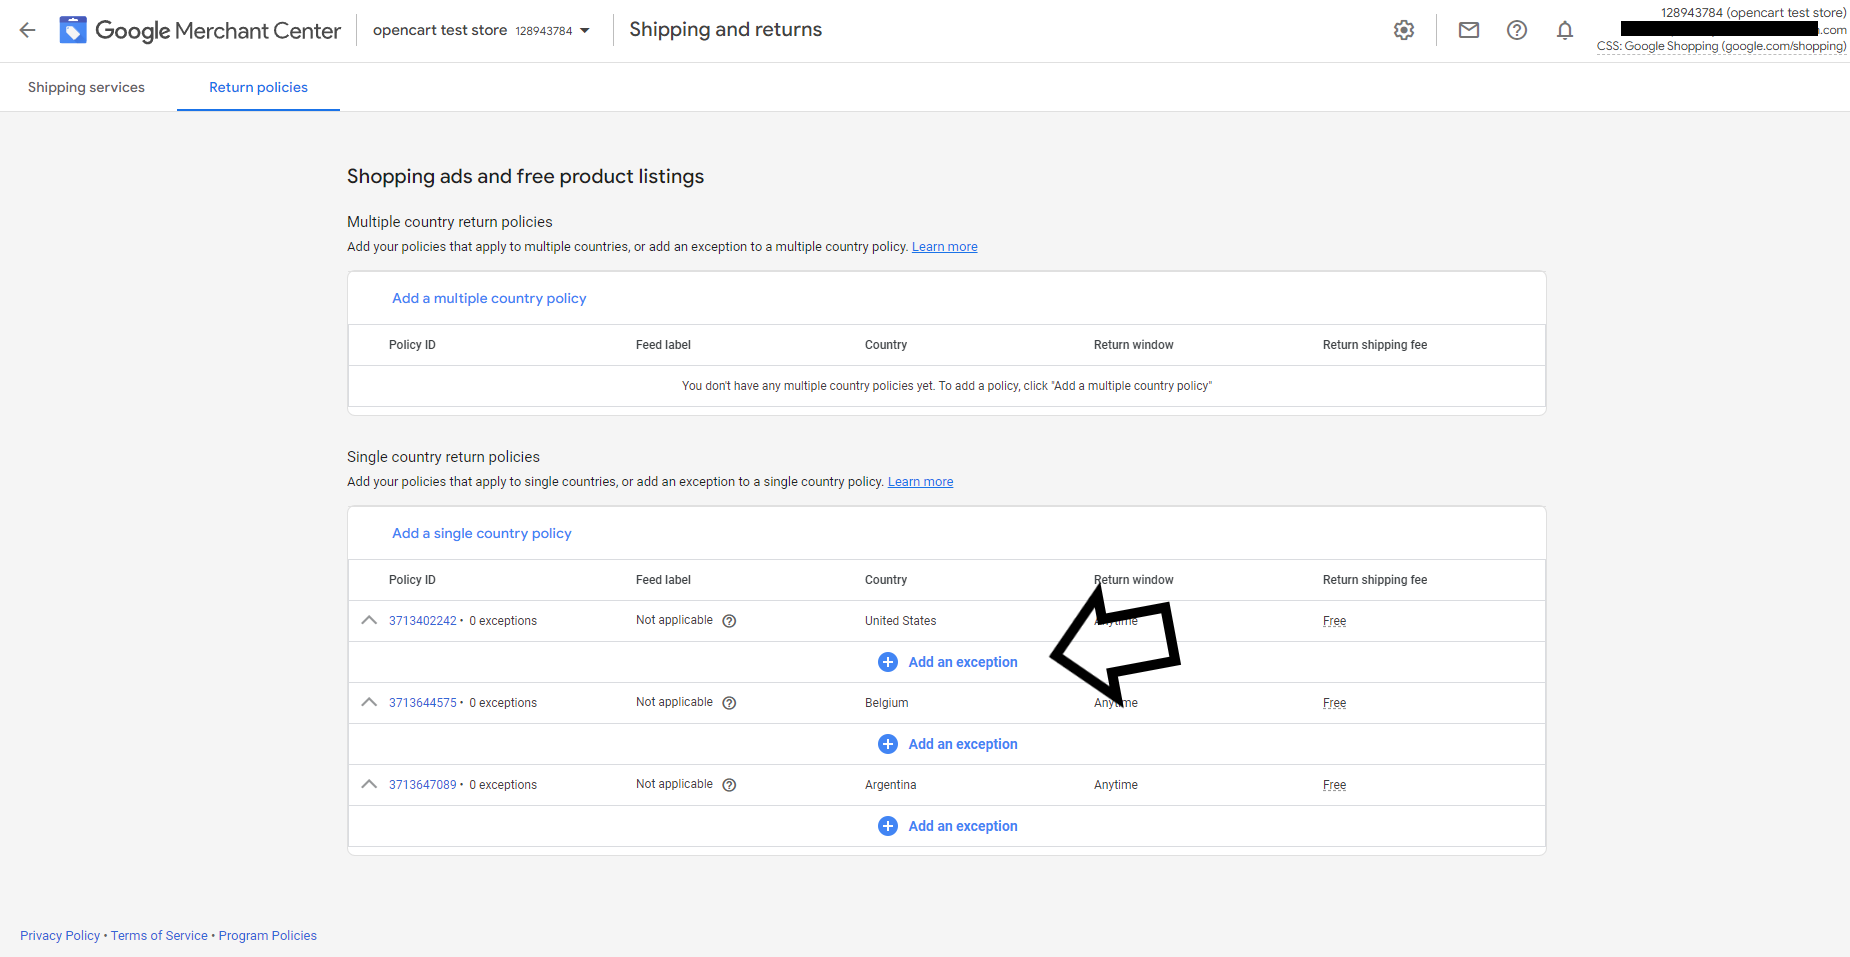
Adding [return_policy_label] to your product feed
You can also add return policies via your product feed if you add a [return_policy_label] attribute to it and then, the return policies can be associated with single products (which have a certain label assigned to them). This way you can create return policy exception based on specific product labels e.g. Electronics.
4. Automatic price and inventory updates by Google
It can be hard to always keep Google Shopping Ads up to date when prices or availability are changing all the time, especially if you advertise many variants of the same product. That’s why you should make sure you have automatic price and availability updates set up in your Merchant Center account!
Google Merchant Center generally enables automatic item updates by default but it’s better to always double check it, because this feature is very important.
What do you need automatic item updates for?
Automatic item updates are currently offered for the price and availability attributes in your product feed. Google uses the information from your website to automatically adjust the prices and inventory (availability of products) you advertise in your Google Shopping and Local Inventory ads. It is constantly checking all of your landing pages and comparing the found data against any feeds that have been provided to them before.
To explain it even more, Google’s automatic item updates cover periods of time between updating the pricing or inventory information on your website and uploading a new feed to your Merchant Center account and correct inaccuracies in your product data (reg. price [price] & availability [availability]).
Benefits of using Google’s automatic item updates:
- They improve user experience a lot
- They increase conversion rates and build customer trust (the customer sees the correct price and availability information on your ads)
- They reduce the risk of Google Merchant disapprovals (errors reg. price and availability mismatches)
Be aware:
Automatic item updates feature will never be a replacement for regular maintaining and updating your product feed. Google designed it to fix temporary problems with your price and availability accuracy for a small number of your items. In order to keep your product data up-to-date we recommend using a feed management solution on the daily basis.
How to set up automatic item updates in your Merchant Center account?
Before you couldn't use Google’s automatic item update if you didn't have structured data markup in the code of your website. Right now there are no technical barriers to using this feature.
From Google's perspective, there is now no reason for merchants to have the automatic item updates feature disabled in Google Merchant Center. That’s why it has been for some time now turned on by default.
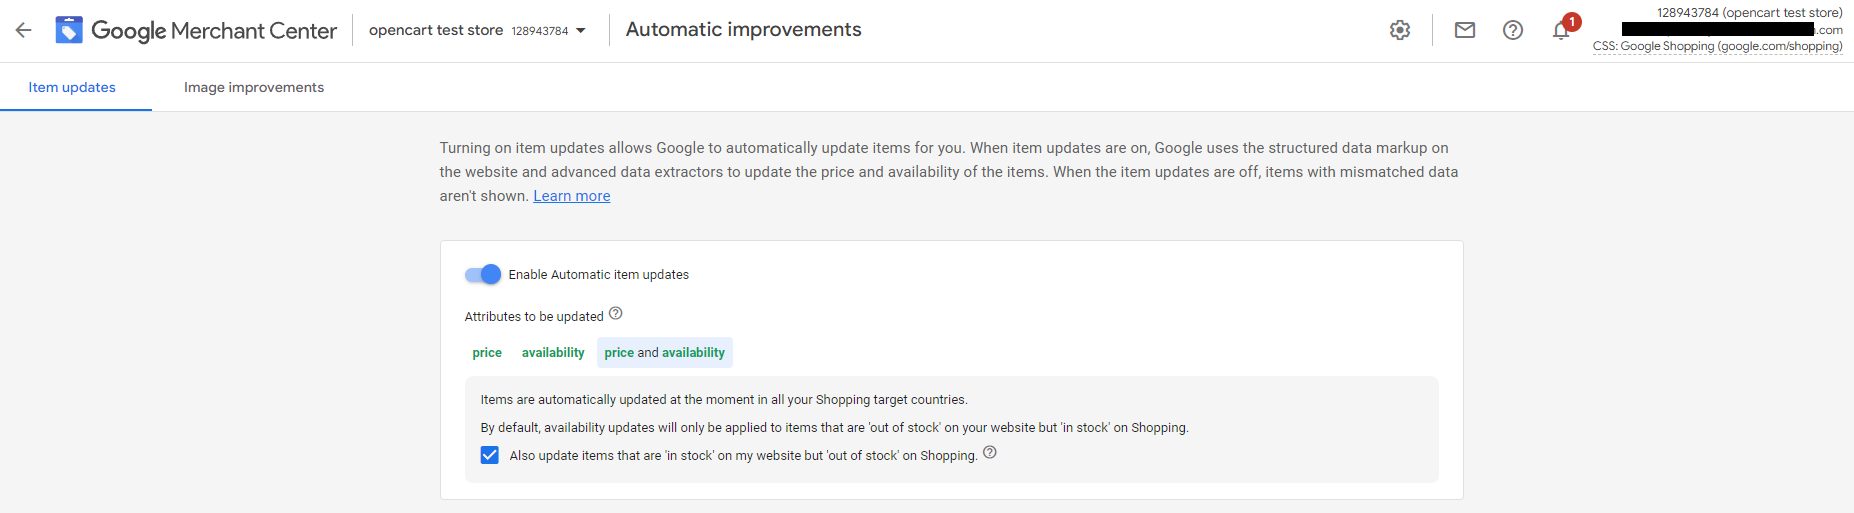
Google still gives you the option of disabling Automatic Item Updates. If it by mistake was turned off you can manage these settings at the account level in Google Merchant Center at any time. To double check your settings or change the status of automatic item updates:
1. Sign in to your Google Merchant Center account.
2. Click Tools icon and then select Automatic improvements.
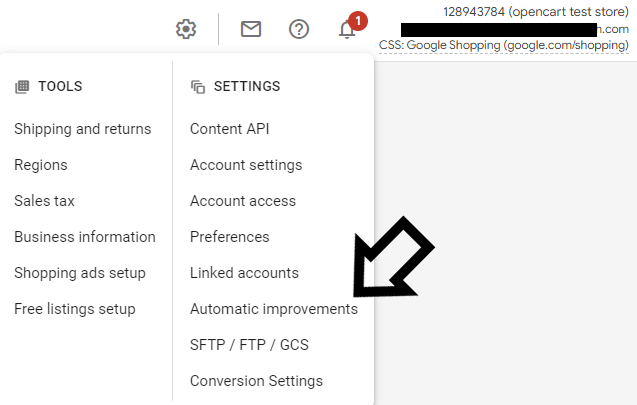 3. On this page, you can either turn on automatic item updates for price, availability, or both price and availability. You can also disable item updates completely.
5. Google’s automatic image improvements
Another interesting Google’s feature is the automatic image improvement. It can bring significant value to your Shopping ads by improving overall user experience. You should check if you have this feature enabled in your Google Merchant Center account before launching your campaign.
Automatic image improvements automatically improve the images that you upload to the Merchant Center. The feature ensures they meet Google’s requirements and improve their quality. Google attempts to automatically fix images by removing promotional overlays and other elements, which would lead to disapproval of the products associated with them by Google (the images would not meet the Shopping ads image requirements).
If you enable this feature (the automatic removal tool) in your Merchant Center account, the improvements will automatically be applied to relevant images in your account.
If the removal of unaccepted elements such as promotional overlays on the particular pictures is successful, the old image will be replaced and the product will be reapproved. However it’s important to know that it’s not always successful - the process is fully-automated and it can fail the task or make mistakes. In case you’re dissatisfied with your new automatically improved image, you can upload a new image yourself and replace the wrong one.
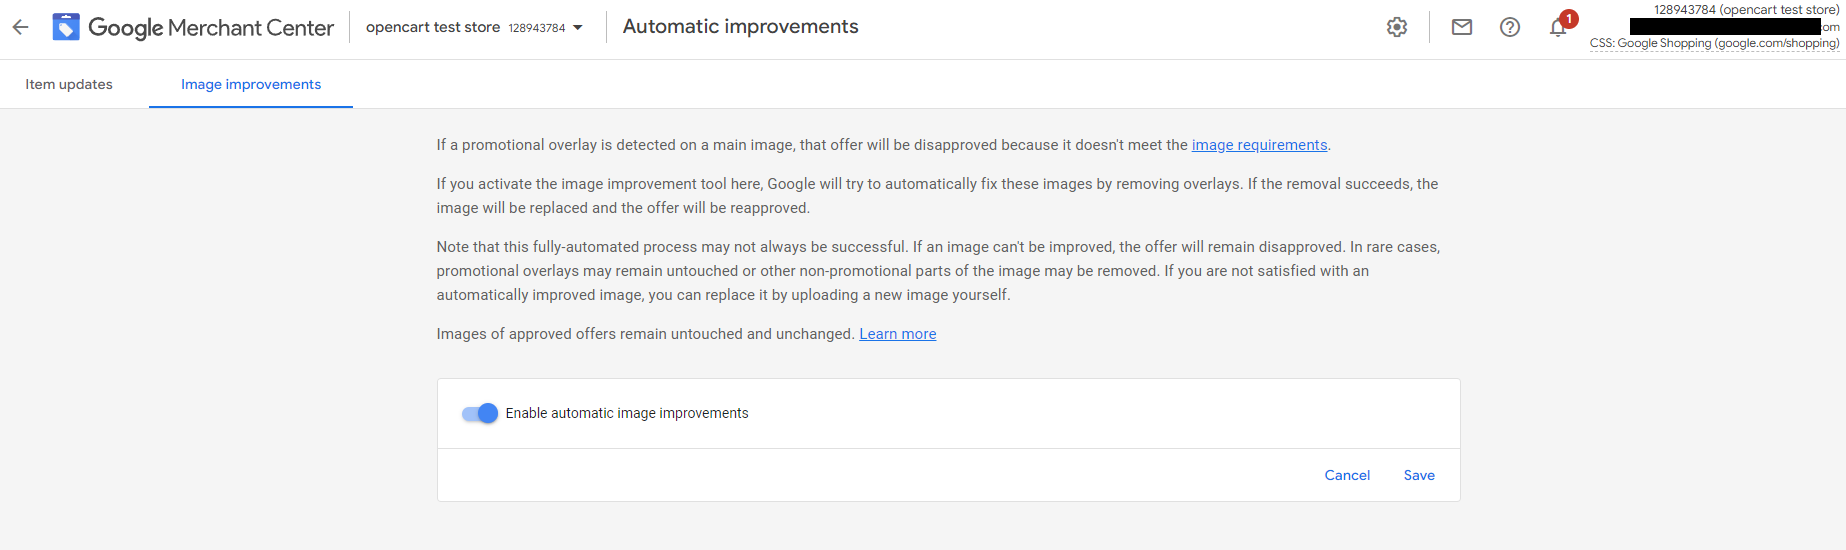
How to set up automatic image improvements in your Merchant Center account?
1. Sign in to your Merchant Center account.
2. Click the tools icon and select Automatic improvements.
3. On this page click the Image improvements tab and enable automatic image improvements by clicking on the blue button (as on the picture below).
6. Data transfer settings - FTP connection
Before you start your Google Shopping campaign, consider how you will transfer your product data to a particular channel and double-check if everything is set up correctly.
If you update your product data more often than once a day, it’s recommended that you upload your product feeds via FTP. DataFeedWatch gives you the option to connect your feeds with the desired channels directly from the tool using FTP up to 4 times a day.
After you connect your data feeds manually for the first time, our system will then continue to upload the updated ones to the channel automatically. You will not need to do any additional work.
FTP stands for File Transfer Protocol and is a procedure for transferring files between computers. In reality the files are not actually moved from one source system to another but they are copied from one computer to another computer. It all happens over Internet channels, formally known as a TCP/IP (Transmission Control Protocol/Internet Protocol).
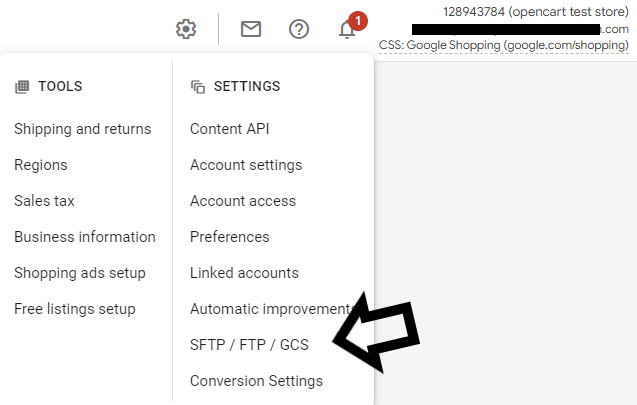
How to upload your product feed to Google Shopping via FTP (using DataFeedWatch solution)
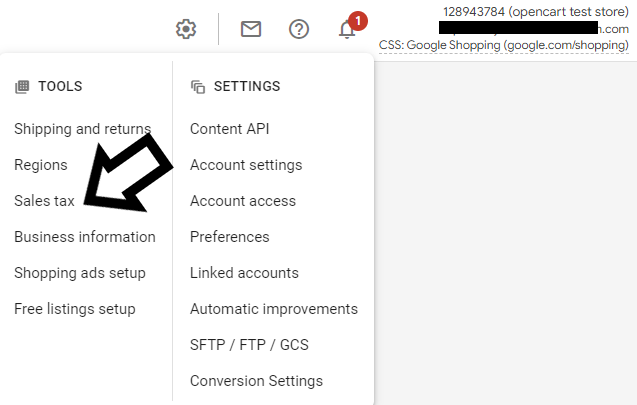
1. Log in to your Google Merchant Center account2, Click the tools icon and select SFTP / FTP / GCS.
4. Note down your FTP credentials.
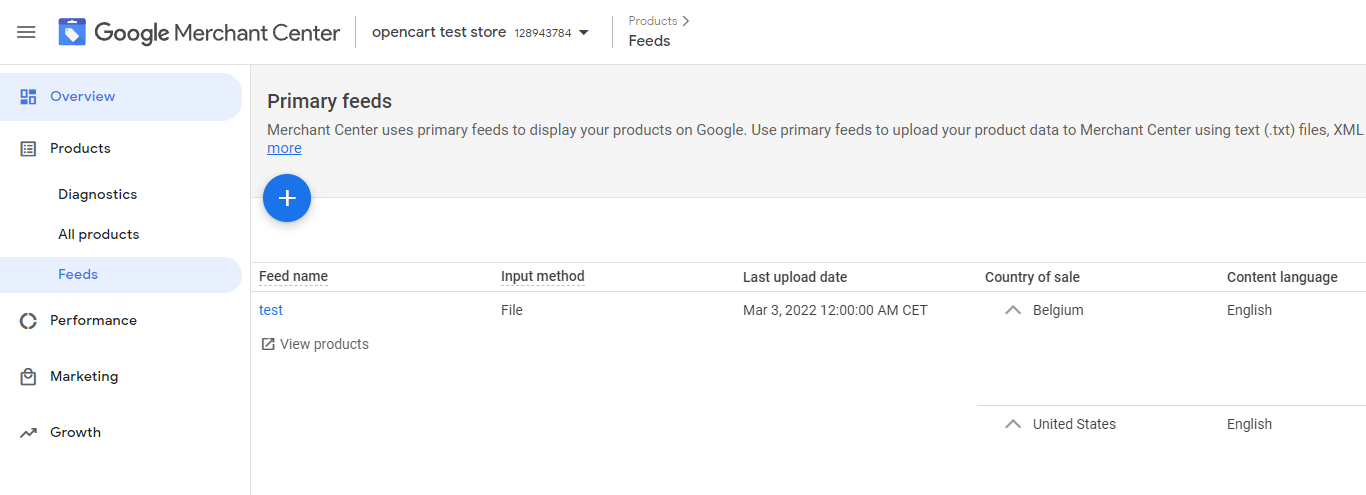
5. Go to Products > Feeds and click + button to add a new feed.
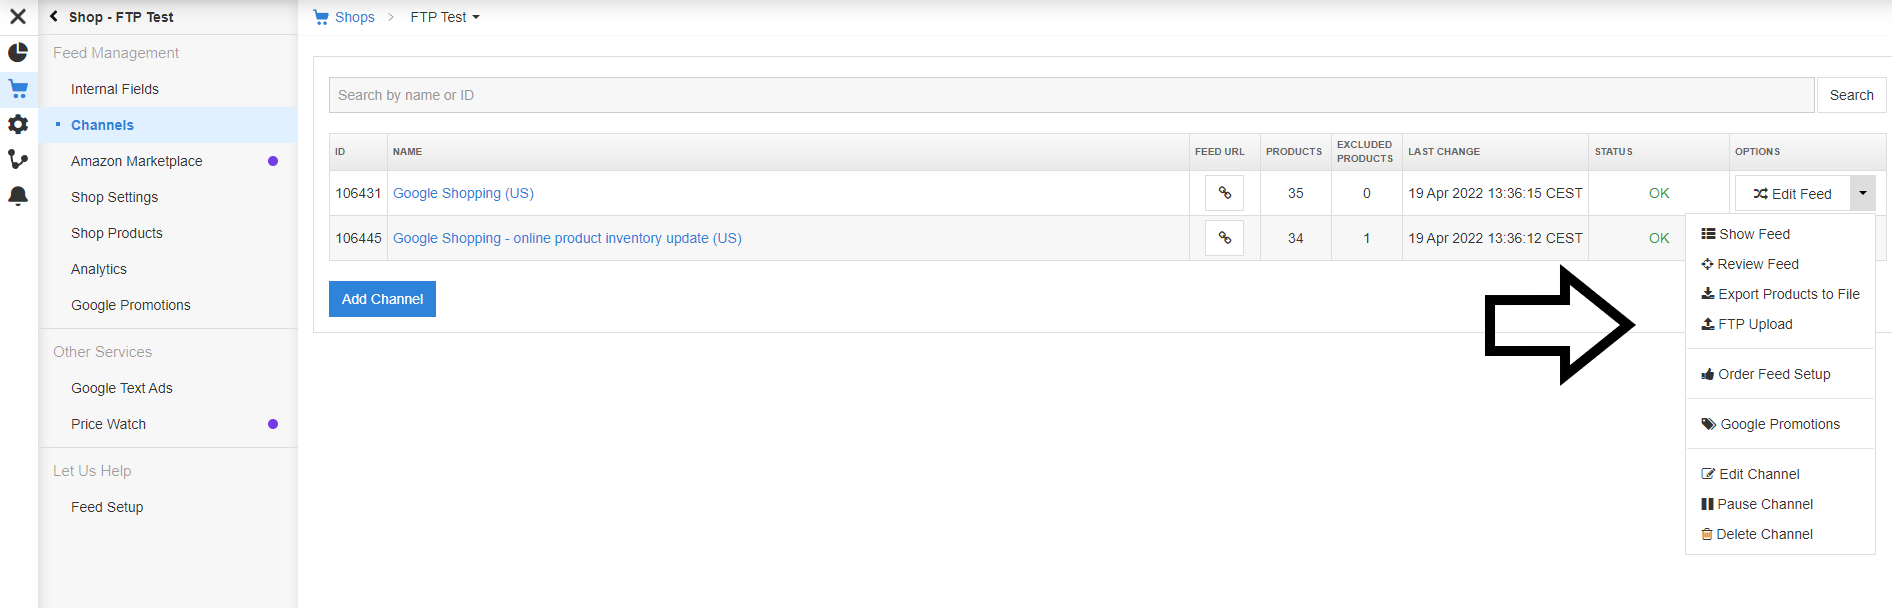
9. In DataFeedWatch go to Shops > your shop's name (e.g. Google Shopping)
10. Select Edit channel from the drop-down menu next to your channel (Options column)
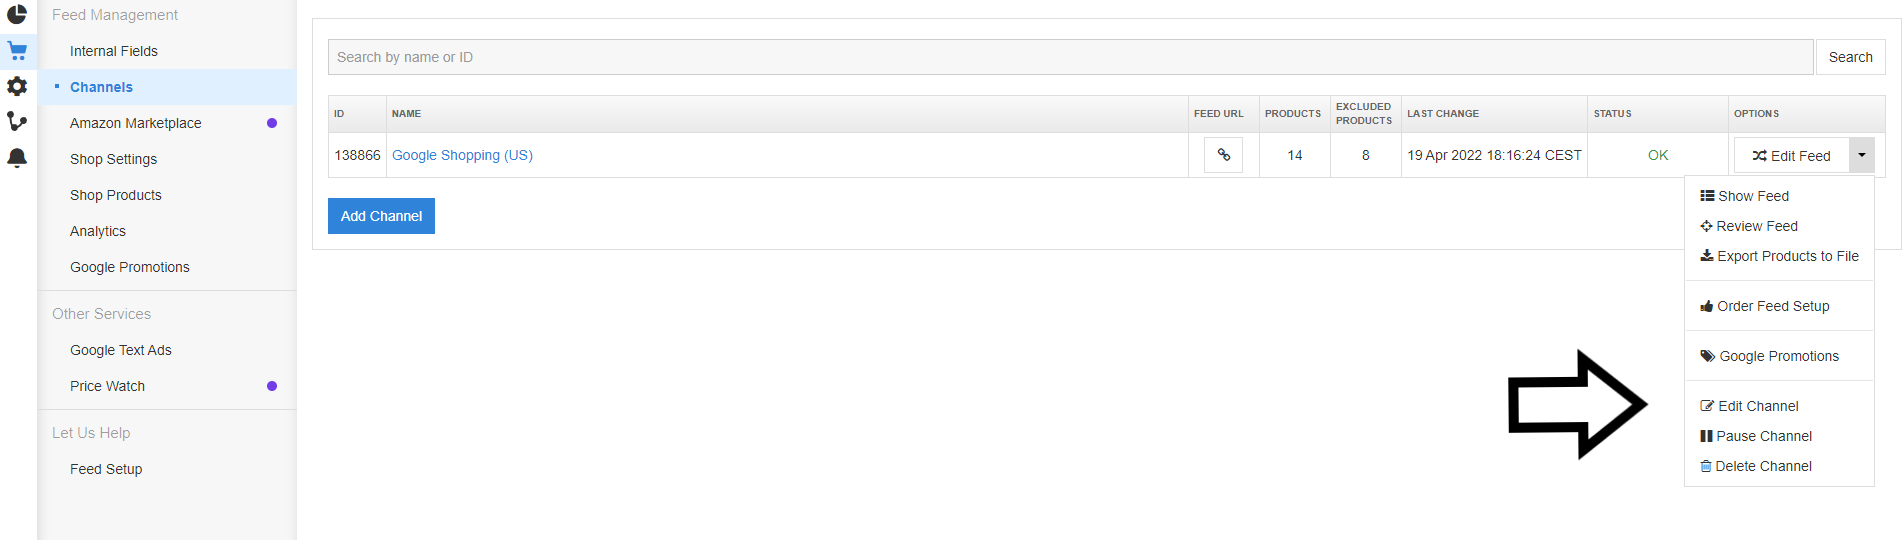
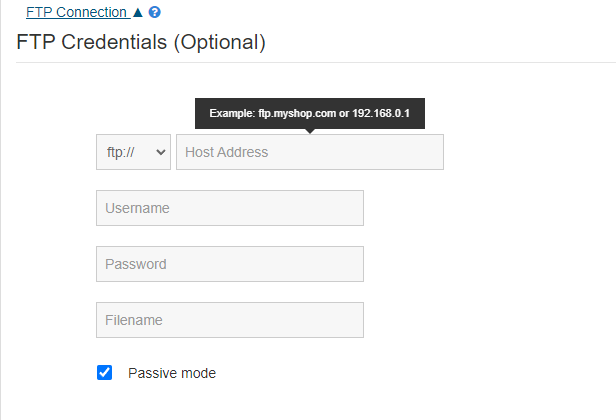
11. Click FTP Connection, and then provide your credentials.
12. Now you can send your feed to the channel by selecting FTP Upload from the drop-down list.
13. From now on your product feed will be sent to the server automatically every day, right after your product data is updated in the DataFeedWatch tool.
7. Tax settings (when advertising in the U.S.)
Tax errors are one of the most common Google Merchant Center errors when advertising in the U.S. It’s important to focus on setting up tax settings correctly, preferably before you launch your ads.
But maybe you’re already running a Shopping campaign and it’s not going so great? Do you keep getting tax errors while advertising in the U.S.?
Then apparently you or your client doesn’t have the default tax values for each state in the U.S. and you need to change it in your Google Merchant Center account.
How does it work?
What you need to do when advertising in the U.S. is to submit the taxes that you collect, so your customers know the exact price of the product they want to buy.
Tax requirements in the U.S. are different from tax requirements in other countries, because you need to set up tax rates for each state in U.S that you charge taxes for. Each state authority has its own rules regarding taxes, which will affect the amount of tax you should collect.
Usually you are required to collect sales tax in those states where your company is physically present (property, offices, employees, contractors etc.). Some states charge tax based on destination (destination of the buyer within the state) and some others on origin (seller’s location within the state).
In case your products target the U.S., but you don’t charge taxes in the U.S., you need to indicate that in your tax settings in the Merchant Center.
You can read more in this Google’s article but we recommend also to consult it with a tax advisor.
There are few options to determine tax in each state:
- Using a custom option to enter a flat rate (in case you charge all customers the same).
- Allowing Google to determine the tax amount (in case you charge taxes based on your customers’ location).
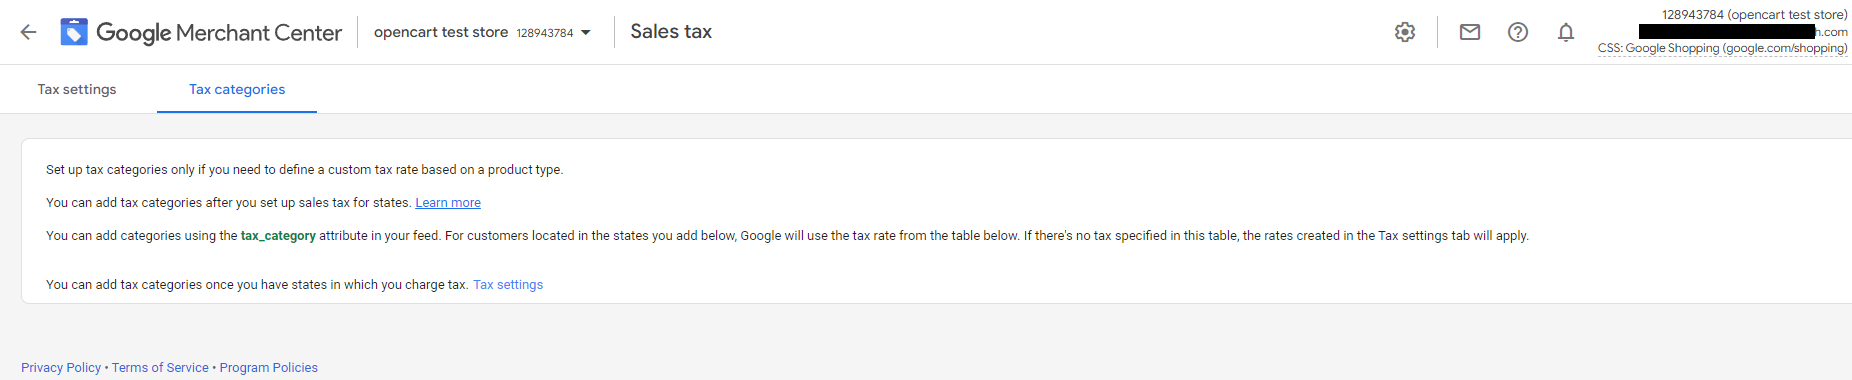
- Using the [tax_category] attribute in the product feed (in case you sell products in a state with a tax rate that is different from standard sales tax rates - some products may not be taxed in some states or their tax rate may be lower than other products’ tax rates or they can be exempt from taxes).
How to set up tax settings in Google Merchant Center
The best and least complicated way to set up tax is to use the tax settings in your Google Merchant Center account. There you can set up tax rates for each state. You can also specify tax rates by including a [tax] attribute in your product feed - this will override taxes for each product set up in the Merchant Center.
Set up standard tax rates
(for each state where you charge them)
1. Sign in to your Google Merchant Center account.2. Click the Tools icon and select Sales tax.
4. Click Advanced settings - you’ll see the list of all states in the U.S.
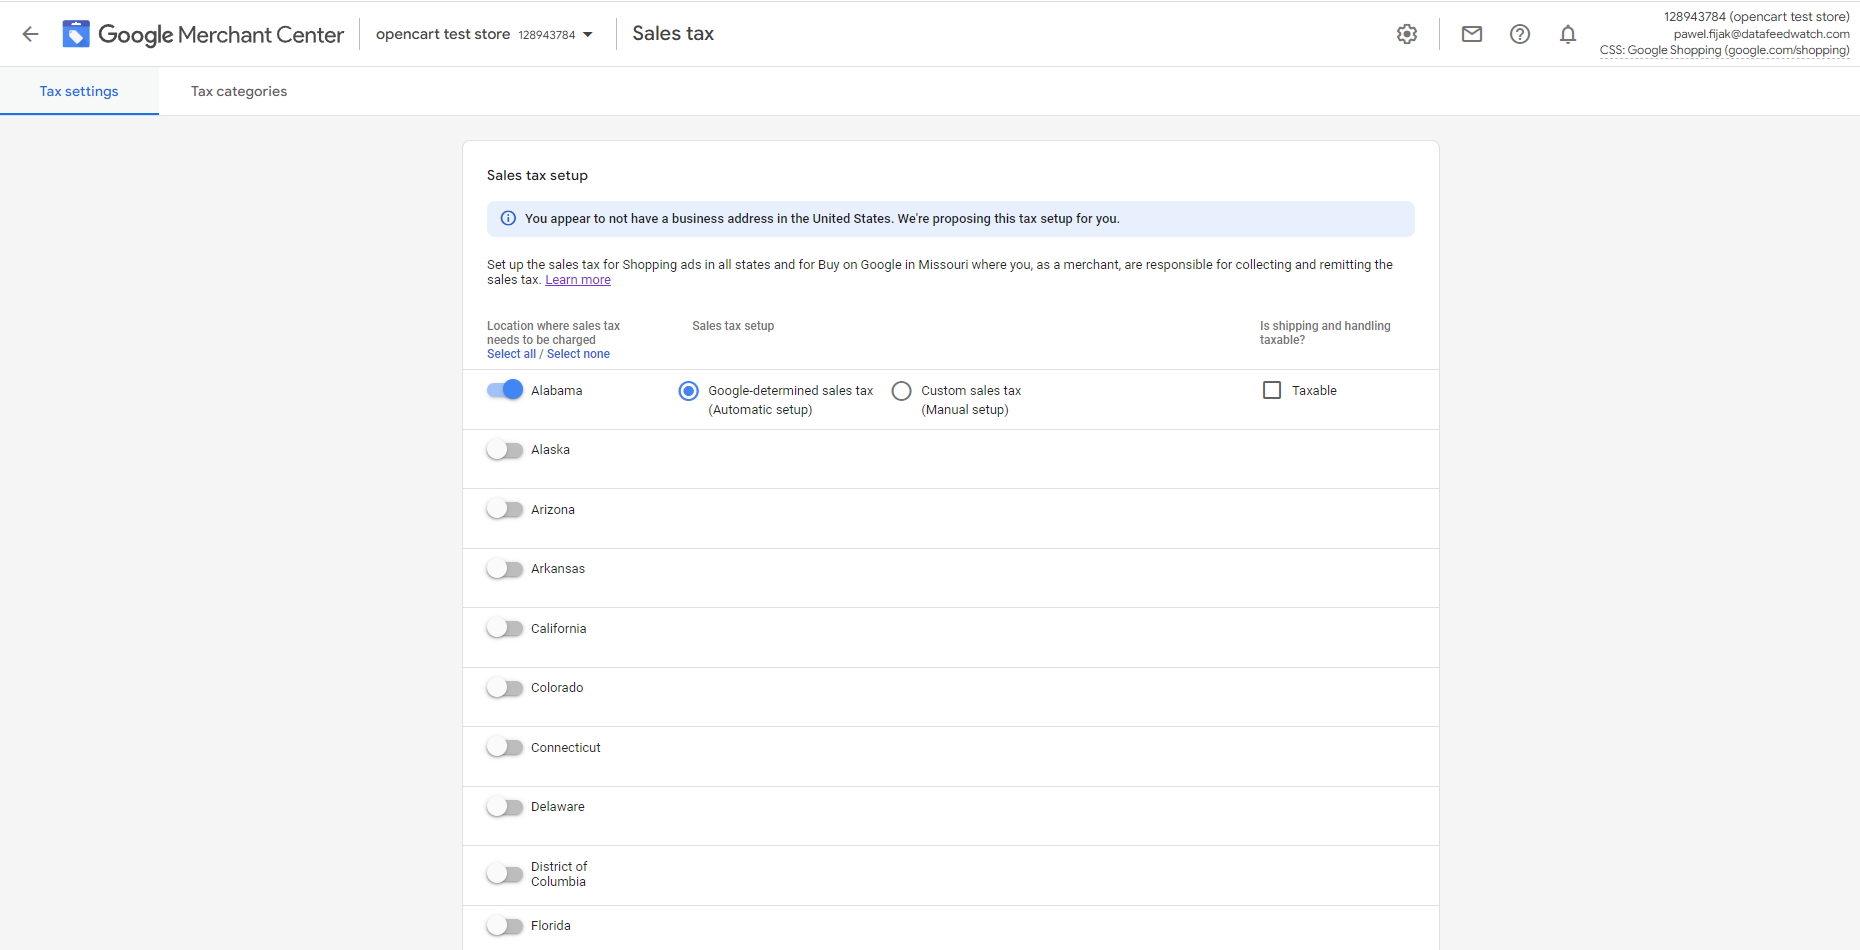
Set up tax rates for each state where you want to charge sales tax:
5. Click the toggle in order to select the state.6. Choose the right “tax rate” option:
- Google-determined sales tax (Automatic setup)
- Custom sales tax (Manual setup)
OR
- Tax on shipping
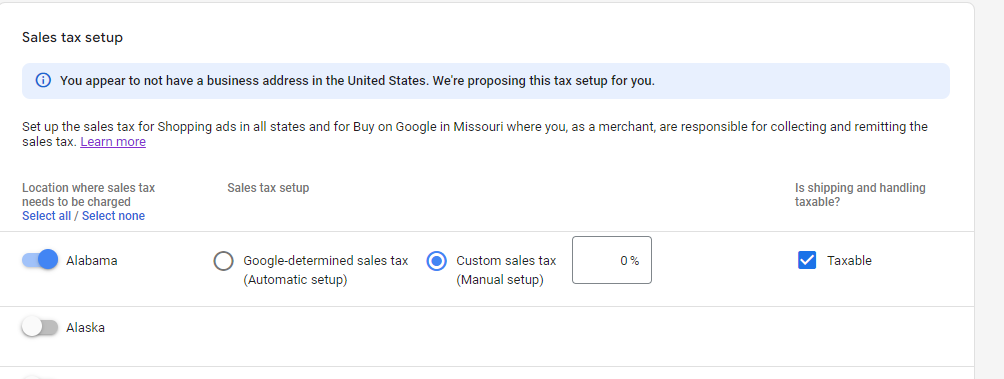 7. After you’ve set up tax rates for all states click Save.
You can also define a custom tax rate base on the category of your products. There are different ways of doing that.
Additional thing to keep an eye on in Google Merchant Center: Google’s recommendations
This advice is more for those who already run Google Shopping or Google Ads campaigns and want to improve them using historical data collected by Google. Once in a while it’s recommended to check Google’s recommendations and try to adjust and update your campaigns so they can become even more successful.
Google’s recommendation is an entire section that you can visit in your Merchant Center account, where you get customized suggestions on how to improve your campaigns and get better results with them.
Recommendations can suggest you to use new, relevant features that you haven’t known about. They help you find a way to get more out of your budget by improving your ads, bidding or keywords and thus increase the overall performance of your Google campaigns.
What are Google’s recommendations based on
As already mentioned, Google gives you tips and recommendations based on your account's performance history, your campaign settings, and trends across Google. It is done automatically without any human insight.
If you just launched your campaign or you haven’t started running your ads yet, you will not see any recommendations. But make sure to come back again very soon and check if anything appeared in this section! This will help you quickly fix some mistakes and improve your campaign. Google comes up with new recommendations regularly and also launches some new recommendation types from time to time.
Benefits of using Google’s recommendation
- You get new ideas on how to improve your campaign’s performance based on historical data: previous campaign performance, things people have searched for on Google etc.
- You can make improvements right away, without wasting much of your valuable time on research first.
- You can always keep your campaigns up-to-date and fresh.
Types of recommendations from Google
You can find the following types of tips from Google in recommendations section in your Merchant Center account:
- Ads & Extensions
- Automated campaigns
- Bidding & budgets
- Keyword & targeting
- Repairs
- Ad suggestions
You can read more about each of them in Google’s article about recommendation types.
Third-party platform to automate many of Google Merchant settings
Using a third-party platform like DataFeedWatch can make managing your Google Merchant Center settings, such as shipping, return policies, pricing, and tax, much simpler and efficient.
For instance, when it comes to configuring shipping settings, platforms like DataFeedWatch can help automate the process by ensuring that shipping costs, delivery times, and other details are accurately synchronized with your product data feeds. These tools can help you prevent common pitfalls, like charging the wrong shipping costs or displaying incorrect delivery times, which can lead to customer frustration and cart abandonment.
Similarly, in terms of return policies, DataFeedWatch can simplify the process of setting up return policies for specific products. By adding a [return_policy_label] attribute to your product feed, you can associate return policies with individual products that carry a particular label. This approach allows you to create exceptions in your return policies that are specific to these labeled products.
Additionally, for pricing and inventory updates, automation tools can be instrumental in maintaining accuracy and consistency across your product listings, especially if you have a large catalog with frequent changes.
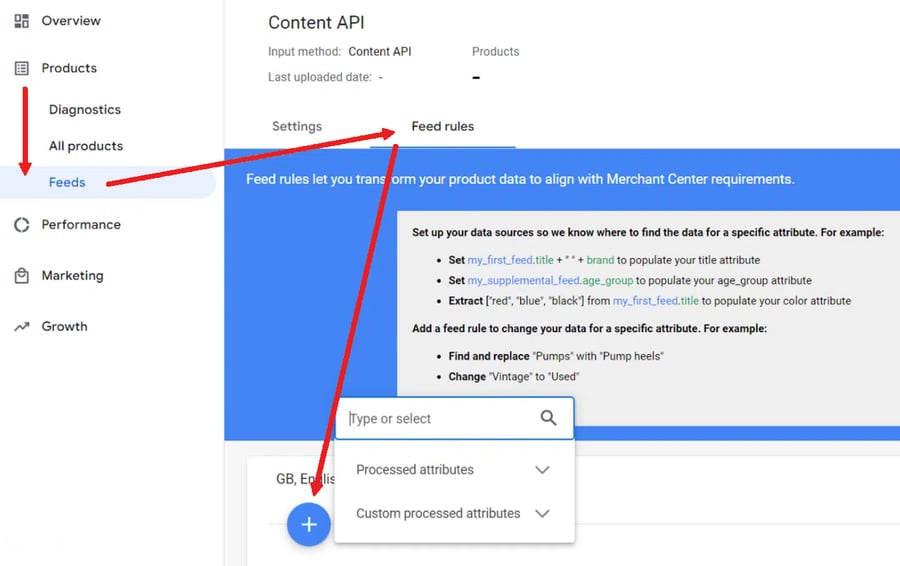
Feed rules
Merchant Center feed rules are a tool provided by Google that allow you to manipulate and modify the product data in your Merchant Center feed.
Feed rules automate updates to your product feed by creating conditions and actions. You can set conditions based on attributes such as product ID, brand, or price range, and define actions that should be taken when those conditions are met. For example, you can add custom labels, change prices, adjust titles, or remove certain products from your feed based on specific rules.
You can set up and manage your rules by navigating to the Products section in the Merchant Center interface.
Using a third-party feed management tool alongside Merchant Center can provide several advantages over relying solely on feed rules within the Merchant Center interface. These tools offer more advanced features and capabilities for manipulating and optimizing product data.
They provide a user-friendly interface and a wide range of options for transforming, cleaning, and enriching your product feed data. Tasks such as mapping attributes, merging feeds, filtering products, or creating custom rules can be easily accomplished using these tools.
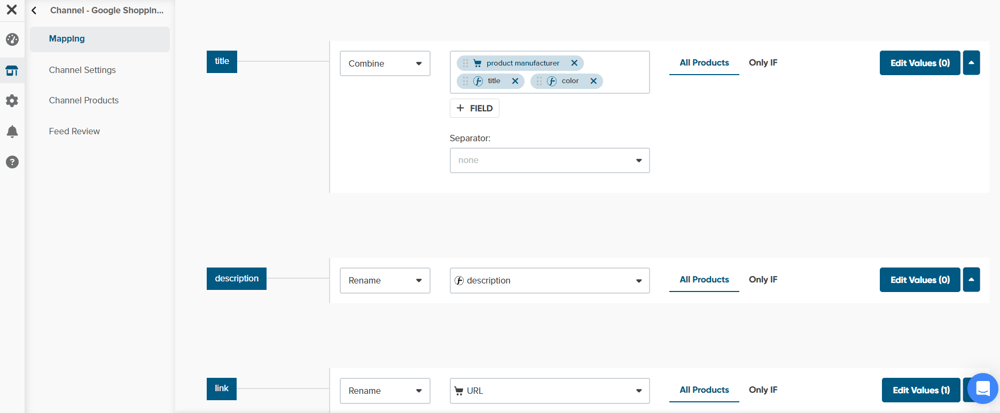 Mapping feed | DataFeedWatch
Workflow automation is a big benefit provided by third-party feed management tools such as DataFeedWatch. Features such as scheduled feed updates, error monitoring, and rule-based actions automate many manual processes involved in managing and optimizing product feeds.
Join important Google Merchant Center programs
To make the most of Google Merchant opportunities, we advise you to join various available programs:
Google Promotions
Google Promotions within the Google Merchant Center program are a way for businesses to make their products more appealing to online shoppers. Merchants can create special offers, like discounts or free shipping, to attract potential customers on Google Shopping.
Google Merchant Promotions improve shopping ads by displaying unique deals like:
- Providing a lump sum discount (e.g. a $10 discount)
- Offering a percentage reduction from the price
- Buy-one-get-one (BOGO) deals
- Offering free shipping
- Free products added with purchases
When people search for products, they might see these offers next to the items in search results. It's a helpful tool for businesses to stand out and entice more people to buy their products, ultimately boosting sales and visibility on Google's shopping platform.
Promotion ID
The Promotion ID serves as a method for advertisers to inform Google that a particular product is associated with a specific promotion. Once a product is linked to a promotion through this identifier, Google uses this information to display the actual promotions in Shopping Ads.
When configuring Merchant Promotions, there are three options available: Products with a promotion id, All products and Products that meet a custom filter.
In this context, the use of a promotion identifier can help avoid two potential problems:
- mistakenly applying free shipping to all products when you intend to offer it only for certain products
- mistakenly applying a discount to products that are not on sale when your intention is to give a discount only on products included in the promotion.
Learn more: How to Add Google Shopping Merchant Promotions to Campaigns
Product Ratings and Customer reviews
Google's Product Ratings and Customer Reviews program is a valuable tool for both consumers and businesses. Through this program, shoppers can access essential information about products featured in Google Shopping ads.
Product Ratings are numeric scores displayed on Google Shopping ads, summarizing the overall satisfaction and quality of a product based on customer feedback. These ratings are often accompanied by Customer Reviews, offering in-depth insights into the experiences of actual users.
This program enhances transparency in online shopping, enabling customers to make well-informed decisions. For businesses, encouraging positive reviews and high ratings can bolster the visibility and credibility of their products, potentially driving more sales.
Learn more: How to Show Google Product Ratings on Your Listings
Local Inventory ads
Local Inventory Ads is a Google program that helps physical stores connect with online shoppers. It lets stores display their products to people looking for stuff nearby. These ads show details like price and where to find the product in a store. So, it helps customers find what they want in local stores and also encourages them to visit the store in person. This is a great way for both stores and shoppers because it makes shopping easier and supports local businesses.
Learn more: Local inventory ads - implementation guide
Summary
Now you know which Google Merchant Center settings to pay special attention to. Forgetting some of them or setting them incorrectly can sometimes lead to errors that you can avoid. Some others will make your advertising much easier. Set up shipping, return policies, automatic price and inventory updates, automatic image improvements, FTP connection, tax and Google’s commendation correctly and you can start a healthy Google Shopping campaign without any delays.