Shopify is one of the most popular ways for any aspiring entrepreneur to set up their own store online. The Canadian software brand has been helping budding businessmen and women set up their stores since 2006, and has continued to grow consistently since then.
Currently, over 5.65 million live websites are using Shopify. In 2024, 25.675 million people bought from a Shopify store. So how does Shopify work? And where do you start if you want to set up a Shopify store in 2025?
What is Shopify?
Shopify is primarily a subscription based software, functioning as a shopping cart. It allows subscribed customers to set up their own dedicated store where they can sell their products.
However, Shopify also has many other commerce functions that it offers to its customers, including Shopify Point of Sale (POS) which allows subscribers to sell in physical locations, and various to help build a bigger and better shopping experience.
Shopify offers a wide range of commerce features, from a basic package to an all-inclusive package. All packages are cloud based in the form of SaaS (software as a service).
What can I sell on Shopify?
Shopify allows you to sell a range of products through the software. They include:
- Handcrafted goods and supplies
- Clothing
- Beauty supplies and accessories
- Outdoor supplies
- Other physical products
- Ebooks
- Subscription boxes
- Memberships (physical or digital)
- Classes and lessons (physical or digital)
- Tickets for events and experiences (physical or digital)
For a better understanding of what can be sold on Shopify, you can check out their terms and conditions.
As Shopify will be your store, you will have to promote whatever you’re selling on the platform by yourself. This means it may be easier to sell certain kinds of products.
Thankfully, Shopify has made a list of some of the top trending items on the platform to help get you started.
What products cannot be sold on Shopify?
Whilst Shopify has an extensive list of what you are allowed to sell on the platform, there are also certain items that you are prohibited from selling. Items that Shopify prohibits are those that do not comply with the acceptable use policy.
These include:
- Alcohol
- Tobacco, cigarettes, and e-cigarettes
- Fireworks
- Firearms and weapons
- CBD
- Gaming currency and anything that endorses gambling
- Pharmaceuticals
- Solvents
- Anything that promotes self-harm
- Anything that promotes hateful content
- Items that do not comply with Shopify’s COVID-19 regulations
- Items that facilitate or promote illegal activity
- Items that infringe on intellectual property
- Items that infringe personal or confidential information
- Items that aim to deceive or transmit malware
Should you list products that are excluded by Shopify, or break their acceptable use policy.
The item listed can be removed by Shopify.
Your account may also be suspended or terminated should the site decide you violate their policy.
What are the pros and cons of selling on Shopify?
Shopify is one of the most popular choices when it comes to setting up a store to sell online. But in what areas does it excel, and which ones does it fall short? Here are some of the pros and cons of Shopify:
Pros
- You can sell across multiple channels, including some of the best known such as Amazon, eBay, Facebook, and Instagram
- The platform is fast and secure for sellers and customers alike
- The depth of features that even come with the basic package can help you get on the right track
- Shopify comes with marketing tools to help you get your store noticed
- Round the clock support can assist you with any issue that may come up
- Shopify stores have numerous theme options, and other ways you can customize your store to make it unique to your brand
- Certain tax rates are automatically applied (EU, US, Canada)
- All the templates and themes work on desktop and mobile
- You can create a website that is available in multiple languages
- You can further the functionality of Shopify with third-party apps such as a data feed service
- There is a built-in blog
- It is available on a free trial, so you can test how helpful it would be for you and your business
Cons
- Unless you choose to use Shopify payments, there will be an extra surcharge for transactions
- Shopify charges can be difficult to understand due to all the additional fees
- The initial set-up can be more time consuming than if you sold on a marketplace directly
- Additional apps costs can quickly build up and add to the subscription fee
- If you change themes then your content formatting may become muddled and cost you a lot of time
- You only get access to all features with the most expensive plan
- Certain functionalities, such as Shopify payments are limited geographically and do not function in certain countries
- The content marketing and email marketing systems are quite limited
Shopify pricing plans and fees
Shopify has 3 separate pricing plans for its customers to choose from. The cheapest plan offers Shopify’s most basic features, whilst the most expensive plan includes all Shopify features. You should also bear in mind that Shopify offers a free trial that covers all its features for a period of 3 days, and then you can also use the selected plan for $1/month for 3 months.
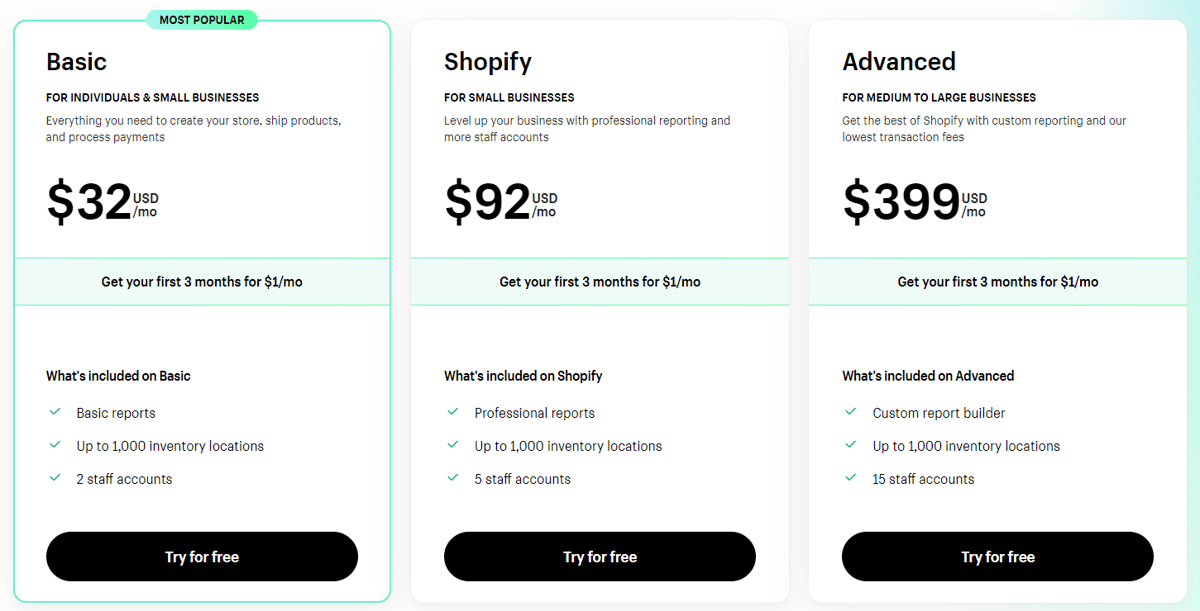
Source: Shopify
Once your trial has finished, you will be automatically moved onto the paid plan of your choice. If you didn’t select a plan, your account will be frozen until you choose one.
Here is a breakdown of all of Shopify’s plans, and what they have to offer:
Basic Shopify plan
The basic Shopify plan costs just $32 a month. It allows you to build your online store, and list an unlimited number of products. It also includes a blog. On the downside, the Basic Shopify plan gives you access only to some basic Shopify reports.
You also have fewer staff administrative accounts (2) than on other Shopify’s price plans. In addition to all that, there a few additional fees, such as:
- A fee for online credit card rates on this plan is 2.9% + 30c USD
- In-person credit card rates at 2.7% + 0c USD
- There is a further 2% charge for using payment providers other than Shopify payments
Shopify plan
The Shopify plan is Shopify’s mid-range plan and costs a total of $92 a month. This plan includes everything already in the basic plan, as well as 3 additional staff administrative accounts (a total of 5), and access to professional reports. You also gain access to international domains and international pricing.
In addition to all that:
- Online credit card fees are also reduced to 2.6% + 30¢ USD
- Offline credit card fees to 2.5% + 0c USD
- There is a further 1% charge for using payment providers other than Shopify payments
Advanced Shopify plan
Shopify’s priciest option is known as the advanced Shopify plan. This plan costs a total of $399 a month and includes everything in the Shopify plan, plus these features:
- Up to 15 staff administrative accounts
- Advanced report builder
- Third-party calculated shipping rates
- An increased shipping discount of up to 76%
- Reduced online credit card rates of 2.4% + 30c USD
- Reduced offline credit card rates of 2.4% + 0c USD
- Reduced surcharge for using payment methods other than Shopify payments (down to 0.5%)

How to get started with Shopify
Getting started with Shopify is a relatively simple and straightforward process. And although the task may seem like a daunting one if it is something you haven’t done before, it is very manageable, even for someone with no experience. Here’s a quick guide to getting started on Shopify.
Signing up with Shopify
Every Shopify store starts with a simple sign-up. With Shopify, the sign-up process is similar to that of most online platforms.
- You are required to enter basic details, such as your email address, password, and your store name. Once you have entered these details, your free trial of 3 days will have been initiated.
- Before you complete the sign-up process, it is best if you have a good idea of what you are selling, as well as a concrete idea for a business name, a business logo, and plenty of images of your products.
- As the free trial period is limited to 14 days, having these things ready to go will help you get the most from the trial period before it expires. By doing so, you can get a better understanding of whether Shopify suits you, and which package is ideal for you.
Setting up your Shopify store
After the sign-up process, you will be ready to begin setting up your store. This will involve:
- listings your products,
- choosing your shipping,
- setting up your payments,
- and any customization you decide upon.
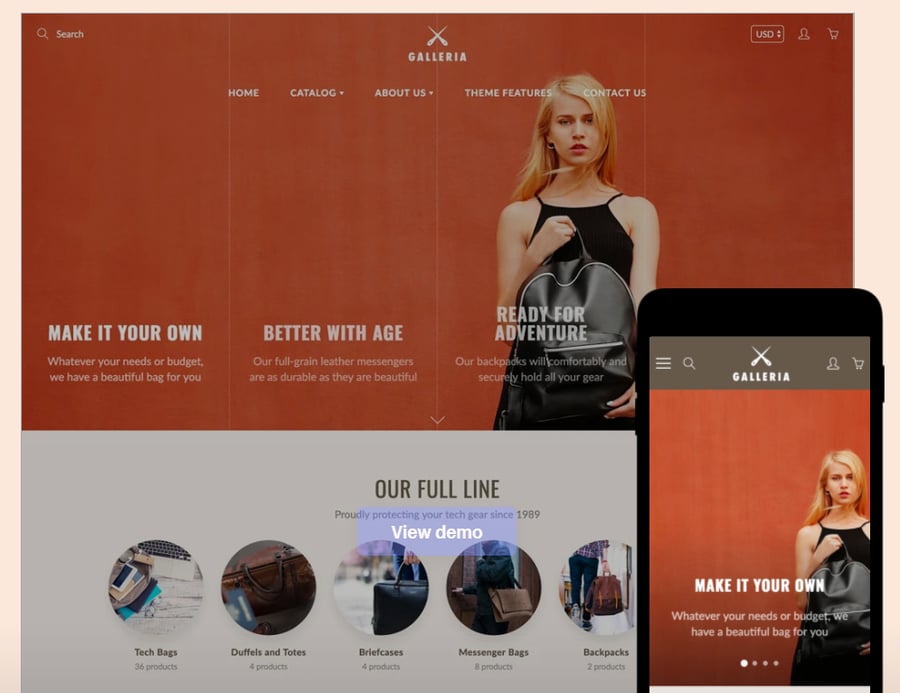
Choosing your Shopify theme
Shopify is well known for its easy to use design and flexibility in terms of the personalization of your store.
Themes are a big part of that, with hundreds of ready-made designs already at your disposal, and a drag-and-drop editor to make them unique to you and your store.
You can find both free and paid Shopify themes in the theme store. In most cases, paid themes will allow more modifications than free themes. However, this isn’t a rule. Paid themes usually cost between $100-$180 a theme.
 Source: Shopify
When choosing your Shopify theme from the many that are available to download, you should consider a number of factors, including:
- Is the theme easy to use and customize?
- Is the theme clear and clean when viewed?
- Is the theme compatible with different browsers and devices?
- Is the theme SEO-friendly?
- Is the theme responsive?
- What are the reviews of the theme like? Are there any recurring issues stated?
- Does the creator of the theme provide any support for its use?
- To what extent can the downloaded theme be personalized and customized?
A great Shopify theme will have all these features, and maybe even more. By making sure you have a good theme, you can get off to the perfect start when selling on Shopify.
From there on, you can add your own branding, as well as your products. The theme should complement exactly what you are selling, and make it easy to optimize your product catalog in the future.
If you aren’t sure whether the theme is suitable for your brand or not, you can always preview it to help give you an idea of its suitability.
How to find out what Shopify theme a website is using?
1. To find a theme, you simply go to the theme store and filter by cost, industry, or features.
2. You can even sort themes by their popularity, price, or recency.
3. But what if you want to find a specific theme that another website is using? You may have seen the perfect theme for your store elsewhere, or simply taken a liking to another website's theme and want to check it out.
But whatever the reason behind your theme envy, there are a few easy ways to find an answer to your question. Here are just some of them:
- Try a website such as Shopify Theme Detector. This website lets you enter the website’s URL and get a quick answer to your question.
- Download a browser extension to detect themes for you
- Press Ctrl + U on Chrome, Firefox, or Microsoft Edge to view the page source on the page in question.
- Then use find (Ctrl + F) to search for ‘Shopify theme’.
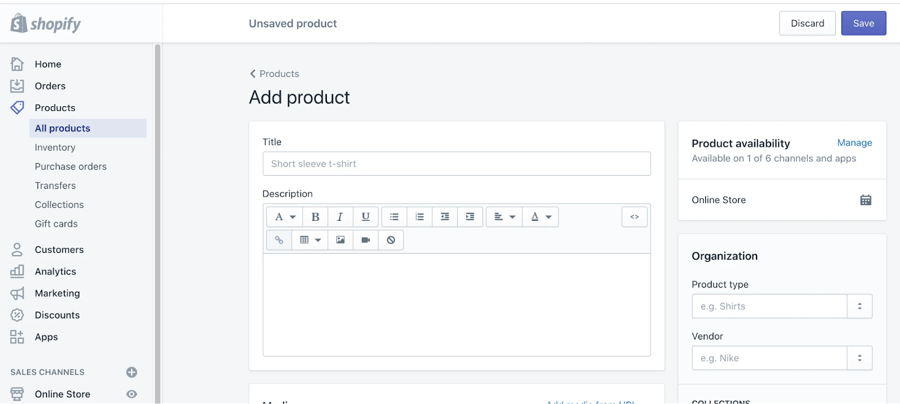
How to add products to your Shopify store
Once you have settled on a theme, you can get to the main part of setting up any store, adding your products.
To add your products on Shopify, follow these steps:
- Using the navigation bar on the left of the page, select ‘products’
- Select ‘add products’ in the top right of the page
- On the following page, fill in all your product details. Make sure you include all the necessary keywords when adding products at this stage.
- Now you can add your product images. Try to make sure your images are clear and will meet sales channel regulations.
- Once you have filled out all the details, click ‘save product’.
Source: Shopify
Using this method you can add products to Shopify. But if you like, you can also duplicate a product or edit a product instead.
When duplicating a product, you have the option to copy one or more of the following details:
- Images
- SKU’s
- Inventory quantity
- Barcodes
If you do not select any of these details (you choose to leave them blank) then the details will also be blank in the duplicate product. With duplicates, all other details will be copied from the original products - with the exception of videos and 3D models.
If you do wish to duplicate an existing product, follow these steps:
- Click on ‘products’ then ‘all products’
- Select the product you wish to duplicate
- Click ‘duplicate’
- Enter a name for the duplicate product and then click ‘duplicate product’
- You can then modify the details of the product as you choose
All duplicated products are automatically set to ‘draft’. So if you want them to appear on your sales channels, you will have to change their status to ‘active’.
You can also choose whether you want the duplicate product to be available on the same channels as the original product. If you do select this option, the duplicate product could be automatically published - however, this is dependent on the channel.
If you are looking to edit an existing product instead, you can follow these steps:
- Go to ‘products’ and then select ‘all products’
- Select the product you wish to edit
- Edit the product details and make any amendments
- Click save
It should be noted that any edits take immediate effect. Changes made can also alter your reports and make the information less reliable.
Customize your shipping settings
Shipping also plays a significant role in how you sell on Shopify. Therefore, you need to put some time aside to perfect your shipping settings.
Here are some of the things you need to consider when deciding upon your shipping settings:
- Your shipping rates and methods
- The products weight
- Packaging preferences
Shipping rates and methods
When deciding on your shipping rates and methods, you should consider a few different factors.
- Firstly, you need to know whether you are going to pass the full cost of shipping to your customers, offer a flat rate of shipping to absorb some of the cost, or base costs on customer locality?
- Alternatively, you could also make shipping free for your customers. So what impact will each method have on your business?
Free shipping means you will have to cover all the shipping costs. This usually means a slight price hike in terms of the cost of the products themselves.
Despite the price hike, customers seem to generally prefer to pay more for a product and receive free shipping.
Alternatively, you could only offer free shipping over a certain order value. This is a common technique used by many vendors, as it offsets the costs of shipping with further purchases.
Alternatively, you could charge customers for all the shipping costs. However, this may lead to inconsistent shipping charges.
Despite this downside, using real-time shipping costs allows customers to choose their delivery format from various courier companies, and get the best deal they can for themselves.
- Another choice is flat rate shipping costs, where you charge the same rate for every delivery. The key to a flat rate shipping cost is balance. Try not to charge too much to deter customers, but don’t make it too expensive for yourself either.
This strategy is most effective when you sell a smaller range of products that don’t differ too much in weight and size.
- Last but not least you can base delivery on locality - charging more for longer distances, and giving extra benefits to local buyers.
Local delivery can help alleviate all delivery costs within a certain area for both customers and vendors, whilst it can also help other local businesses if you offer collection.
Product weight
Product weight is another decisive factor you should consider when shipping your product.
- Firstly, you should find out the precise measurements and weight of all your product catalog.
- Then, check the distance between your business and the end destination. Once you have this information, you will have an idea of the exact cost for you to ship each item.
- There may also be further costs for the customer or yourself if tracking and/or insurance are requested.
If you are using Shopify in the United States or Canada, many couriers offer pre-negotiated fares at a cheaper rate. Outside the US and Canada, you will have to check individual providers for the best rates.
Packaging preferences
- Depending on what you are selling, you may wish to give your customers more than just standard packaging. Sometimes, the packaging is part of the experience.
Shopify allows you to choose your packaging, and then add that information to the platform. This allows it to add it to your costs and calculate the total for every package sent.
- Should you only need standard packaging, you can source it for free from most couriers, including DHL and UPS.
- Looking beyond the aesthetics of your packaging, you also need to consider the practicality of it. If you have a smaller product that doesn’t need any protection, it may be more economical to send it in an envelope.
Whereas a larger product or a product that requires additional material to protect it may be better sent in a box.
You can source a variety of packaging materials from Shopify’s merchants, so it may be worth having a quick look around for companies with discounts for other Shopify vendors.
And remember, try and keep the packaging as light and small as possible, whilst still protecting your product. After all, you pay for both size and weight.
Tracking, insurance, customs, and more
There are a few other things you have to consider when it comes to your shipping.
- The first things to consider are tracking and insurance. Tracking and insurance are offered by various courier companies, so you may wish to add them automatically to every sale you make.
Especially if it is part of the deal you already have with your courier. Alternatively, you could allow the customer to request it and pay a small additional fee.
Tracking and insurance can be particularly useful when it comes to pricier products, or those traveling a long distance to a destination - so a small fee per product can be well worth it.
The cost of tracking and insurance differs vastly between couriers. So make sure to look around before settling on a deal.
- Another thing to consider when shipping is customs. Customs forms and documentation are a necessity if you are shipping internationally.
You can get the correct forms and all information from your local post office. Forms are also available on Shopify if you already have the necessary information.
If any customs fees are due when the package arrives in the destination country, the customer will be responsible for paying them.
Therefore, it is important to note this to any customer purchasing from you by stating it on the shipping policy page. However, fees should not be necessary with the correct paperwork anyway.
Other shipping tips
Shipping is a highly customizable area of eCommerce. Here are just a few more ways you could save money or optimize your shipping further:
- Open a business account with your courier for better shipping rates and options
- Use a fulfillment service for better shipping and storage rates and times
- Use Shopify Shipping to speed up your labeling process
- Use Shopify Shipping in the USA and Canada to get a fuller shipping experience, including better rates and perfectly timed order pickups
Set up payment gateways
Customers like to have the ability to pay in any way they choose. It is not only convenient for them but also allows them to trust the platform further if it has their preferred method.
Shopify ensures that as a merchant, you can provide that kind of service to your customers. It does this through Shopify payments.
Shopify payments eliminate the need for any third parties. The build-in payment processor allows you to bypass all the different issues you may come across using a third party and lets customers pay in almost any way they like, in any currency they choose.
You can still use third-party payment gateways such as Stripe and PayPal if you choose to. However, most merchants see it as a step backward doing so.
Shopify payments have numerous benefits, including no additional fees for commission, and all payment information is readily available in Shopify. The downside is that it isn’t available in every nation yet.
Shopify payments are also relatively cost-effective, with the highest price coming in at 2.9% + 30c per transaction on the Shopify Basic plan.
With the more expensive plans, the cost reduces gradually. Using Shopify payments also sees any commission fee waived, and all customer payments can be made without the need for a redirect - keeping everything secure and in-house.
To set up Shopify payments, follow these steps:
- Go to the settings tab in the bottom left corner of your dashboard, and then click on ‘payments’.
- Provide the information requested about your business, including business type and address.
- Next, enter your personal information including name and date of birth
- You will then have to write a quick description of the services you provide as a business, before finishing off by entering your banking details.
Set up your sales taxes
Taxes are one of the most complex elements of selling online, especially if you are selling internationally. Thankfully, Shopify can help to resolve most of your sales tax issues for you.
If you do set up Shopify to automatically manage your taxes, you will need to ensure you regularly check to make sure the tax laws are up to date.
You also need to make sure you report and file your taxes to your national government (the country where your business is based) as Shopify does not do this for you.
It is also recommended that you double-check all the tax calculations Shopify provides with a professional accountant, to ensure you file everything correctly.
It is also important to check sales tax laws in your country or state when managing Shopify taxes. Sales tax laws can differ vastly from country to country (or state to state) so your Shopify sales tax can be significantly different depending on where your store is based.
To can perfect your sales tax on Shopify by using these rules:
1. Create shipping zones - Shipping zones tell Shopify where in the world you sell products.
You should create individual zones for each country and state, as some places charge tax based on the destination of a product.
To create a shipping zone:
- Go to settings and then shipping, before selecting ‘add shipping zone’.
- Then just give your zone an accurate name that is based on the location of the zone.
2. Set your tax rates - Next you have to set the tax rates for each of your shipping zones. This can be done automatically through Shopify.
All you have to do is:
- ensure you have your correct company address set for tax purposes
- and then go to settings > taxes, before adding in the necessary tax rates.
- You can then set all taxes to be calculated automatically based on the location.
3. Tax exemptions - Certain items in certain locations may be tax-exempt. Should you sell any tax-exempt items, you can create a product collection for the exemption to apply to.
To create a collection for tax-exempt products:
- Go to product > collections, and then select ‘create collection’.
- You then have to name your collection, before saving.
- Following that, go to settings > taxes, and select the country where your collection is exempt.
- After doing this, select ‘tax override’ and then select ‘add a tax override’.
- You can then choose a collection to override for tax purposes. This collection will then be calculated as tax-exempt on Shopify.
You can also download a number of plugins, such as TaxJar to help you monitor your Shopify sales tax, throughout the tax year. Plugins like these will help you to spot any tax rules you were unaware of well in advance, so you don’t end up missing out on any exemptions.
Choose a great domain name
Your domain name is the name in the URL that people see when visiting your store. This means it has to be memorable and accurate enough to search for, whilst also being relevant to your store and what it sells.
Your domain name will gradually become part of your brand identity, so getting the right domain name is integral to your success.
So just how do you choose the perfect Shopify store name?
Here are some ideas:
- Research current existing domain names - By researching existing domains, you can get a better idea of what you are competing with, as well as domains that are already taken.
- Use creativity wisely - Thinking of unusual domains is great, as they help you stand out from the crowd. However, don’t think too unusual. Otherwise, it is unlikely that anyone else will be searching for the name!
- Collect suggestions - You could ask friends, family, or colleagues. But regardless of who you ask, it never hurts to get a range of suggestions from different people. You never know where the best idea may come from.
- Test your name - Survey your demographic online, offline, or over both channels. Try to get an idea of whether they think the name is effective or not. And if not, where can it be improved. This could also be another opportunity to get further feedback and suggestions.
- Try a brand name generator - If you’re stuck on the creativity front, a brand name generator might help to push you in the right direction. Shopify even offers its own brand name generator, but you could also try Oberlo or another competitor.
- Include relevant keywords - Keywords are often the way people stumble across brands and products. So a URL domain that includes relevant keywords will always help your store succeed.
Try to find the most consistently relevant keywords to your area of expertise. Once you have found them, using them in your domain name could help you to attract your demographic with little to no effort.
How to start selling on Shopify
Now you know how to set up your Shopify store. But how exactly do you go about making sales on the platform?
Here are some tips on how to start selling your products on Shopify by reaching your target audience.
Generating relevant traffic for your store
An integral part of successfully selling on Shopify is to generate relevant traffic for your store. The more relevant traffic you bring in, the more sales you are likely to make.
You can generate traffic for your store in a few ways. Traffic can be generated through social media, referral, advertising, email marketing, or even direct marketing.
Some of these methods will be more effective than others for certain types of business, so be sure to do your research prior to settling on a main medium to target your customers.
When deciding on your approach, you should also consider these factors:
- The amount of effort, experience, and ability you need in the field to conduct the approach. For example, a pay-per-click advertising campaign may need more time and expertise to be useful to you.
- The cost of the approach you intend to take. There are many free ways to generate traffic, such as Google Shopping’s free listings. So if you are on a tighter budget, you can still reach your target market.
- The potential of the approach. How profitable could it be for you? And how much relevant traffic can your approach generate?
- Whether you are aiming for a short-term, or long-term impact. Short-term tactics may see faster results, but may also cost more and need maintenance. Long-term tactics will take longer to have a positive effect, but may not drain your budget all at once and can be maintained over a period of time.
- The amount of time it will take for your approach to successfully return your investment (ROI). The can be measured in any period of time you perceive is relevant to the campaign.
Popular methods of generating Shopify store traffic
If you are looking for inspiration on how to generate traffic for your Shopify store, here are a few ideas:
- Google Shopping’s free listings
- Facebook promoted listings
- Instagram product ads
- Referral programs
- Email marketing campaigns
- Guest posting
- PPC ad campaigns such as Google Text ads
- Sponsor relevant products, brands, events, or anything else that could help
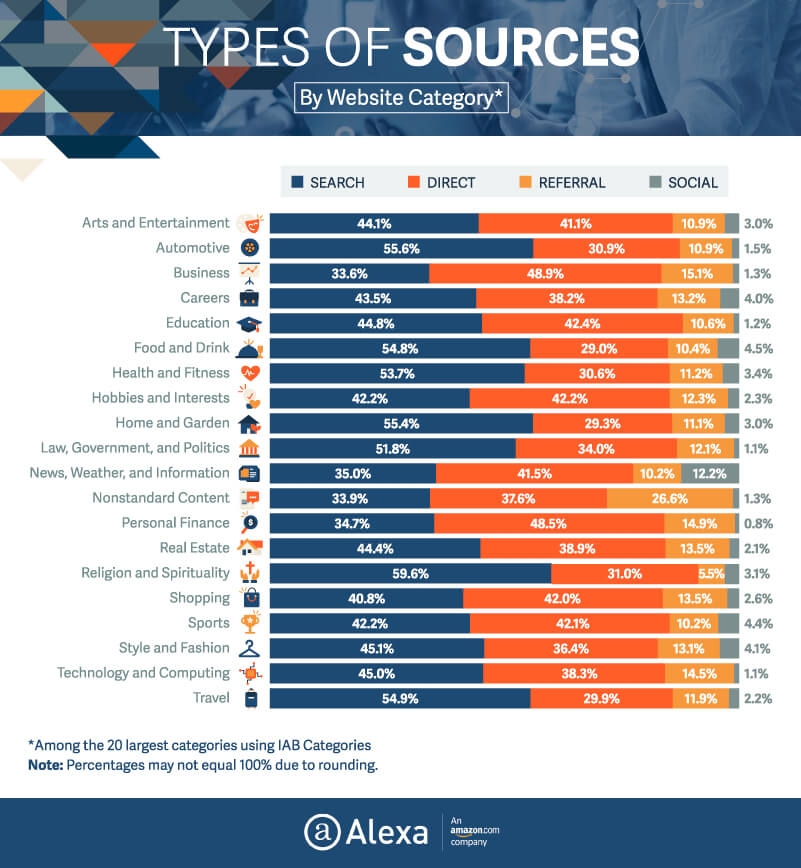
The best SEO practices for Shopify stores
Another effective way of making sales on Shopify is to optimize your SEO. This can be done in a few different ways, such as:
Optimizing your website structure
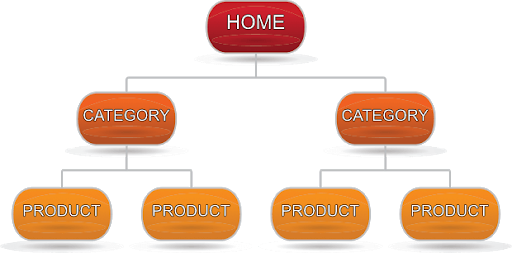
A clear website structure goes a long way to helping both Google and customers better understand your website.
Easy navigation will encourage shoppers to spend more time on your website, whilst a simple design helps search engines crawl through your pages.
Try to ensure it only takes 2-4 clicks to reach specific items. An example of this could be to have a homepage that leads you to categories and then product pages from there.
Source: OptinMonster
Creating a good website experience
Another factor that can help your SEO is to create a positive website experience.
By this, we mean creating an aesthetically pleasing website that loads quickly and is highly responsive across all devices.
You should try to avoid clutter as it makes it difficult for customers to find their way around your site.
Conducting effective keyword research and targeting
Keyword research and targeting are the most significant part of SEO. To create the perfect product pages to draw customers in, you need to use the perfect language.
You can find the ideal wording for your titles and descriptions by doing keyword research.
Research can be done through various free and paid keyword research tools. You can also try putting yourself in your buyer’s shoes, and then creating buyer personas from what you find out.
This will help to give you a better idea of what your customers are searching for.
Creating perfect product pages
Once you have the perfect keywords, you can then work on improving things further by optimizing your product pages.
This can be done by giving them an easy to read layout. You can also further the impact of your keywords in your listings by ordering them in a specific way, which is dependent on the product you’re selling.
 Using content and social media marketing
As well as your copy in titles and descriptions, you can also use other areas of content marketing to improve your SEO.
Outreach to get more backlinks is just one way to draw further visitors to your website. But you could also try using industry influencers or social media content to funnel customers in. Partnering with a Shopify agency can help you develop a tailored content strategy to maximize your reach and drive targeted traffic.
Using SEO tools and conducting regular testing
SEO tools are a great way to check how your website is doing, and what could be improved. You can also check data, and conduct A/B testing to ensure you are regularly improving and staying up to date with your website.
Here are just a few examples of great SEO tools that can help you stay on top of your SEO optimization:
Distributing your products via additional sales channels and marketplaces
Selling across multiple platforms can help to increase your Shopify sales. This is because your products will be visible to more potential customers, in their channel of choice.
By connecting your sales channels to Shopify, you can keep track of all your listings and orders in a single place. This makes mass distribution easier, faster, and more efficient.
Here are some of the most popular channels to sell your products on through Shopify, and how they can be linked up with your store:
Sell on Amazon with Shopify
To connect Shopify to Amazon you will first need a professional seller account on Amazon seller central. Then, all you have to do is install the Amazon app on Shopify and you’re ready to connect the two platforms.
Once you have the app installed, you will be able to sync your full inventory and manage everything through Shopify.
This includes all your orders and listings. You can complete the setup by following these steps:
- From Shopify admin, select the ‘+’ icon next to sales channels
- Next, click ‘Amazon’ and then select ‘add channel’
- Then select ‘Connect to Amazon’
- You then need to follow the prompts to allow information to be shared between your Shopify and Amazon accounts. After following these prompts, you will be redirected back to Shopify admin.
- Lastly, go to your user permissions in Amazon seller central and confirm developer access for Shopify.
Amazon is a great way to sell your products, as it is the marketplace that many customers around the world choose as their primary shopping platform, with many beginning their search for products there.
Once you have everything set up, you will have access to a wealth of new customers.
Sell on Facebook and Instagram with Shopify
Social media platforms are an increasingly popular way of selling products online. However, it may be challenging to manage all your social media commerce all at once.
That’s where Shopify comes in. By connecting your Facebook and Instagram with Shopify, you can sync all your products and listings, and manage them all in one place. One channel gives you easy access to Facebook marketing, Facebook shop, and Instagram shopping.
To connect the two platforms, you first need to have Facebook business manager set up.
Once this is done, you can set up the Facebook channel by following these simple steps:
- From Shopify admin, select the ‘+’ symbol, next to sales channels
- Then select the ‘+’ next to Facebook and click ‘update sales channel’
- After that, click ‘start set up’ on the feature you want to install and then click ‘connect account’
- You will then be required to sign in to Facebook and connect the necessary Facebook assets for your desired features
- Lastly, accept the terms and conditions before clicking ‘finish set up’
Sell on Google channels with Shopify
To connect Google channels, such as Google Shopping with Shopify, you will need a Google Merchant Center account at the minimum.
For full access to all campaign types, you will also need to connect to a Google Ads account.
To set up a Google channel on Shopify, follow these steps:
- From Shopify admin, select ‘sales channels’ and then ‘Google’
- Next, select ‘Connect Google account’ before clicking on your desired Google account. You will also need to allow Shopify access to your Google account information.
- After that, you can review the setup requirements for your store. Make any changes you deem necessary.
- Following that, go to Google, then Overview. Select ‘get started’ for one of the program options (free listings, marketing, or product feed).
- Finally, link your desired merchant center account from the drop-down menu.
Install Shopify apps to increase sales
One of the most useful features of Shopify is the number of apps available to install. Apps on Shopify help to bring new functionalities to the table, allowing vendors to take their stores to the next level.
So what are the best Shopify apps to increase sales?
Here are some free and paid options to enhance your Shopify store.
Free Shopify apps
- Sales notification
This free app allows you to encourage purchases through notifications. Notifications can help to highlight the popularity of a product to customers, and therefore create a sense of urgency.
- Ominsend
Omnisend takes email marketing to the next level. The email marketing tool allows you to send relevant emails to customers across multiple channels, from Facebook to Amazon. The smart segmentation used by the app ensures your email automation is targeted based on the customer’s own shopping trends, behaviors, and existing data.
- Oberlo
Oberlo is a marketplace of suppliers. The platform allows you to purchase and directly import products into your Shopify store from suppliers around the world.
Then, when you receive an order, you can fulfill it directly through the Oberlo supplier.
Thus, no need for storage fees, shipping, or packaging costs.
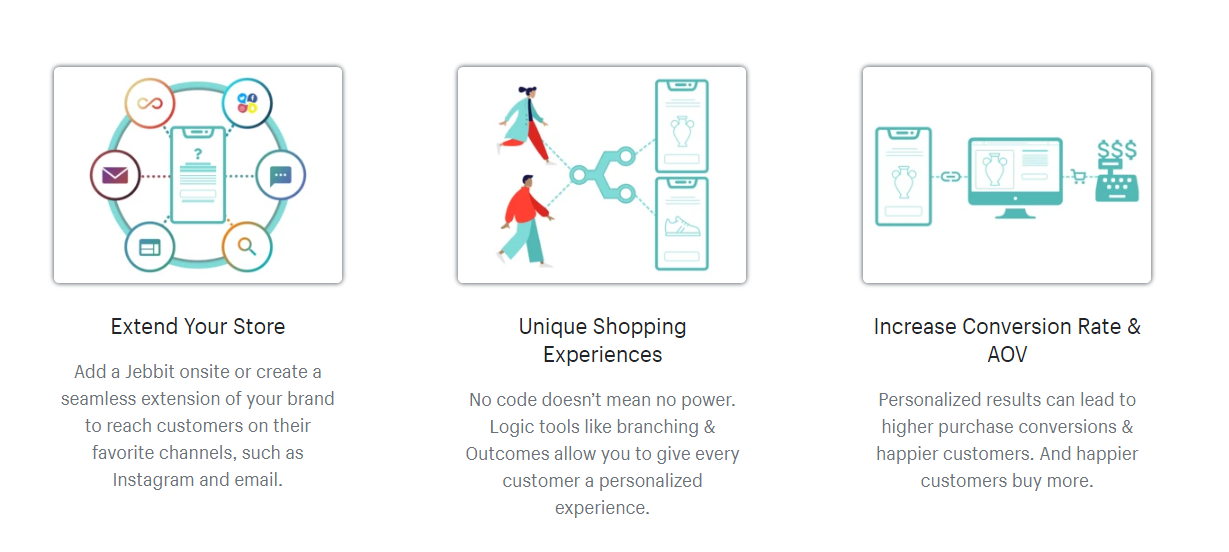
- Jebbit
Jebbit is a unique app that lets you create customized product quizzes for your customers to engage with. These quizzes can be used in a number of ways, but generally serve the purpose of allowing you to learn more about your customers, to enhance their experience when shopping with you.
For example, you can create shoppable quizzes to help provide customers with more accurate product suggestions and therefore increase sales. Alternatively, you can conduct a survey to collect feedback from an event you have run or a product line you previously released.
- Advoz
Advoz is the perfect app for those looking for assistance with their social media marketing. The app gives you access to certified professionals who can assist you with campaigns across multiple social media platforms.
These campaigns will help to funnel traffic to your store and improve your sales. However, you will still need a weekly ad budget, plus a Facebook business account for the app to work. You also need to ensure you have a product catalog on Facebook too.

Paid Shopify apps
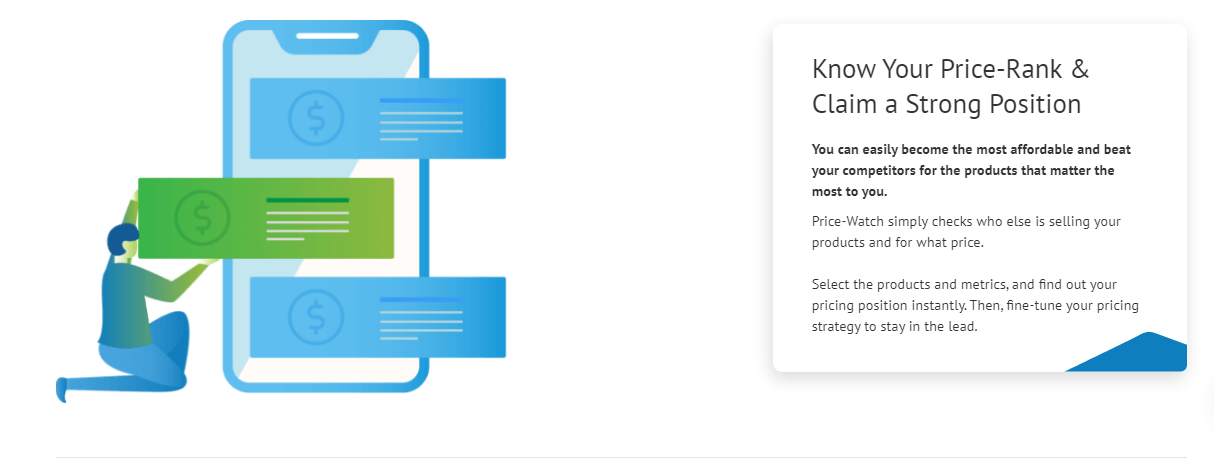
- Price Watch by DataFeedWatch
Price Watch is a handy tool that allows you to stay on top of your competitors prices. This app lets you automatically adjust your price based on a number of parameters, such as cheapest competitor, or 2nd cheapest competitor
By doing so, it allows you to continually have competitive pricing in your market sector.
- BeProfit Profit Tracker
The BeProfit Profit Tracker app leverages the power of automation and algorithms to provide you with the most accurate profit margin calculations - starting at just $20 per month.
First, integrations pull info from a multitude of sources (including your store, your ad platforms, and more) to give you total control over your business’s data. BeProfit then turns all of that complex data into easy-to-understand graphs and reports so you can track your ad spend, COGS, shipping, and every other aspect of your online store.

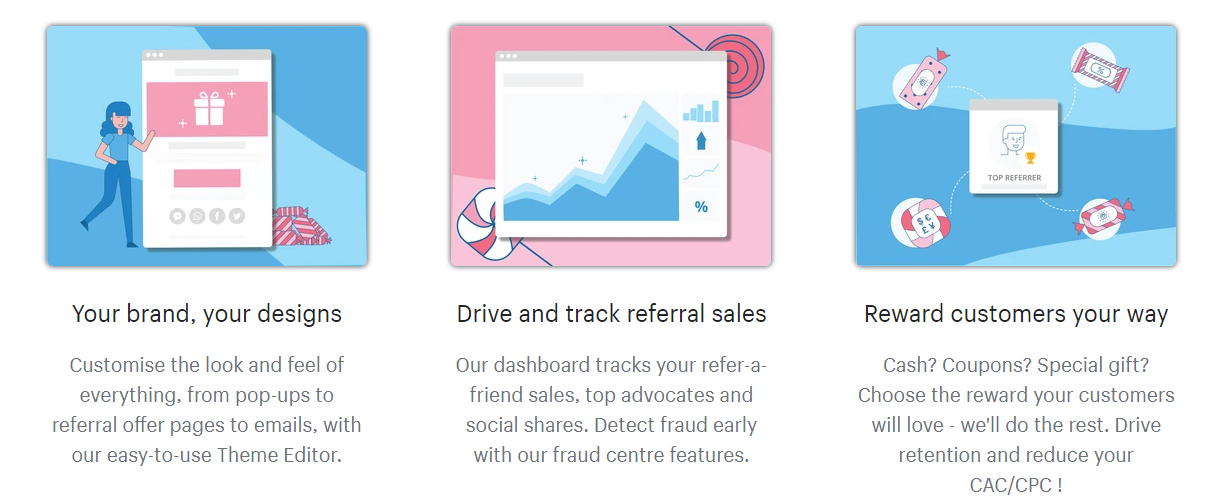
- Referral Candy
Referral Candy allows you to offer rewards to your customers who refer their friends to your business. For just $49 a month, you can offer rewards of your choice, with automatic delivery, and referral tracking.
- Plug In SEO
Plug In SEO allows you to troubleshoot your SEO issues, and drive more traffic to your store. The free version of the app offers a good deal of features, such as automatic checks on your titles and descriptions.
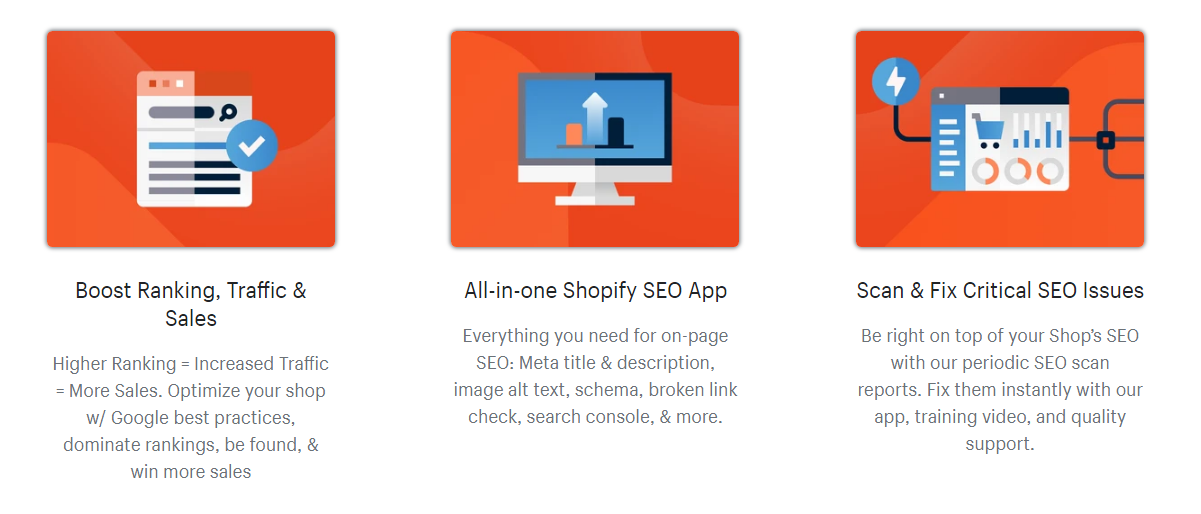
However, the paid app adds even more features to your arsenal, including multilingual SEO and bulk editing. The paid version is just $20 a month.
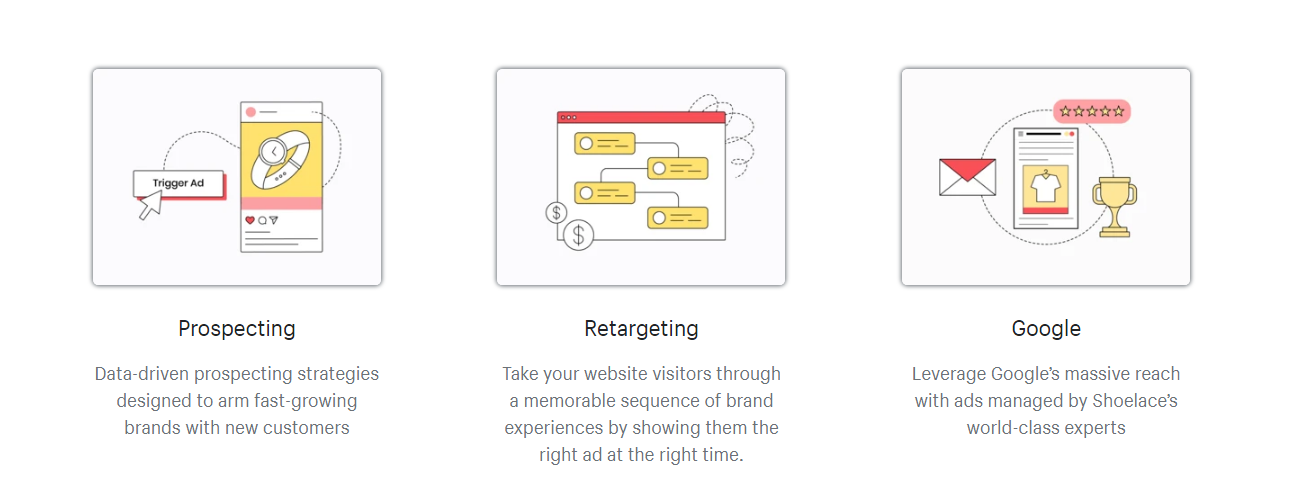
- Shoelace
This app is ideal for automated retargeted advertising campaigns. The app targets customers who have previously shown interest in your products, across the entire customer lifecycle. Shoelace will set you back $249 a month, for stores with 15,000 monthly traffic.
- Instafeed
Instafeed is the ideal tool if you aim to sell on Instagram. The app allows you to publish custom Instagram feeds on your Shopify store, allowing you to showcase user-generated Instagram content or your own feed. Instafeed is available on a free plan, but for all features, the app costs $9.99 a month.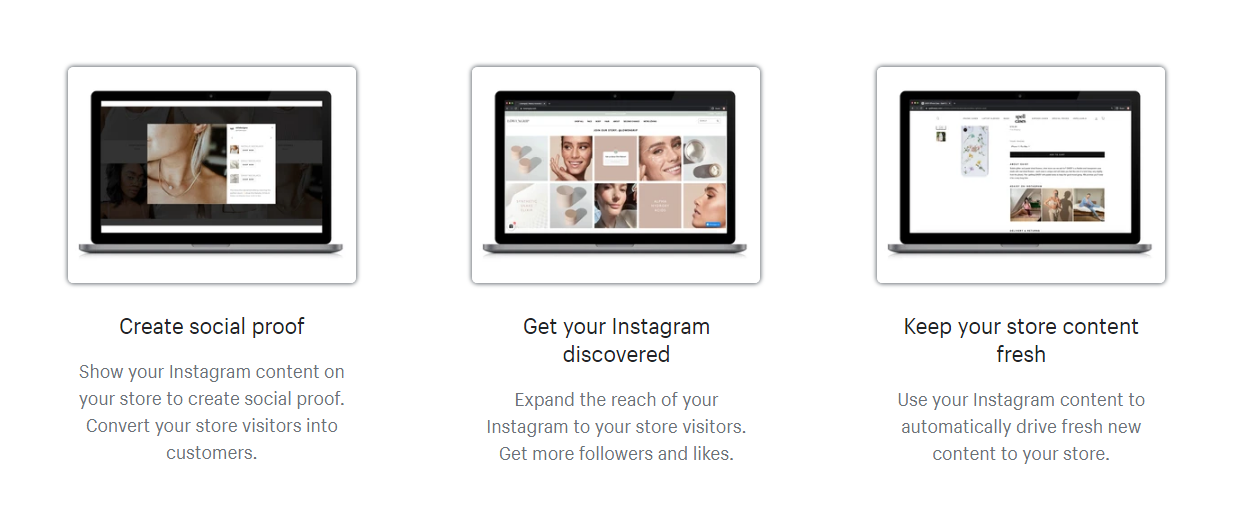
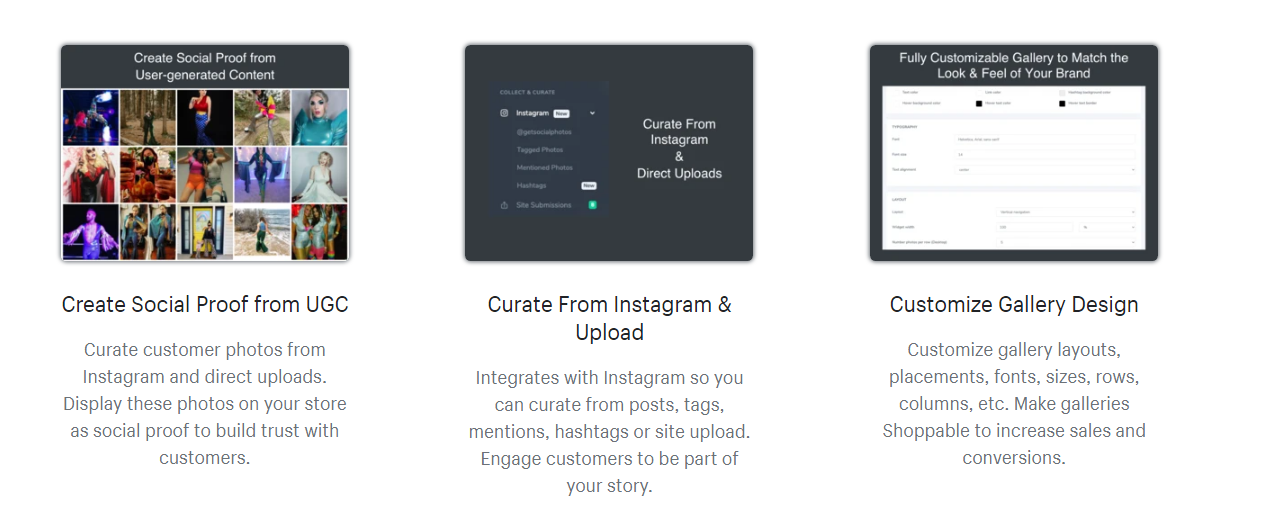
- Socialphotos
Socialphotos is another very useful social media based app for Shopify. The app collects real-time photos of your products, purchased by your customers on social media.
It then generates social proof of the quality of your products by showcasing these visual reviews on your store. Costing between $10-$50 a month, Socialphotos is an ideal tool to gain customer trust through your other loyal buyers.
Track the performance of your Shopify store
Measuring the success of your Shopify store is important. By using quantitative measurements, you can use A/B testing to find ways to improve your sales in the future and increase your profitability.
Most of your Shopify store’s performance metrics can be seen via the Shopify overview dashboard. The dashboard shows key sales, visitor data, and orders for any date range and channel of your choice. You can also compare channel performance, check average order value, and even see which geographical region is providing you with the most sales.
Should you want to make any changes to the metrics dates visible on your dashboard, follow these steps:
- From Shopify admin, go to Analytics and then Dashboards.
- - If you want to see a different date range (as opposed to the standard data shown) click the date menu and choose your desired date range. You can also select a preset range. - If you instead want to see comparisons within a date range, select ‘compare to previous dates’ and enter the dates you wish to compare.
- After you have selected your parameters, click apply.
Shopify FAQ
How much does Shopify cost?
Shopify’s cost varies depending on your choice of payment plan, and quantity of sales. Base prices range from $32 a month for the basic package, to $399 a month for the Advanced Shopify package.
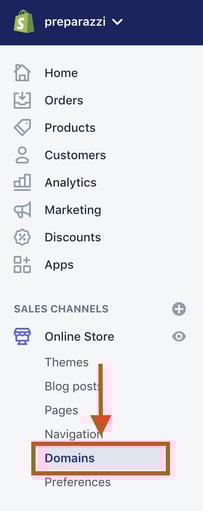
How do I get my own domain name with Shopify?
You can get your own domain name with Shopify by purchasing it through the domains section of the Shopify online store.
 Source: Maisieai
How can I change the name of my Shopify store?
You can change the name of your Shopify store by going to the general section of your store settings. There you will see your store name. Simply enter a new name and save.
How do I add products to Shopify?
To add a product to Shopify store follow these steps:
- On the left of the page, select ‘products’
- Select ‘add products’ in the top right
- On the following page, fill in all your product details.
- Next, add your product images.
- Once you have filled out all the details, click ‘save product’.
How to remove ‘Powered by Shopify’ from my store?
To remove ‘Powered by Shopify’ from your store, follow these steps:
- From Shopify admin go to ‘Online store’, and then ‘themes’.
- Find the theme you want to amend, and select ‘actions’, then ‘edit languages’.
- Fill in the filter translations box with the word ‘Powered’.
- Then in the ‘Powered by Shopify’ box, type a single space.
- Should you need to, repeat these steps with the ‘Powered by Shopify HTML’ box.
- Click save
How to set up Google Analytics for my store?
To set up Google Analytics for your Shopify store, you need to have a Google account that is signed up for analytics tracking.
You also need to ensure you choose the data you want to track. After that, you need to enable Google Analytics and turn on eCommerce tracking.
Final thoughts - Selling on Shopify in 2025
If you are looking to start selling online, Shopify is one of the ideal places to start. The platform guides you through the basics of selling online quickly and easily, with pricing packages to match that of a startup business. However, should you decide to build on your store, the platform also has everything you need to take things that step further.
As Shopify continues to grow, so do the possibilities it brings to its merchants. The self-described ‘all in one eCommerce platform’ has succeeded in making online selling accessible for all. And in 2025, it is set to continue in its role of a customizable eCommerce platform for all comers.
Read also: How to Sell Shopify Products on TikTok: The Ultimate Guide