How to Properly Match Shopify Fields with Google Shopping Attributes
10 min read
Developing your online presence by creating thorough, well-performing ads has become more and more accessible thanks to the many channels, eCommerce platforms and tools available. Shopify is one of those eCommerce platforms which serves as a base for all of your product data.
If you're wanting to create powerful Google Shopping ads, then this data can be exported from Shopify and used as your product data feed. We'll be focusing on the differences of how data is labeled and how to transfer that information successfully. We've put together this guide to lead you through exporting your product data from Shopify and using it to map your Google Shopping feed with DataFeedWatch.
Because Google is “reading” your data feed, it needs to be structured in a digestible way. Then Google can make sense of it and match your ads to the most relevant and appropriate search queries. When your product feed speaks Google’s language, your ads will perform better. It will also prevent your ads from getting disapproved right off the bat or getting your account suspended due to data errors or violations.
Invalid or insufficient information in your data feed can actually lead to loss of sales. Even if you have all the required fields complete and correct, your ads could still not show up for searches that they should.
Shopify fields vs. Google Shopping feed attributes
Across different platforms, feed attributes will be called by various names which can cause confusion at times. In some cases like with ‘URL’ and ‘Link’ it’s easy to tell they mean the same thing, but often the connection between the Shopify fields and Shopping feed attributes can make for a good head-scratcher. The same general idea is there, but you need to know what you’re looking for. It’s made easy with feed optimization since you can reuse your feed and adapt it to any channel.
When you’re mapping out your feed, each channel will have a set of required fields. But it’s a good idea to add as many optional fields as you can. They’ll only make your ads more relevant to searches. In this article, we will focus on matching the Shopify product data with Google Shopping feed attributes - the right way. To do this, you’ll primarily need to use the rename rule. The attributes in the blue boxes are the Google Shopping names, the ones in the drop-down menu come from the data imported from Shopify.
Required attributes
SKU or variant_id → ID
Product IDs are unique identifiers. This one may seem like a no brainer but the challenge may occur if you’ve previously used one of Shopify’s native apps to list your products on Google Shopping. In such cases, it’s likely the item IDs submitted to your Google Merchant Center account were automatically structured as shopify_{2-letter-country-code}_id_variant id.
Eg. shopify_US_12345678_123456789
Changing your Google Shopping product IDs after you’ve already run campaigns resets the item transaction history, and what comes with it - the ad’s quality score (QS). But, no worries! Keeping the previous structure isn’t a problem. You can easily recreate this structure using DataFeedWatch’s combine rule and keep the same IDs. It’s not mandatory, but you’ll be able to keep your transaction history intact.
In other cases - you can simply match the ID attribute with SKU (as long as it’s unique and available for every product) or variant_ID in your Shopify feed.
Why go for SKU?
Many advertisers have an internal system established for SKUs that helps them distinguish the products quickly. For example, you could have decided that all your products within the apparel category will be assigned a SKU that starts with ‘AA’, while items fitting the home & decor category can be identified by ‘BB’ in the SKU.
If this sounds like you - you may want to utilize SKUs as item IDs to be able to easily tell how each item is performing inside the Google Ads interface. And simplify shopping campaign management on a product level (useful if you have a smaller product catalog).
Why go for variant_id?
Variant_ID is a safe bet as this field is automatically generated by Shopify for all your products. This means it’s always populated and it holds a unique value per each item, including all its variations.
All in all, the item ID will not have an impact on your ads performance. To get it right you need to use a value that is unique for every product, parent or child, and you’re all set!
Title, global_title_tag or attribute combination → Title
Title
This one is pretty intuitive, you can match your title Shopify field with Google Shopping title attribute if you want to keep them all the same. However, if you’d like to change your title from the way it was in your Shopify store, you can do that as well. With Shopify, each product can only have one title. But Shopify also offers the use of meta fields.
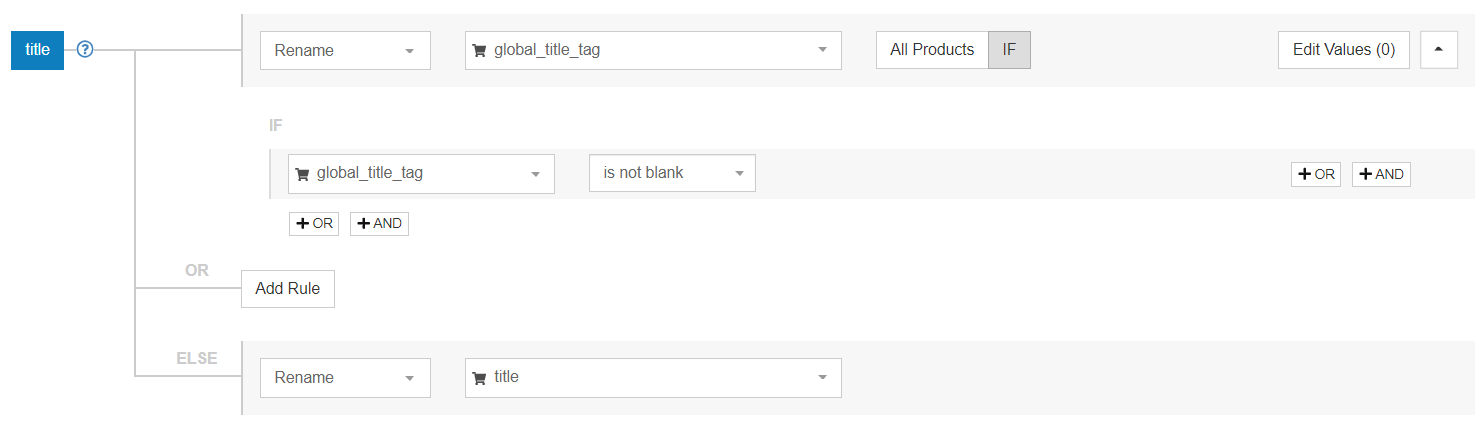
Global_title_tag
Let’s say your Shopify product titles are just fine for your store the way they are but aren’t fully where they should be to compete on Google. Global_title_tag is a meta field where you may keep an alternative version of the product name - one that is more suitable for SEO and/or your shopping ads. That version could be utilized for your shopping feed.
And what if you have ‘global_title_tag’ available for only part of your catalog?
You can always set up rules that will give priority to this field whenever it’s available but will default to your regular titles if a given product doesn’t have global_title_tag assigned.
Combination of attributes
Another way of ensuring the right information is submitted within your product titles in your feed. Since you’re not able to set keywords for Shopping Campaigns, you’ll want to include as many in your title as you can. Start with the most important information first and make sure it includes the product name, brand and other details specific to the product. You can use any data from your Shopify store to create new titles for your Google Shopping Ads.
There’s a difference between body_html and global_description_tag. Body_html, which is Shopify’s default field for description, includes HTML tags, but not all the tags are going to be converted into a readable format.
The global_description_tag on the other hand is often used by retailers to create an alternative, SEO-optimized description. It may not always be in the raw data imported from Shopify, since it’s an additional meta field. If you have used this field for your products in Shopify it could be a good choice for your Google Shopping feed.
Note: If you are a DataFeedWatch user - no need to worry about html tags ruining the shopping experience for potential customers. The Google Shopping feed template in DataFeedWatch is set-up in a way that will automatically strip the html tags from ‘body_html’ if you choose to go with this field.
While seemingly simple, this attribute might cause a bit of trouble if you’re not careful. But luckily you can catch it before that happens. There’s a chance that your URL in Shopify and the one in Google Merchant Center (GMC) aren’t exactly the same. Reason being that Shopify URLs always contain ‘myshopify’ in the shop link, while the domain claimed in the GMC is oftentimes a simplified version of the full URL.
For example: Shopify xx-shop.myshopify.com Google Merchant Center xx-shop.com
That’s why it’s a good idea to double check if the domain URL you’re sending is the right one. If they don’t match - Google will return an error.
When you send the domain URL to DataFeedWatch, the Google Shopping template automatically adjusts the URL if you’ve submitted the Google Merchant Center verified domain when adding the channel in DataFeedWatch. If you haven’t filled in the claimed GMC domain in the channel settings, you can quickly fix it by using the replace rule.
To be certain that shoppers are directed to the variation landing page they clicked on and not the default product, use variant_url instead of URL. It ensures that their journey is a smooth one and you’ll also avoid any price mismatch errors. This is really useful for situations when variants have differing prices, like a phone model with more than one storage option.
Images → image_link
It’s common for merchants to forget to use their variant_images and use the default image instead. But if you have variant images it’s recommended to use them when you can. Especially for products with many different colors, for example.
Using the biggest possible version of your images is best. Make sure they line up with Google’s image size requirements so they get approved. It also depends on the type of product you’re selling.
Non-apparel images need to be at least 100x100 pixels, apparel images need to be at least 250x250. Any image can be no larger than 64 megapixel and no file larger than 16MB.
Among Shopify fields, the ‘image_1’ and ‘image_grande_1’ generally represent the biggest version of your default image from the product page.
If you’re advertising variations, analogically, you would go for ‘variant_image_grande’. Just make sure you set up a safety net in case not all your products have a variant image. The rule could look like this:
Mapping your price rule is fairly straightforward if you’re not planning on having any active promotions or discounts. If that’s the case, you can use the rename rule and it will simply look like this:
After that you can click on ‘Edit Values’ to add the currency to your prices for Google.
Sale Price
If however, you know you’re going to have discounted prices, it can get a bit more complicated. But don’t sweat it, we’ll go through what you need to do together.
The confusion comes from the fact that Shopify has a very particular set-up for pricing compared to other platforms. When there is a discount available, the regular product price actually ‘jumps’ from the price field into the ‘compare_at_price’ field. At the same time the ‘price’ field gets populated with the discounted price.
Let’s visualize it in a clearer way:
Example
‘Price’ in Shopify
‘Compare_at_price’
in Shopify
Current price in effect
Product A before promotion
$20
-
$20
Product A during promotion
$10
$20
$10
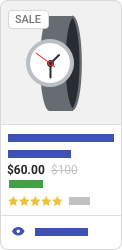
Submitting price and sale_price opens the door for you to show strikethrough pricing.
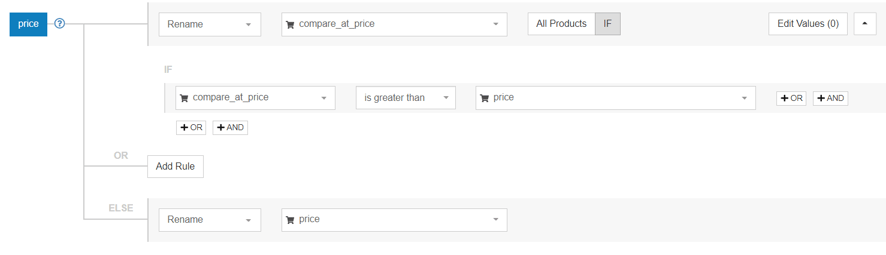
So, how would the rule look like if you’d like to provide Google with both the regular price and the discounted price?
In this case you will need to utilize 2 price attributes in your shopping feed:
Price (will send the regular product price to Google) - here’s what the rule should look like:
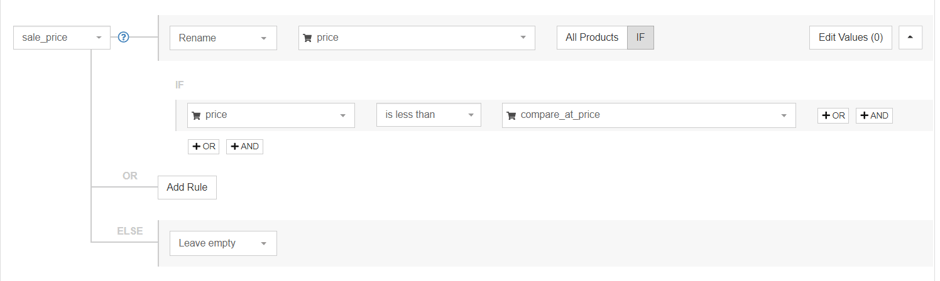
2. Sale_price (will send the discounted price to Google) - here’s what the rule should look like:
The current price will always be in the price field, whether that is the discounted or original price. So if you don’t care about letting Google or your customers know there’s an active promotion going on then you can simply rename price as price and be okay.
Vendor → Brand
Another simple use of the rename rule. Now every value that was listed as a vendor in your Shopify feed will be listed as the brand in your Google Shopping feed.
Other common ways of assigning brand in your shopping feed would be:
Adding your brand as a static value
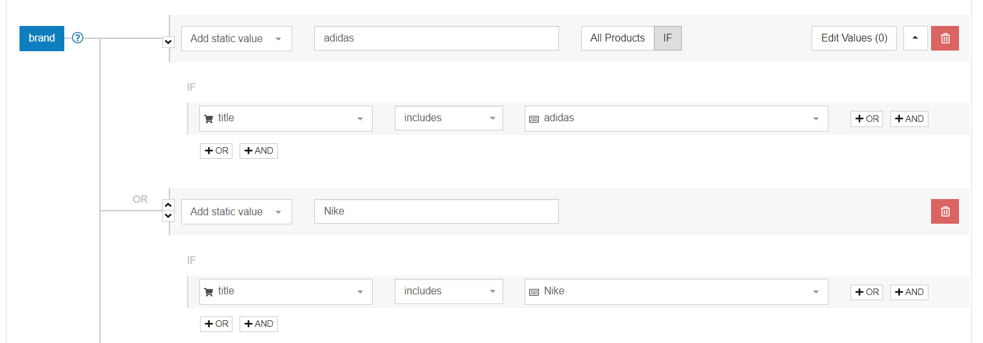
Perhaps you’d like to send your brand name as the brand to Google Shopping, while you have multiple suppliers under the vendor field. There’s a simple fix:
Extracting brand information from another feed attribute
In case you keep the brand information inside your product titles or descriptions (body_html), but you haven’t populated your vendor field in Shopify - you can always extract the data with a quick rule:
Barcode or UPC → GTIN
The choice depends on where your GTINS are located in your Shopify store. Barcode is more common, but you might also see your Global Trade Item Number (GTIN) located in a field called ‘UPC’ (Universal Product Code) instead.
DFW_availability or quantity based rules → Availability
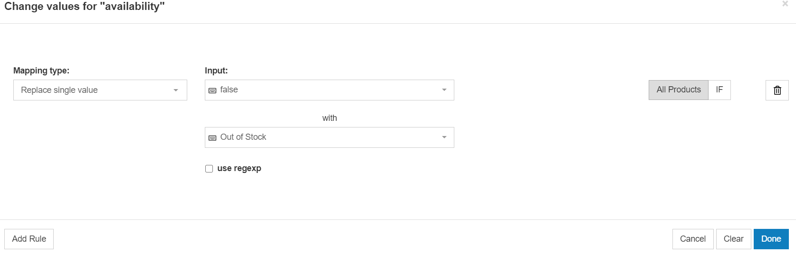
In Google Shopping you can only choose between three preset values when it comes to setting availability: In Stock, Out of Stock, and Pre-Order. Entering something other than these three or nothing at all can get your product disapproved.
If you find that your availability information was labeled differently in your Shopify store (eg. ‘true’ or ‘false’), you can quickly turn it around. Simply choose the ‘Edit Values’ option in the ‘Availability’ attribute and replace the values
Another option is to use dfw_availability which is a field automatically generated in DataFeedWatch. It will mark your products as ‘in stock’ or ‘out of stock’ based on the product information received from your Shopify store.
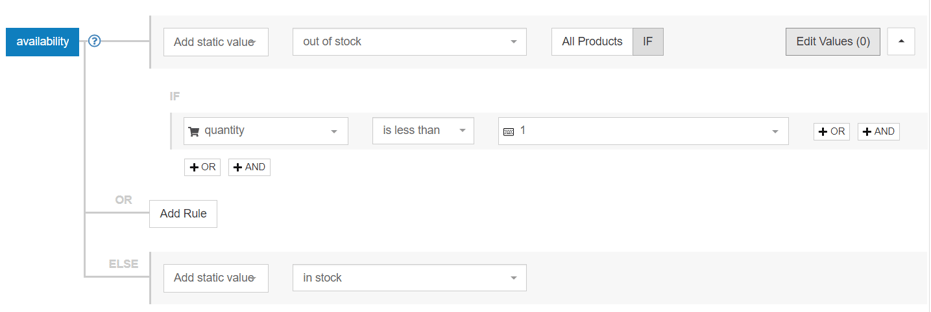
Finally, you can label your products as ‘in stock’ or ‘out of stock’ by using your quantity data. Here’s how the rule could look like in DataFeedWatch:
Optional attributes
Product type → Product type
For a way to further organize your inventory, use product_type. With Google Shopping campaigns product_type will allow you to create your own classification for your products which the google_product_category attribute doesn’t allow you to use.
In Shopify you can use them when filtering your products when logged in to your admin account or as a condition to create an automated collection.
If Google’s taxonomy didn’t quite cover the specific products you have, using the product_type attribute is a great way to get more specific.
Promotion_ID
This is a unique identifying code that you choose for your promotions to track sales made through them. They shouldn’t contain any spaces or symbols in the text. You can create a promotional ID when you want to apply a promo to a certain brand, season items, etc.
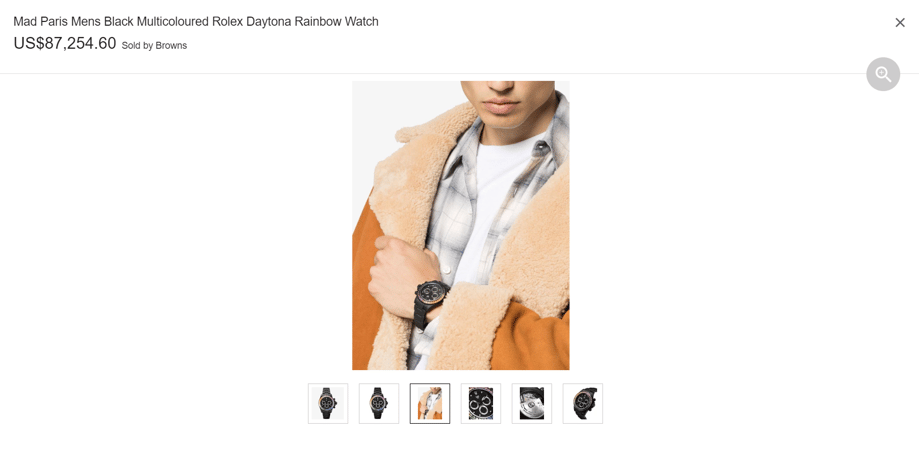
additional_image_link
Optimizing your images for Google Shopping can elevate your ads. If you have more than one image for your products, use them. Let’s stick with our watch example (we can dream a little with this one).
This carousel of images can appear in the Shopping tab when you have more than one image for a product. It’s a good idea if you have different angles of your item or even a lifestyle image like shown here. You can add this field again for each additional photo you have.
Grams → Shipping weight
Here is another example of all not being what it seems at first. If your delivery costs are dependent on the weight of the products you’re selling then you’ll need to add the shipping_weight field. The attribute itself is called ‘grams’ in Shopify, but don’t be fooled by this. The unit of measurement downloaded isn’t always going to be in grams and often just the value of the weight is downloaded but not the unit.
Google has specific requirements for how the shipping weight is labeled so you’ll just need to add in this information. A quick way to find what unit the product’s weight is measured in is heading over to ‘Shop Products’ in DataFeedWatch. Customize your columns to show shipping_weight and see what the numbers look like.
It’s pretty safe to say that 1100.0 for a pair of leggings is measured in grams. So now you can go back to your mapping and create your rule.
If it had been measured in kilos or pounds we would have typed in that unit instead.
With this information handy you’re all set to tackle interpreting the relationship between Shopify fields and Google Shopping attributes.
Optimizing your product feed is an essential step for selling on any channel, especially Google Shopping. Taking the data from your Shopify account and translating it into a Google Shopping feed gives you a head start because you already have most of the information you need. It’s just a matter of creating rules and mapping. Using a feed optimization solution like DataFeedWatch in this process will save you time, money and will also help you keep the process automated in the future.
Read More About How to Increase Your Shopify Store Sales:


.png?width=900&name=replace-domain-feed%20(1).png)


.png?width=1002&name=availability%20(1).png)