One of your most valuable campaign audiences are the ones who have already showed interest in your products. Google offers an ad type that allowed you to directly target this group of people.
Reaching this specific audience can be achieved by creating remarketing campaigns. They allow you to show ads to people who have already come into contact with your website or app. By being reminded of your products and your brand, shoppers will be more likely to make purchases from your store.
Keep reading for your complete beginner's guide to setting up your campaigns, create specific audience lists, using remarketing tags, and more.
What is Google Remarketing?
Remarketing is a digital campaign strategy that serves as a "friendly reminder" to your website visitors about a product or service they have already interacted with or looked at but did not purchase.
With remarketing, you promote yourself by following your visitors after they leave your website and showing them new ads for the same products and services they have previously shown interest in.
Remarketing remembers all information about your visitors and all actions they have taken on your website:
- Whether they have visited your website
- Whether they have used your app
- What they have shown interest in
- What they have looked at
- Whether they added your product to their cart
- Whether they made a purchase
Based on all that data, you know who exactly your visitor is and what exactly you need to present to that visitor to get his/her attention and increase your chance of a sale. Remarketing is one of the most effective campaign strategies with a very high conversion rate.
Back to Top or ![]()
How Does Google Remarketing Work?
Google uses cookies to track users’ behavior. A cookie is a small piece of code stored in internet browsers. Cookies are often used to distinguish visitors on your website. Every time a user visits your webshop or completes an event on your website, Google or Facebook stores a cookie ID on the user's computer, tablet or mobile phone.
Each cookie is assigned a unique ID. If a user visits or performs an action on either your website or app, it is registered and the specific customer data is added to a remarketing or retargeting list. Such a list is an overview of all the visitors that Google has collected customer data on. The message is forwarded to the platform where you have set up your advertising for remarketing. Based on how you have set up your campaign, specific people "from the list" will be exposed to your remarketing ads.
A tag (Google remarketing tag) or must be placed on your website or app in order to collect data. To do so, you need to be familiar with the code on your website or you will need the help of a developer.
What are remarketing campaigns?
Remarketing display and search campaigns are means by which you can reach a highly valuable audience - one that is a significant part of your company’s sales cycle. This group of customers is populated by those who have already visited your website, or engaged with your brand online in some way.
They are, therefore, crucial in establishing a long-term customer base, who return to make repeat orders.
Types of remarketing audiences:
Google offers two main types of remarketing audiences or lists, which we will be covering below:
1. Google Ads Customer Match List
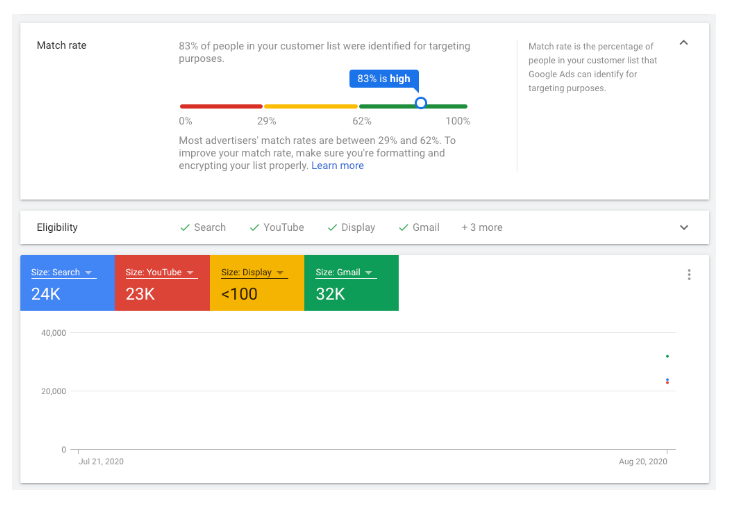 This service enables us to upload our collected customer email address lists directly into the google ads platform.
This product has been designed in order to allow sellers to reach their most valued customers, from within the Google Ads platform itself. These email address lists are then matched to profiles on Google Chrome, enabling us to target any of these users who are ‘signed-in.’
Notably, users are able to control the ads they see when logged into Google Chrome. This includes ‘Customer Match ads.’
Should a customer want to prevent their browser showing your ads, they’re able to opt-out of ‘personalized ads,’ or mute / block the individual ads in Google Ads Settings.
Customer Match is not available for all advertisers as there are certain requirements that have to be met before this option is available. Additionally, customer match lists are not available in all countries, to find out more, view the Account Requirements.
These ‘Similar Audiences’ enable us as marketers to reach new audiences. This expands our overall reach in a highly refined way using collected customer data.
Collecting Customer Information
You are only able to upload customer information that has been collected via a first-party context, in which customers have explicitly shared their information willingly and directly with you. This includes websites or physical shops where customers have purchased items from you or signed up to receive marketing messages.
Data Protection
Ensure your lists are compliant with your country’s data protection requirements for cold emails. Specifically in the EU, recent General Data Protection Regulation requirements suggest that email lists ought to be updated on a 30-day rolling basis, with any customers who have not replied within this time-frame being removed from marketing communications.
It is also recommended that you ensure you're complying with any relevant laws and regulations stipulated by Google, including self-regulatory or industry codes.
You must make sure that your website’s privacy policy discloses you may share customer information for the purpose of performing services on your behalf, with other third party firms.
Additional Restrictions
You are prohibited from the following:
- Running ads that collect personally identifiable information;
- Uploading information for any customer who is under the age of 13 or that was collected from any site or app directed to children under the age of 13;
- Creating ad content which implies knowledge of personally identifiable information or sensitive information about your customers (see below for more information);
- Advertising products related to sensitive information, such as pharmaceutical products, in a Customer Match campaign (see below for more information); or
- Running any ads that are prohibited by Google Ads polices.
How To Set-Up Google Ads Customer Match List
Ensure you only utilize Google’s approved API when uploading your customer information.
- Log into your Google Ads account at https://ads.google.com/
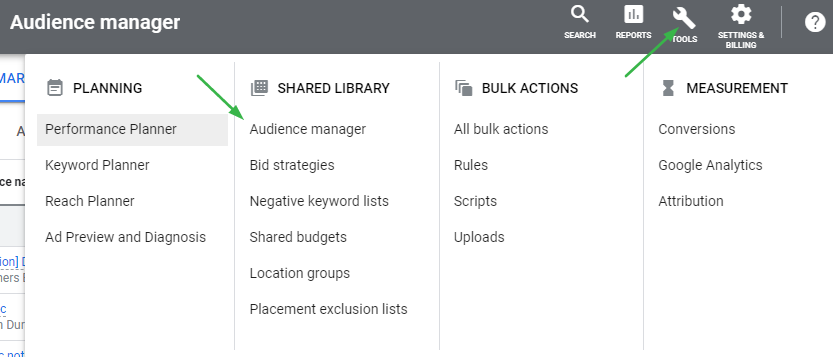
- Head to Shared Library > Audience Manager
- Click + Remarketing List
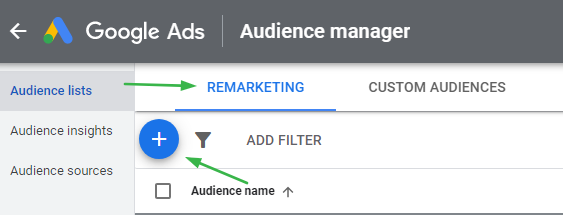
- Click + Customer List
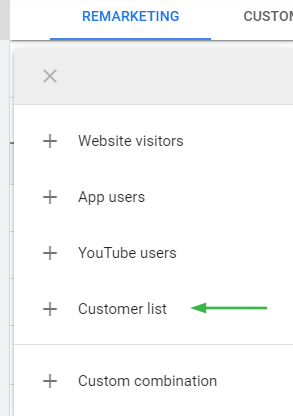
- Choose a name
- Select ‘Upload Emails, Phones, and/or Mailing Addresses’
- Select ‘Upload plain text data (unhashed)
- Choose a file - please see Google’s requirements
- Set a membership duration
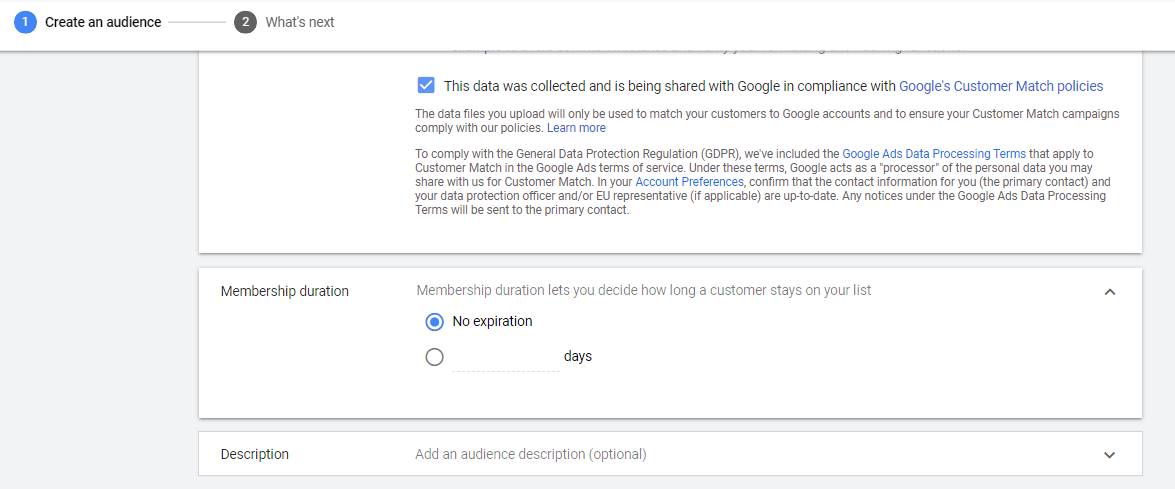
- Check the box “This data was collected and is being shared with Google in compliance with Google’s policies.”
- Select ‘Upload and save list.’ You will be able to view the progress of your file under ‘Audiences,’ which may take three hours for completion.
Additional Requirements
You are also prohibited from:
- Running any ads which collect personally identifiable information
- Uploading information for any customer under the age of 13
- Implying knowledge of any personally identifiable or sensitive information about your customers
- Advertising via a Customer Match List any products related to sensitive information.
Back to Top or
2. Google Ads Remarketing Audiences
Google Remarketing ads allows advanced targeting of target users who have previously visited the advertiser's website, app, and the specific pages they browsed.
First, remarketing lists are created, and then these lists are implemented into various campaign types.
How to set up your remarketing lists
Lists can be set up and used on Google Ads advertising platforms in two main ways:
1. By using Google Ads remarketing tag
2. By using Google Analytics tracking
1. Google Ads Remarketing Tag
To begin remarketing in this way, you need to add a snippet of code to your website that you get from Google Ads called a remarketing tag. This enables you to add the global site tag, and the optional event snippet.
This will then proceed to capture information about your website visitors and the pages they are viewing. This information includes page URL, page title, etc. The tag must be installed on each and every page of the website, but only once per each Google Ads account. Alternatively, a remarketing tag can be created in Google Analytics or Google Tag Manager.
The event snippet is extremely beneficial in tracking specific actions your visitors have taken on your website that could be useful for future advertising.
Notable examples are:
- Previous purchasers
- Cart abandoners
- Contact form completions
- Newsletter sign ups.
Advertisers have the ability to be as creative as possible.
Setting Up Remarketing Tag:
1. Sign into your Google Ads account
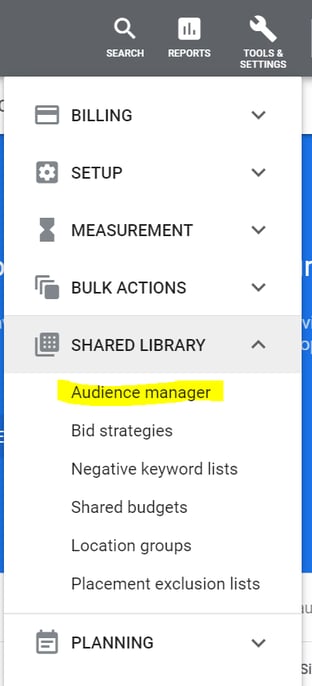
2. Click on the Tools icon in the top right > Shared Library > Audience Manager
3. On the left-hand-side, click Audience Sources
4. In the card labelled ‘Google Ads Tag,’ click ‘SET UP TAG’
5. Select either standard remarketing or dynamic remarketing data.
You are able to select to include ‘User ID’ as a parameter at this stage, which allows you to pass a User ID for each website visitor, thereby later allowing features such as cross-device linking.
To add the User ID tag:
I. Click the three dots ⋮ next to ‘Google Ads Tag’
II. Click ‘Edit Source’
III. Click ‘Advanced Settings’
IV. Select the ‘User Id’ check box.
Note: If this is grayed out then the account doesn’t meet the requirements to use a Customer Match List.
6. Select Create & Continue
7. The installation screen will then appear. This gives you a variety of options to then install the code on the website. You can copy the code and use Google Tag Manager.
8. Managers can install it, or download the tag and email this to your web developer.
| Tip - Be sure to paste the code between the <head></head> tags of the website. |
9. Please note, the event snippet should not be copied and pasted directly to your website, as it contains placeholder values which must dynamically be populated by your website developer when they integrate the snippet code. This code only needs to be added into the specific pages events occur, rather than across all web pages.
10. Click DONE. In the next screen, click DONE again.
Back to Top or ![]()
How to Create Remarketing Audience Using Remarketing Tag
1. Log into Google Ads
2. Click Tools & Settings in the top-right-hand corner
3. Select Shared Library > Audience Manager.
4. Click the Blue + button in the top left corner in order to create a new audience
using the Google Ads remarketing tag.
5. For example, click on Website Visitors to make a remarketing audience for all those who have visited your domain.
6. Name your audience
7. Create a variation of audiences based on your business objectives and overall marketing needs. Please see some further options below:
- Visitors of a page (input URL)
- Visitors of a page who have additionally visited another previous page
- Visitors of a page who did not additionally visit another previous page (for example cart abandonment audience)
- Visitors of a page during specific dates
8. Ensure the URL requirements are met, by either inputting specific parts of the URL into Google Ads, or certain words which fit a theme of the pages you want to include in the list. For example, a bed retailer may only want to target those looking at specific sizes and input the term ‘King’ into the ‘URL contains’ field.
9. Select the pre-fill options, which tells Google to pre-fill the list using people from the previous 30 day period.
10. Choose a Membership Duration, which determines how long users stay in the audience before being removed from this. The maximum duration available is 540 days.
11. Click Create Audience, which is the final step to secure the audience in Google Ad’s approval process. This can take up to 24 hours.
Back to Top or ![]()
2. Google Analytics Remarketing Tag
Alternatively, you’re able to use the Google Analytics tag as opposed to the Google Ads tag. This data can then still be imported into the Google Ads interface and used directly by advertisers.
For this you will need to ensure:
- You have the Google Analytics tag installed on your website
- A linked Google Ads and google Analytics account, with administrative access to the former, and edit access to the Google Analytics account
- Remarketing features enabled in Google Analytics
It is worth bearing in mind that there is a limit of 2000 Remarketing Audiences per each Google Analytics account.
Setting Up New Remarketing Audience in Google Analytics
To create an audience in Google Analytics:
1. Sign in to Google Analytics
2. Click Admin, and head to the Property you’d like to create your audience in
3. In the property column, click Audience Definitions > Audiences
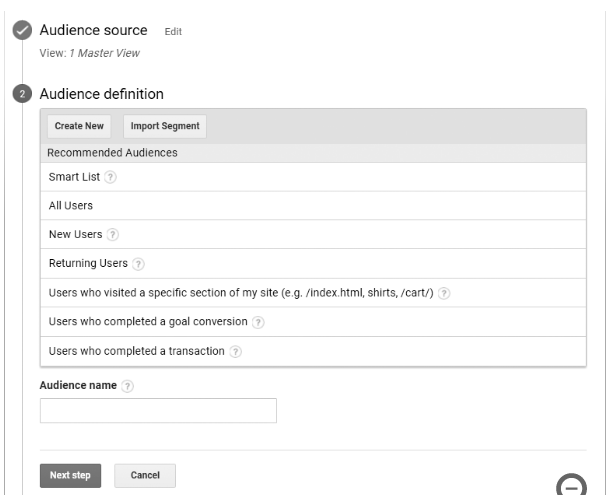
4. Click + New Audience
5. When choosing which audience you’d like to configure, you have three options:
I. Select a preconfigured audience:
- These include ‘All Users, New Users, Returning Users,’ etc.
- They also enable us to target users who have visited a specific section of the website, by entering the URL of the page you would like to track (this option uses the contain match types, and matches any URL containing the string entered here.)
- Users who have completed a goal conversion are also in reach here. Click edit > select goal. Please note only goals configured in Google Analytics are applicable.
- Users who have completed a transaction.
II. Create a new audience definition
- You can also create a new audience tailored to your specific marketing needs, based on a variety of conditions and segments you define. When you finish configuring your specific needs, click Apply.
III. Import a segment
- You are also able to import segments from your current property, to use as the basis of your defined audience
- Name your audience and then click Next Step
- Within the Audience Destination, use the + Add Destinations menu in order to choose which accounts you’d like to use these audiences within. Ensure to select Google Ads in order to push the list through to this advertising channel.
- Click OK and then Publish.
If you want to read more about how to create audiences in GA4 and use them for your remarketing campaigns check our article.
Back to Top or
3. How to Use My Remarketing Audiences
There are two main ways to integrate the remarketing audiences into your Google Ads campaigns. Both traditional Display remarketing and RLSA ads use cookies to track users who have previously visited the advertiser’s website, and add the visitor to remarketing lists.
- Google RSLA (Remarketing Lists for Search Ads) Audiences
- Google Display Remarketing
1. Search Ads (RLSA)
RLSA ads will only show on the results page when the user has actively searched on Google, using a keyword the advertiser is specifically bidding on. Using the search network, remarketing lists are added into existing search campaigns, and used in one of two ways:
- You are able to optimize the bids and make independent bid adjustments on your existing keywords, for those high-value individuals on your remarketing lists.
For example: you are able to increase your bid by 45% for users who have visited your website in the past 15 days.
- You can create campaigns specifically to only target people in your remarketing lists. Therefore, you can create distinct messaging or trial new search terms for those high-value customers who you already know have previously purchased or contacted you in the past.
The advantage of creating distinct remarketing campaigns is that a set budget can be focused on them. That makes it easier to track spending on the remarketing audience than with bid adjustment.
| Tip: The membership limit for such lists is capped at 540 days. |
Why Should Advertisers Use RSLA Ads?
RSLA ads are great for advertisers specifically because they target an interested audience at the exact moment they are looking for relevant products or services.
These tools greatly assist marketeers in re-engaging those who have historically shown an interest in the brand. This improves overall enquiry and purchase rates, while reducing shopping cart abandonment rates.
“69% is the average documented online shopping cart abandonment rate”
– Ecommerce Checkout Usability Study, Baymard Institute, Jan. 2017
2. Google Display Remarketing
 Google Display Remarketing is a fantastic way for advertisers to reach out to those users who have previously visited the website. It carefully offers a reminder of your products and services via the optimum channel, time and place.
Using image, video or text ads, Google enables us to showcase our ads on a variety of websites comprising of the Google Display network and YouTube. This captures an interested audience as they are browsing the internet.
Whilst the Search Network is a fantastic way to reach people while they’re already searching for specific products, the Google Display Network is a great opportunity to capture a potential customer earlier in the buying cycle.
You are able to push your ads in front of an interested audience before they’re actively looking, which is a key element to your overall advertising strategy.
What You Need:
- Custom Data Feed
- Custom Remarketing List
- Custom Code
How to Set Up Remarketing Audience within Display Campaigns:
1. Create a Dynamic Ad Campaign
- Sign in to your Google Ads account and select Campaigns from the page menu.
- Click on the Blue + button in order to create a new campaign
- Select the optimum ‘Goals’ from the offered suggestion, according to your business’ main objective
- From the ‘Campaign Type’ section, select Display Network
- Choose the parameters which most suit your marketing needs (campaign name, location, language settings, bidding strategy and budget)
- Additional settings also offers further options such as ad scheduling, content exclusions or device targeting
2. Create Data Feed:
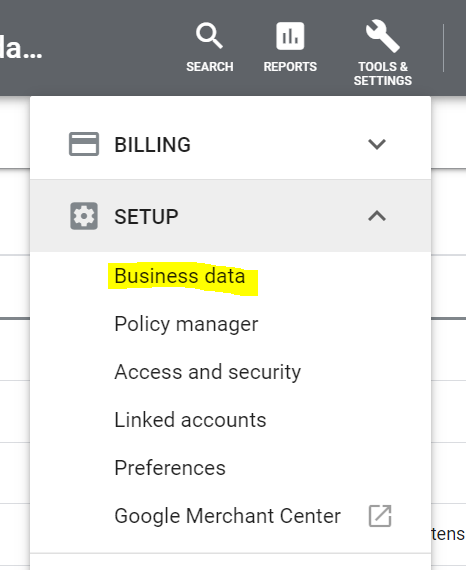
- Click Tools & Settings > Setup > Business Data
- Click the blue + button to add a feed
- Select Dynamic Ad Feed > Custom
- Download the Custom Feed Template
- Upload the completed Custom Feed
|
Tip: If you already run a Google Shopping Campaign then you can just use your Product Feed from Merchant Center. Remember that the Item ID collected by the remarketing list must be the same as theID attribute in your feed |
3. Create a Remarketing List
- Click Tools & Settings > Shared Library > Audience Manager
- Select Audience Source from the menu on the left
- Click the three dots ⋮ next to Google Ads Tag and Edit Source
- Select ’Collect data on specific actions people performed on your website to show personalized ads. ‘
- Select ‘Custom’
- (If available, you can also select to include the User ID tags)
- Save and Continue
4. Add the Custom Code
- Since you've updated the parameters, you'll need to reinstall the tag. Learn more
- Select how to add the code:
- Install the Tag Yourself
- Email the Tag to Your Developer
- Use Google Tags Manager (Recommended)
5. Insert remarketing list to the campaign,
- Under the People section, find Audiences and select Remarketing
- From your previously created remarketing lists (see above), you can tick the boxes next to each audience you would like to add
- Select save
| Please note, when creating a new Display Audience, Google Analytics repopulates the list with up to 30 days of data so that you are able to use the list in 24-48 hours' time. If you have less than 30 days worth of data, the data you have will be used. |
Types of Display Ads
Display ads can be created in a variety of formats. Below are some types of image adverts available for creation:
- Responsive Display Ads
This process is partially automated. It's a creative way to enable Google’s algorithm to play a part in determining the best visuals to show across the web when reaching your target market.
Simply enter your ad text, upload some images (automated website scanning is also possible here) and add your logo. These ads show as ‘native’ ads, blending into the font and feel of the publisher’s website in which they appear.
- Uploaded Image Ads
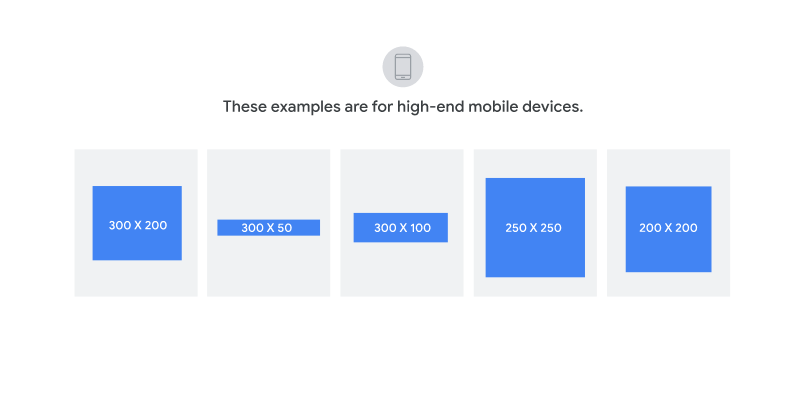
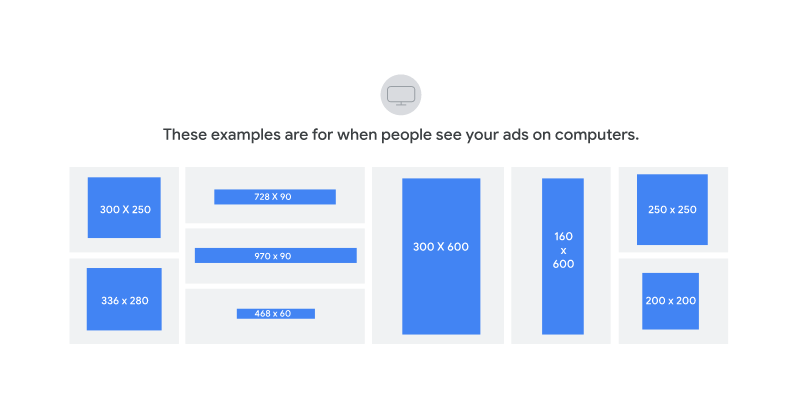
Image ads are also an available option if you have a graphic design team that has created specific ads to match with the theme of your brand. Ads are available in a range of sizes (see below), and are also available in HTML5.
Common Display Ad Sizes:
Back to Top or ![]()

