There are a few factors that contribute to the success of your product advertising on Google. The first is creating a perfect data feed. But a great-quality feed isn't enough. Another important aspect is creating a Google Shopping campaign in Google Ads (formerly AdWords) and also optimizing it to perfection. This will increase your sales and help you avoid wasting your money on products that don't perform well.
In this article we’ll take you through the 12 most important steps that any one just starting out needs to know.
Get your own copy of 10 Simple Tactics to Optimize Your Google Shopping Campaigns
PLA optimization
PLA, or Product Listing Ads, optimization is a crucial strategy in digital marketing, especially for e-commerce businesses.
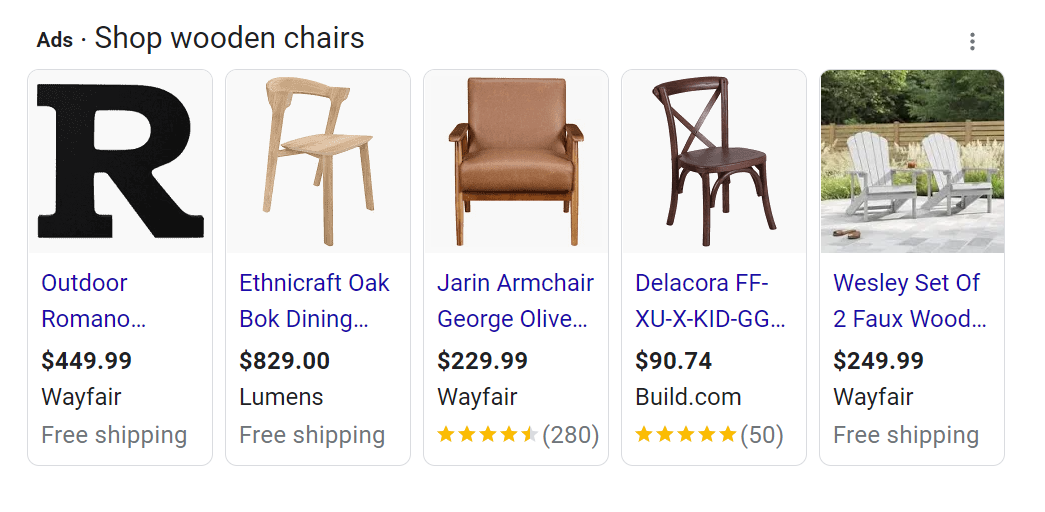
Product Listing Ads are a type of online advertising format that showcases a product's image, price, and brief description directly in search engine results. Optimizing PLAs involves a range of techniques aimed at enhancing their visibility and effectiveness. This includes optimizing product data in your feed, excluding relevant keywords, creating effective bidding strategies & setting competitive bids, and segmenting your Shopping campaign.
Additionally, ongoing monitoring and refinement of PLA campaigns are essential to maximize ROAS (return on ad spend) and ensure that the products are being showcased to the right audience at the right time.
Check out our 12 tactics to be successful with Google PLA optimization ↓

1. Optimize your product feed
The first step to better Shopping ads is to optimize your product feed. This is where Google pulls data about your products to serve your ads. You need to add as many product attributes that describe your items as you can and optimize them for the best quality.
Product data for Google Shopping
Product data is the essential information about the items you want to advertise on Google's e-commerce platform. This data is found in your product feed and includes details like the product's name, price, availability, and a link to the product page. It's crucial to have high-quality images and accurate descriptions, as this data directly influences how your products are displayed to potential customers.
Why is product feed optimization important?
Well-organized and up-to-date product data can improve your visibility in search results. The easier you make it for Google to ‘read’ the information about your products, the better chance you have of showing up for the right customers.
So, ensuring that your product data is complete and optimized is a key factor in running successful campaigns on Google Shopping.
Where should you start?
If you're new to optimizing data feeds, there are several product attributes you should focus your attention on first. The most important attributes are, of course, those that may appear in shopping ads. Here we will describe just some of them.
Required product attributes
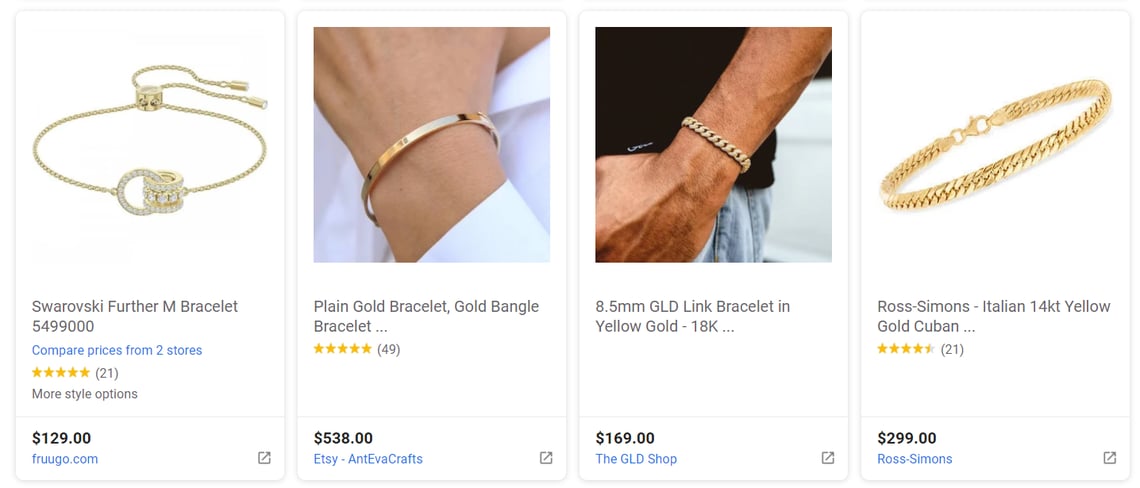
Images
The element of Shopping ads that immediately stands out are the images. Yes, there are Google rules and regulations that you should follow, but you’re able to optimize your images beyond that as well. For example, you can do regular A/B testing (especially with lifestyle vs. stock photos) to see what performs best with your audience.
The important thing is to map images correctly in your feed. You can do it very easily using a feed management tool. In some cases it’s very simple:

Mapping images | DataFeedWatch
Other times when you have multiple variants of one product it’s important to prevent mistakes such as matching the wrong image with the product variant. The easiest solution to this problem is to create a rule such as one below:
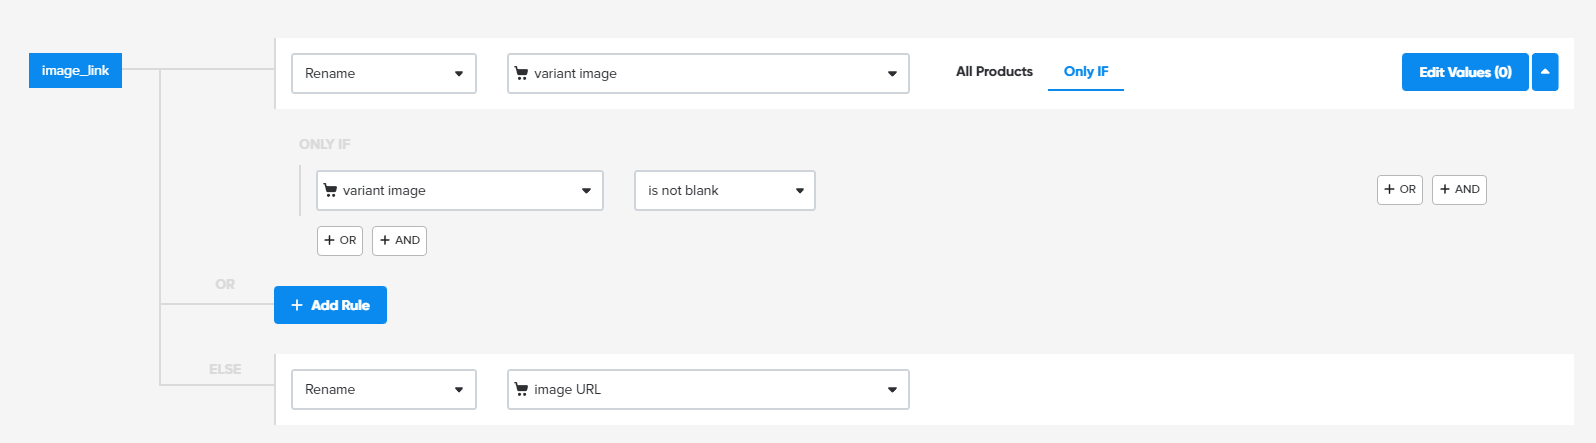
Matching the right image with the right product variant | DataFeedWatch
It’s also very important to add more images of your product than just one. People like seeing the product from different angles before making the final purchase decision.
When using DataFeedWatch, you simply add additional images by adding an optional field to your feed.
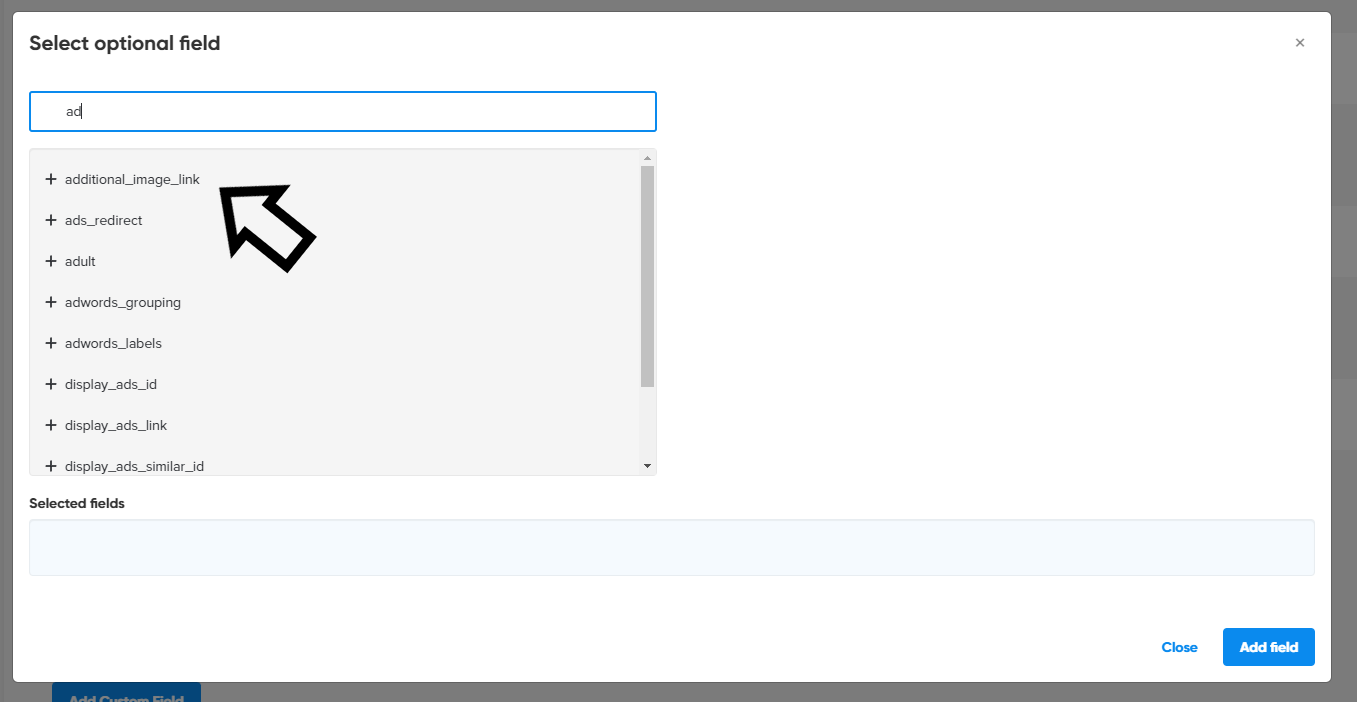
Adding additional_image_link field | DataFeedWatch
Product titles
While images might automatically catch shoppers’ attention, product titles also hold their own weight. Peak interest by putting the most important keywords first. Get a more in-depth look into creating the best titles with our 10 tried and true tactics.
Remember to populate your titles with all the most relevant information about your product. Then you can combine them all using a rule like this in DataFeedWatch:

Combining attributes in a product title | DataFeedWatch
If any phrases in your titles repeat, you can easily fix this problem using the “Remove Duplicates” functionality.
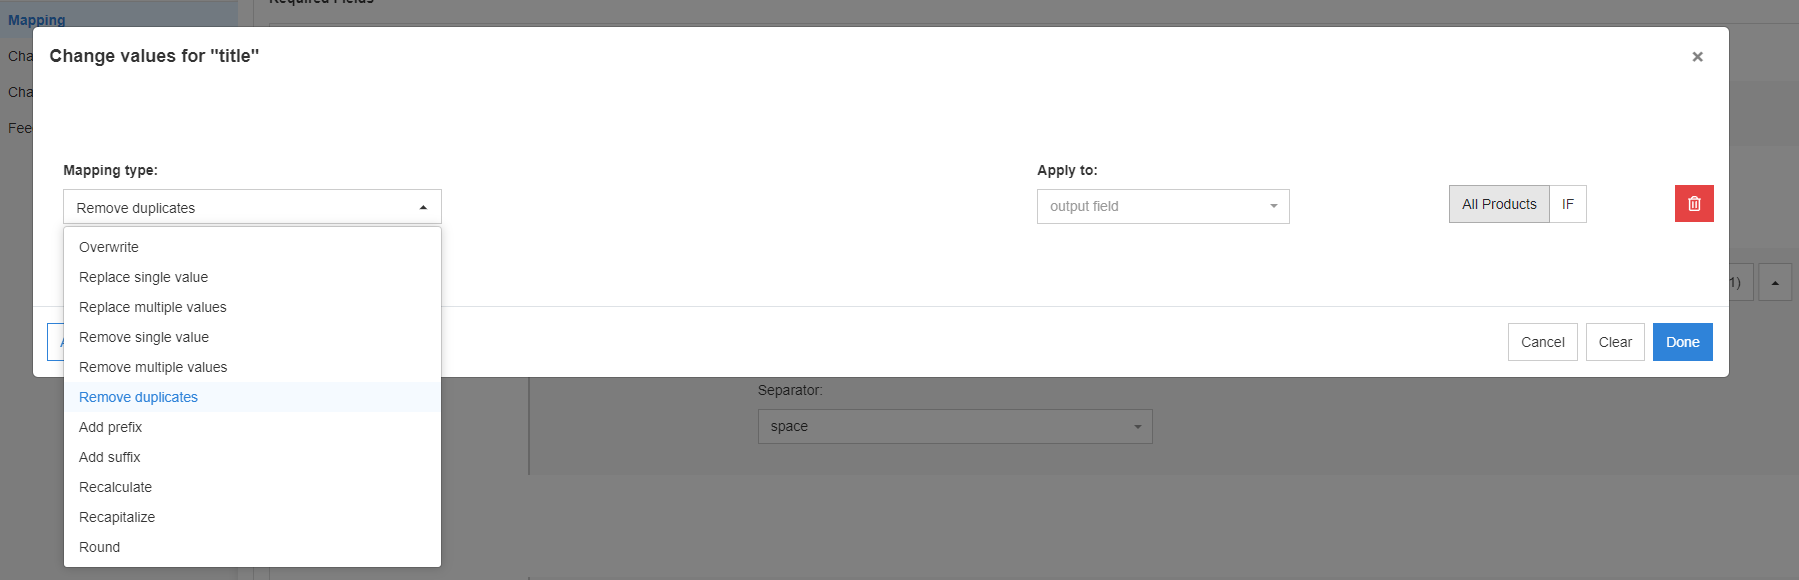
Removing duplicates in a product title | DataFeedWatch
Price and sale price
Getting the price right can also impact the quality of your product listing ads. Making sure that Google is pulling the correct price is crucial, especially if you also sell on-sale products. To avoid common Merchant Center errors, make sure things like price, sale price and currency are up to date and formatted correctly.

Mapping price | DataFeedWatch
Make sure that all products you sell at a special price are assigned the correct price in your feed.
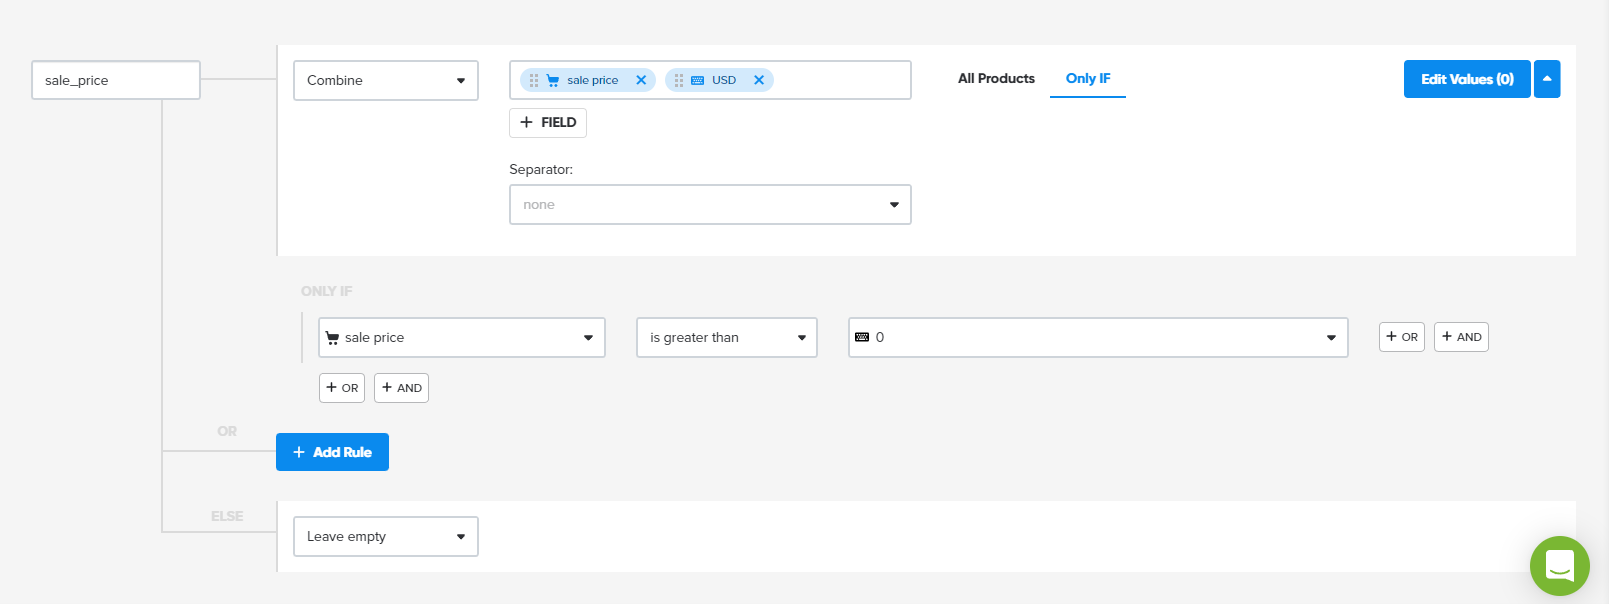
Mapping sale price | DataFeedWatch
Optional product attributes - make your Google Shopping ads stand out
ECommerce is a very competitive industry and including and optimizing the required attributes in your feed is often not enough to achieve advertising success. In order to stand out, you need to enrich your feed with additional attributes that will help you better describe your product.
Below we described a few additional fields you can include in your feed to enrich it and thus make your Shopping ads better.
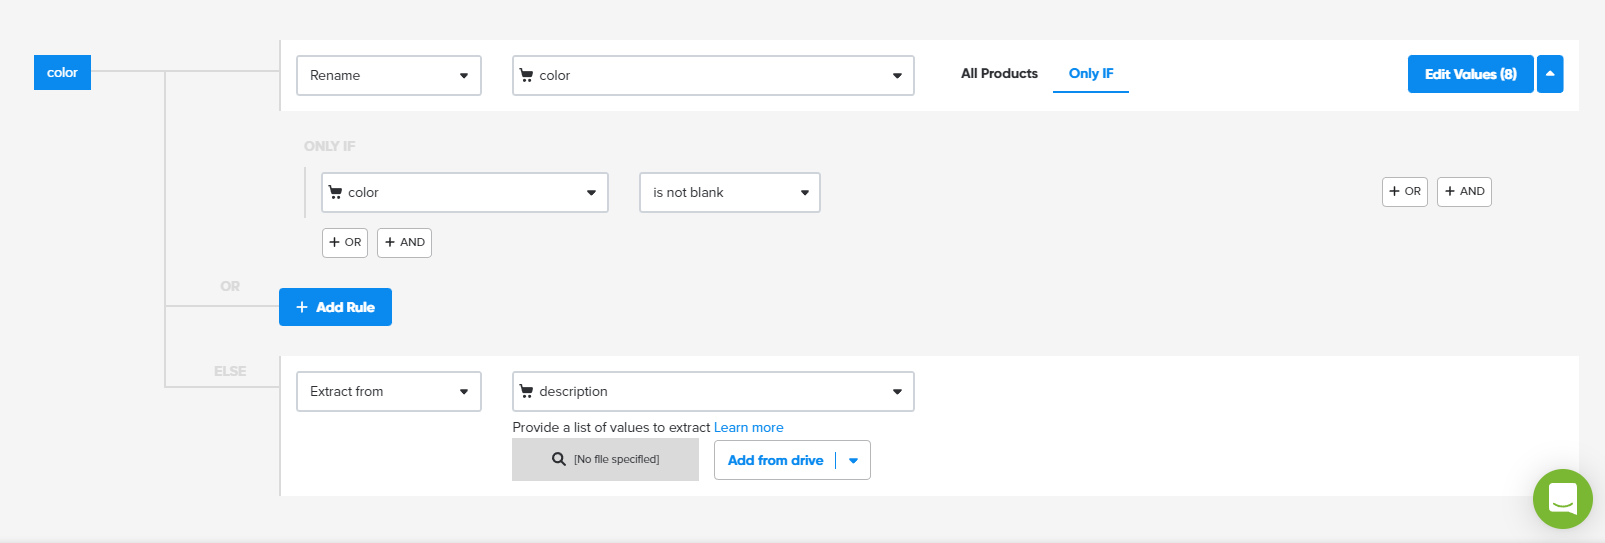
Color
Product color is a very important feature for many shoppers. Many of them are looking for very specific products in specific colors. Therefore, you should include the color_attribute in your product feed.
In some countries (UK, France, Germany, USA, Brazil and Japan), for certain categories, such as Apparel & Accessories, adding a color attribute is mandatory.
If you have listed colors for all your items, mapping will be super easy. But more often, colors are missing for at least some products. In that case, you can extract it from other attributes, for example product description. You create a list of all colors you’ve got and upload it to the tool. The system will populate the color field for each product where the color was previously missing. The rule in DataFeedWatch would look like this:
Extracting color from description | DataFeedWatch
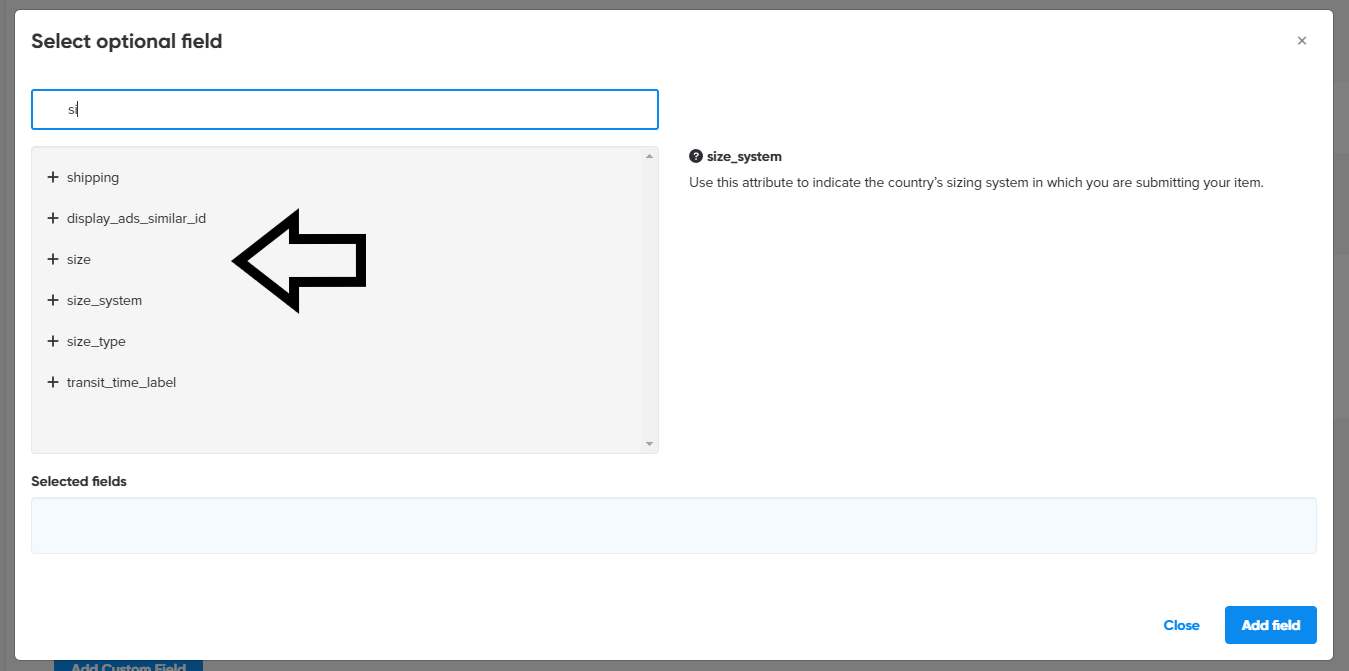
Size
A clear indication of size is also very important when shopping online. Google sometimes even highlights this attribute in shopping ads (even though it is not a required attribute). You should definitely add the size for each product in your feed, where it is relevant.
To map it in our feed tool, you need to add an optional field to your feed.
Adding optional field - size | DataFeedWatch
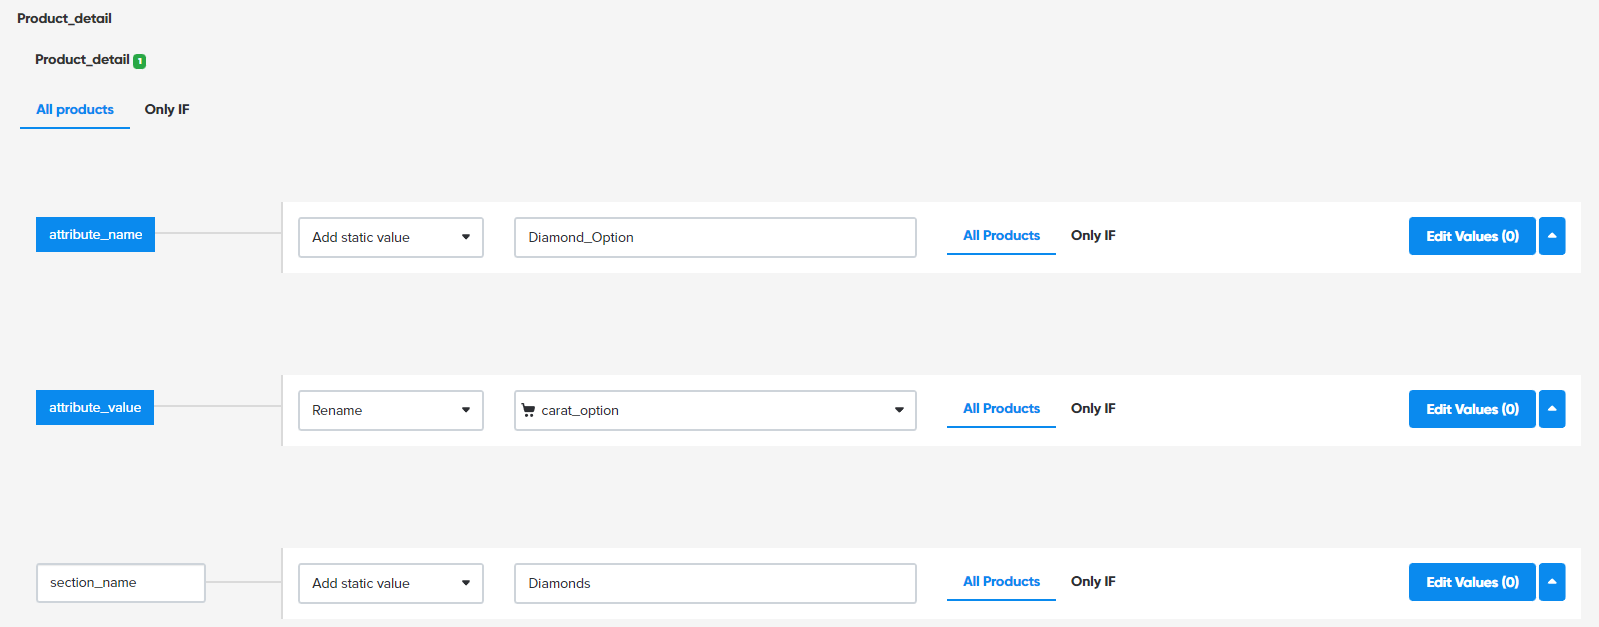
Product detail
Some of your products are so unique or complex that you might want to describe them with attributes that don’t really exist (even as optional). Google is ready for this kind of situation. You can include a product_detail field in your data feed. Through this attribute you can include more information about your items such as type, style or technical specifications.
There is a special way to map the product_detail attribute in your feed as it has 3 sub-attributes: an optional section_name and two required attribute_name and attribute_value.
Mapping product detail | DataFeedWatch
Shipping and return policies
If you set up shipping and return policy information in Google Merchant Center, Google will display it in Shopping and Free Listing Ads. That way, your ads will stand out among the rest.You can read more about it in this article.
![]()
2. Optimize your campaign structure
Creating an optimized campaign structure is one of the most crucial steps to setting you up for success in the long run. But if you’re just starting out, it can be hard to know exactly what that means.
Your goal is to have as much control over your product listing ads as possible. That way you’re able to bid differently for different products. While this isn’t possible from the start, there are ways to segment and organize your products so that you can.
You don’t want to have one bid for all your products because different products have different profit margins, some products are more popular than others, some have very different conversion rates, etc.
That is why Google Ads enables you to divide your products into different groups. Like we mentioned earlier, you can divide them by category, brand, condition, Item ID, product type and custom labels.
How to divide your Google Shopping campaign structure
Step 1: Start with one product group - 'All products'. Click ‘Edit’ and select the attribute that you would like to use to divide your products.
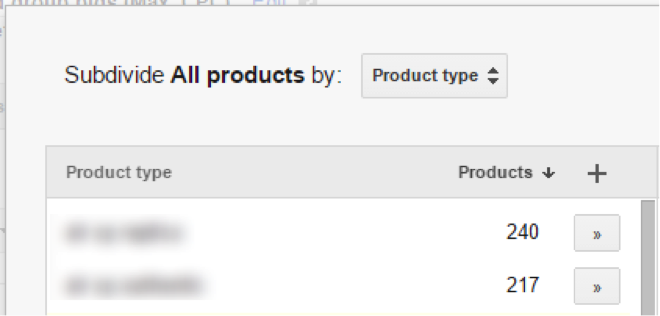
Subdividing products by product type | Google Ads
Step 2: You will see the list of available values - all of them are pulled from your data feed. You can create separate product groups for some of your values (use '>>') or for all of them at once (use '+').
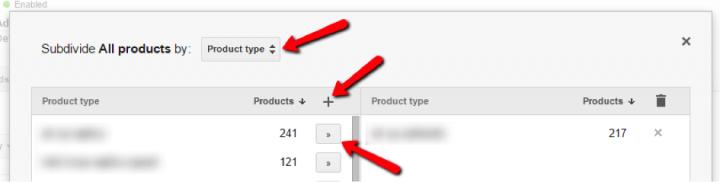
Creating product groups | Google Ads
Step 3: Now you can subdivide these new product groups once again. Just edit them and select attributes that you would like to use. You can repeat this process many times. Here is an example of a campaign structure: Category > product type > item ID
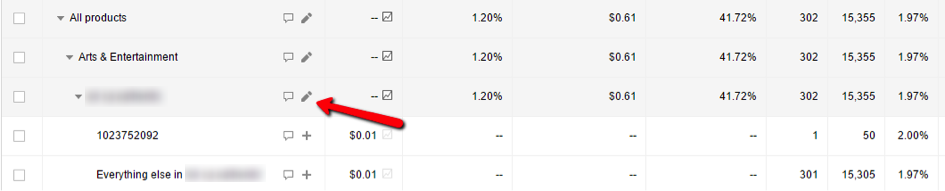
Subdividing product groups by chosen attributes | Google Ads
Once your campaign has the correct structure, you need to set bids. Google Ads automatically adds a new product group called 'Everything else'. As a result you can use a different bid for one particular product within a category, brand, product type etc., and another bid for all other products (Everything else) in this group.

Subdividing product groups by chosen attributes | Google Ads
![]()
3. Divide your products into ad groups
You’ll need another way to control the bidding on your ads since you won’t be able to do it by keyword. Instead, you can organize your products using ad groups. Your ad groups are like different departments in a store. The other key concept here is to make sure the ads that are triggered are as relevant as possible.
You might have seen that you already have your first ad group from when you created your campaign.
Here’s how you can create additional ad groups:
- Sign into your account
- Go to the page menu and select ‘Ad groups’
- Click on the + button
- Choose ‘Select a campaign’ and choose where your ad group will go
- Name your ad group
- Set the bid
- Click ‘Create’ and you’re all set
Now you’re ready to divide and then subdivide your products. If you have multi-level categories in your feed, you need to use each level separately.
To add a product group for Apparel & Accessories > Jewelry > Bracelets you need to create a group for Apparel & Accessories first, then divide it by category to create a group for Jewelry and subdivide it again for Bracelets. That may look tricky, but it’s quite easy.
Which attribute should you use to divide your products?
It depends on your campaign. If all your products have the same Google category, this attribute will not be helpful; using the product type may be better. On the other hand, if you sell items manufactured by Nike, your brand group may contain T-shirts, shoes and sport equipment.
The good news is that you can divide your products using one attribute and subdivide them again using another one. Hence, subdivide your products by brand to create a group for Nike, and subdivide it again by product type or category to add separate product groups for Nike T-shirts, Nike shoes and Nike sport equipment.
Or do it the other way around: divide your products by category or product type and subdivide again using your brands. Last but not least, it’s a good idea to create product groups with comparable numbers of products inside.
![]()
4. Top vs. Other
It may sound surprising, but increasing your bids is not always a good solution. That could just end up as wasted ad spend. Interestingly, some products may perform much better when they aren’t shown at the top of search results.
If you’d like to see if this is the case for some of your products, go to Segments -> Top vs. Other and compare conversion rate, CPA and other important metrics between Top position and other positions.
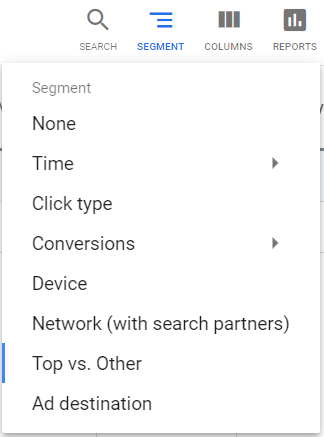
Using Top vs. Other tab | Google Ads
Please note that this data is available for ad groups but not for product groups.

Comparing metrics between Top and other positions for your products | Google Ads
![]()
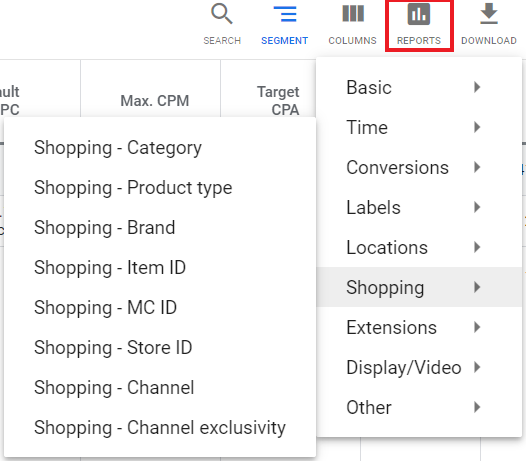
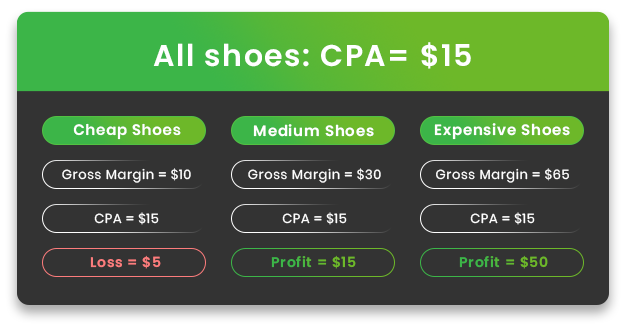
5. Find your winners and losers
Some of your products are going to perform better than others. This is really valuable information to have about your ads so that you can make adjustments accordingly. ‘Winners’ are products or product groups that bring you many transactions. ‘Losers’ provide you with many visits, but no transactions. You probably want to sell your products, not just show them, especially since you have to pay for every single click.
Identifying your winners and losers will help you to boost your sales and decrease your CPA, thus increasing your ROAS.
How can you do that?
Go to the Predefined reports (formerly Dimensions) and to ‘View: Shopping’. Select an attribute that you would like to use to look for your winners and losers.
Identifying most and least profitable products | Google Ads
If you are searching among individual products (item IDs), it is a good idea to customize columns and reflect the structure of your campaign (add product type, brand etc. to your columns). This way you will know which product group you should modify to set separate bids for winners and losers.
Filtering your products will help you to find losers in an easy way. Please note that you should adjust your filter to your campaign and market. A T-shirt with 100 clicks and 0 conversions is a loser, but it may not be for a luxury watch.
Note that not only a product without conversions may be a Loser. If cost per conversion is higher than your profit margin, you are wasting your money as well.
Once you know your winners and losers, go to the ‘Product groups’ tab and adjust your bids for them. If they are not in your campaign structure yet, you need to create separate product targets for them first. Just subdivide your categories, brands, product types etc.
Bid more on winners and bid less on losers with high cost per conversion. Items with many visits and no transactions should be excluded.
![]()
6. Exclude unprofitable products
You can stop advertising your unprofitable products in an easy way – just exclude them from your campaign. All you need to do is edit your bids and mark these products as excluded.
Alternatively, you can use a data feed tool like ours to identify losers with a similar filter and remove them from your feed with a single click.
There are some other times when you may want to do this, for example when you know that certain products aren’t going to be popular. You can create a list of them and exclude them using a single rule.
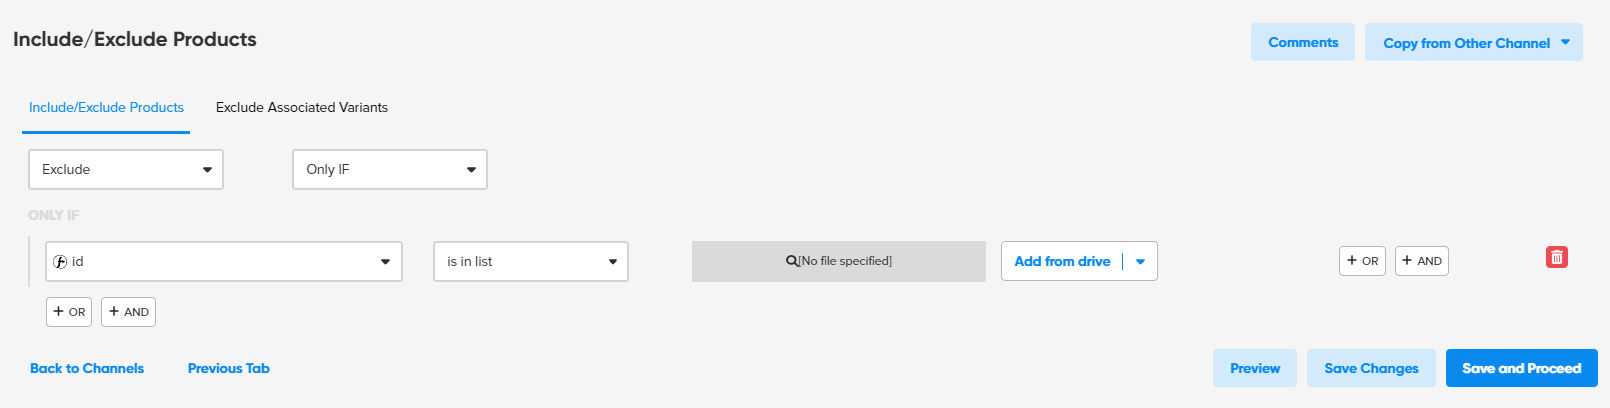
Excluding a list of products | DataFeedWatch
If you have some summer items, it’s probably safe to say that they’re not going to be getting you a lot of conversions in winter.
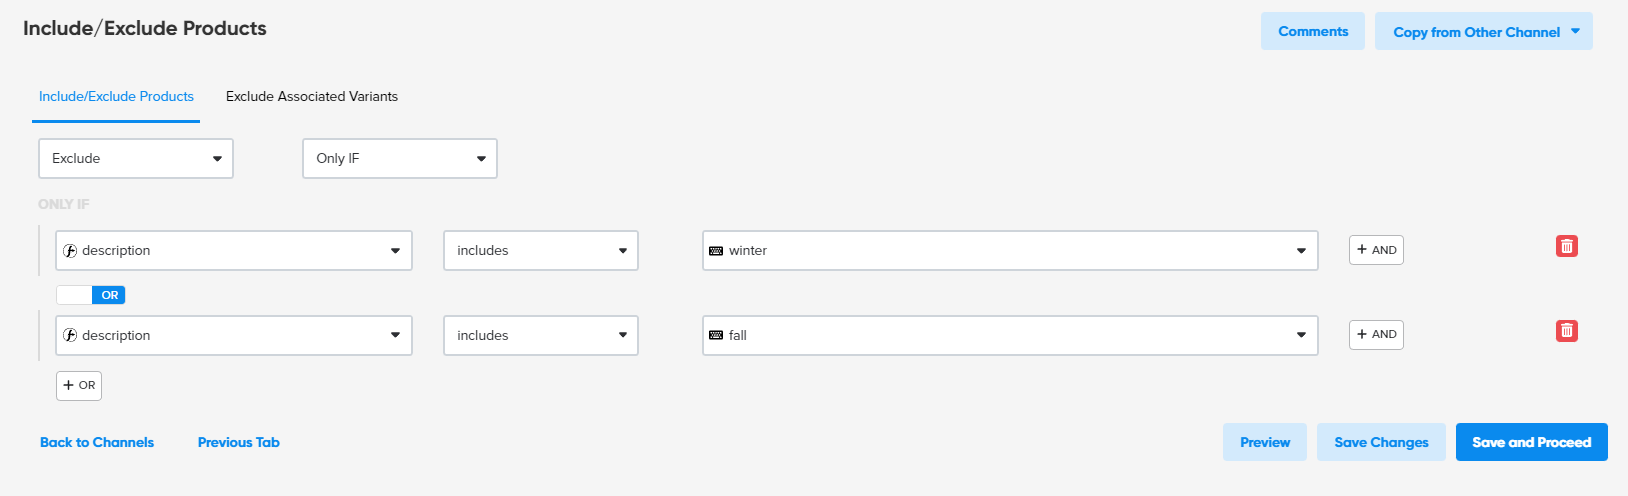
Excluding seasonal items from your feed | DataFeedWatch
Another time you’ll want to exclude products is when they’re out of stock or the items that are left are in an uncommon size or color.
Google automatically pauses ads for products listed as sold out. This works as a kind of "safety net" for them, and it's only temporary, of course. Your role is to make sure that your current stock status is up to date and that the correct information is sent to Google.
If you use a 3rd party data management tool like DataFeedWatch, you can set up a dynamic rule that assigns all products in your feed the correct availability status.
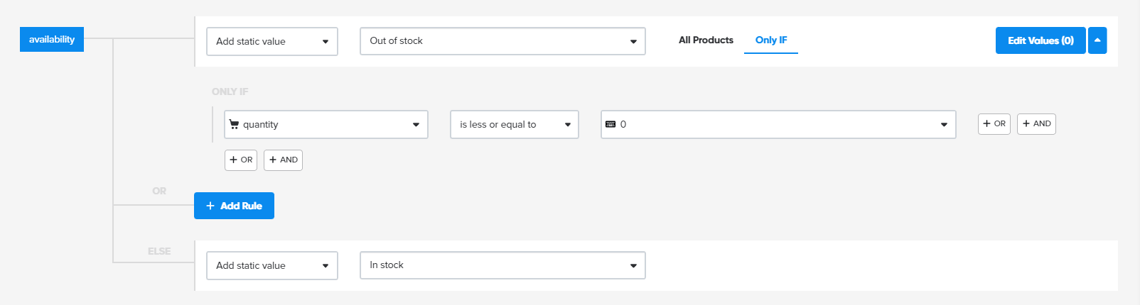
Excluding out-of-stock products | DataFeedWatch
![]()
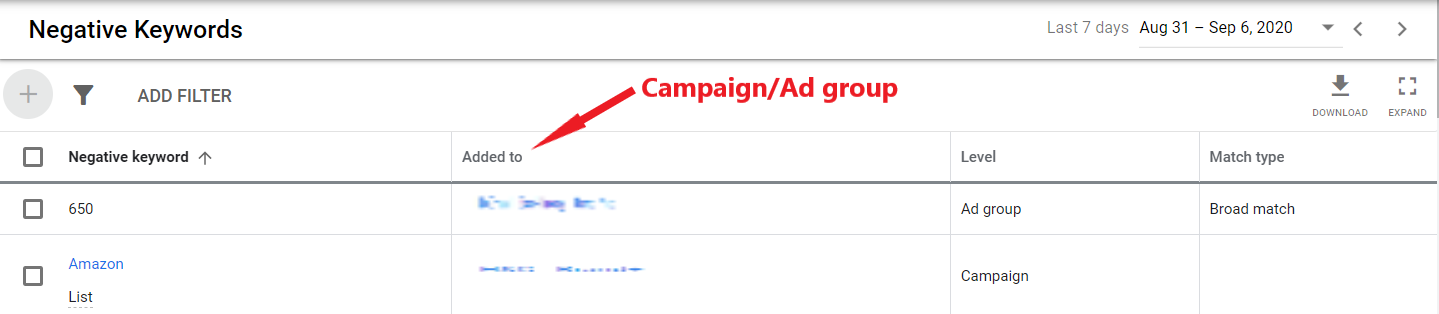
7. Use negative keywords
Negative keywords are the silent heroes of your campaigns. Unlike with Text ads, you can’t define keywords that will trigger your product ads to show. All queries are pulled from your data feed. However, you can limit the searches for which your ads will show by adding negative keywords. Negative keywords tell Google which search terms should not trigger your ads.
Let's say that you sell silver bracelets. Someone who is looking for a gold bracelet probably will not buy your products, but he may click your ad. And if this keeps happening, it could really hurt your ad spend budget. As a solution, you can add 'gold' as a negative keyword so his ‘gold bracelet' query will not trigger your ad to show.
You can add negative keywords for the whole campaign or each ad group separately (more on that next). Just go to the 'Keywords' tab, scroll down to Negative keywords and add your values.
How to find the right negative keywords
Google Ads allows you to check search terms that have triggered your ads to show. You can use it to find queries that bring you many visits but no transactions. These are the kind of costly clicks that you want to avoid.
Luckily, you can 'exclude' them in an easy way - just add them as negative keywords.
- Go to the 'Keywords' tab
- Click on Details > Search terms > All
- Select terms that you would like to use
- Add them as negative keywords.
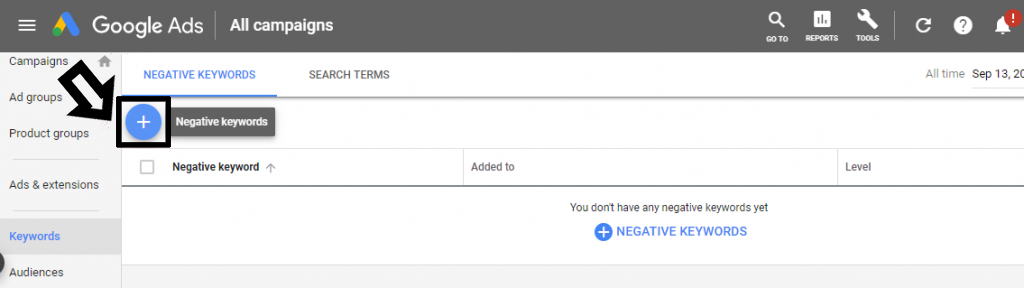
Navigating to Negative keywords + button | Google Ads
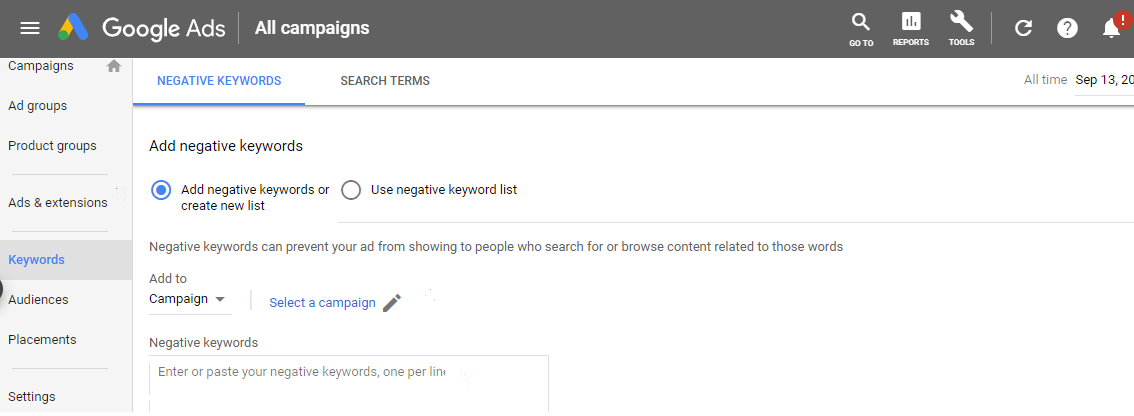
Adding negative keywords | Google Ads
Wondering how this works for Performance Max campaigns? You can find all the information on how to add negative keywords to a PMax campaign here.

8. Subdivide negative keywords
Did you know negative keywords can get even more specific? Your negative keywords will fall into two categories: universal negatives and ad group negatives. Subdivide them and you can have even more control of whether your products show or not.
Universal negative keywords are the ones that you absolutely never want to trigger your product listing ads. Period.
On the other hand, negative keywords set at an ad group level aren’t so cut and dry. These are the ones you can set up to not show in a given ad group, but allow it for others. Google always says it best, “keywords at the ad group level prevent specific ad groups from showing ads for specific queries”.
The benefit of doing this is that you can increase metrics like conversion rates or ROAS while also preventing you from competing with yourself.
Subdividing negative keywords | Google Ads
![]()
9. Bid Adjustments as part of your bidding strategy
This is one of the best bidding strategies for Google Shopping. As you probably know, some clicks are worth way more than others. By using bid adjustments you can have more control over who sees your ads and when. Let’s go over a few types that will be useful for your Shopping ads.
Location
By using the location bid adjustment you can control how often shoppers are able to see your ads based on geographic location. This can be helpful if you’re advertising in more than one area and you know that the competition in a particular city is higher. In that case, you could increase your bid if those sales are really important to you.
Devices
Let’s say you notice that the majority of your sales are coming from desktop computers, second from mobile devices and third from tablets. In that case you can adjust your bidding based on the device that’s being used so you don’t waste your ad spend.
Schedule
Your ads may be performing better at certain times of the day or week, depending on where and what you’re selling. The reports tab enables you to check the performance for day of the week or hour of day. This data may be really useful, since it may occur that your cost per conversion is much higher at weekends or at night.
To check it, just go to Reports and then to View: Time >Day of the week (View: Time >Hour of day)
If you want to differentiate your bids for days/hours, you need to create the ad schedule first. Go to the 'Settings' then to 'Ad schedule' and create a new schedule.
Important: if you want to set different bids for hours, you need to add one day multiple times with different periods of time.
Once your schedule is ready, you can increase/decrease bids in an easy way.
![]()
10. Use A/B testing
A/B testing images
Even if you feel you know your customers pretty well, you can't always predict which image will get their attention and which image will perform poorly.
To find out which images work best for your Google Shopping campaign, it's important to A/B test them. Try different image variations and then analyze the results.
With this knowledge, you'll be able to make adjustments to your images and improve your ads' performance. Guesswork would be a bad approach if you are serious about Google Shopping campaigns.
A/B testing product titles
You should use a very similar approach with product titles. Certain titles always perform better than the others.
Some feed management solutions like DataFeedWatch allow you to run 2 different versions of titles simultaneously across your product portfolio.
You simply create two different title structures and create version A and version B of the specific product title.
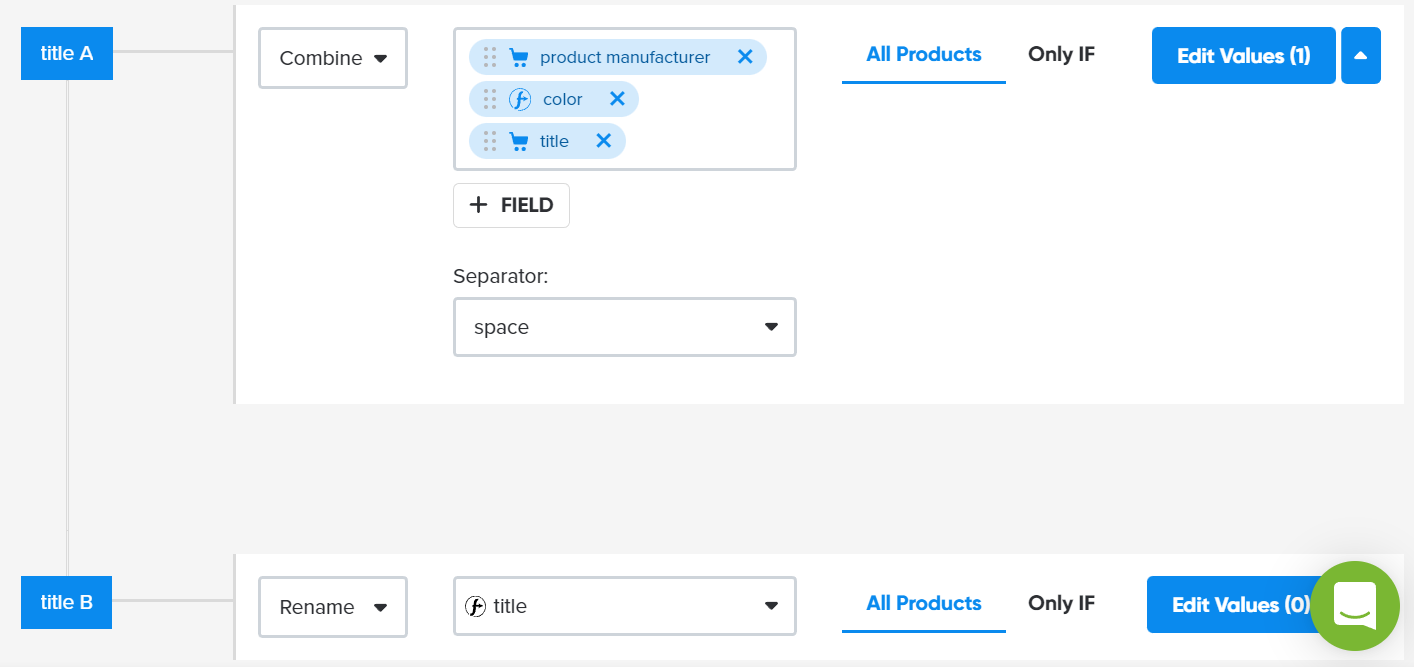
A/B testing product titles | DataFeedWatch
Then you can compare the performance datasets, analyze them and choose the winner.
Want to know more? We've written the full article on A/B testing titles in DataFeedWatch.
![]()
11. Don’t make drastic changes
While it can be tempting to try and make a ton of changes all at once, this isn’t the best course of action. Google Shopping campaigns are sensitive. A small adjustment of your bid may have a big effect on your performance. Hence, except for excluding your losers, you should not make any drastic changes.
Here is a good practice: do not increase or decrease your bids by more than 20%.
Do that for product groups that bring you no more than 20% of your traffic. For example, if your campaign gets 1000 clicks within a certain period of time, adjust your bids only for product groups with up to 200 visits in total.
You also need to be able to easily track if the changes you made are benefiting you. If you make a lot of changes at once, this will be more difficult. Consider using A/B testing with your campaigns to ensure that you’re making the smartest changes possible.
![]()
12. Consider running a Performance Max campaign
All Google Smart Shopping campaigns and Google Local campaigns were converted to Performance Max campaigns by the end of Q3. So if you had been running these campaigns until then, Performance Max probably became your new everyday. If you've just been running standard Google Shopping campaigns, you should still consider launching this new campaign type, as it pretty much does all the work for you!
The Performance Max campaign is a brand new campaign type from Google Ads that combines smart bidding and targeting features. The main goal of this campaign is to increase brands' presence and conversions across the entire Google network. However it is also possible to run afeed-only Performance Max campaign without assets to focus only on Google Shopping. Performance Max optimizes ad performance in real time using smart bidding.
You should definitely consider running a Performance Max campaign if:
- you want to reach new customer segments (across the Google Network).
- you want to gather lots of data on audiences, campaign performance and more.
- you've set multiple goals within your advertising strategy.
- you don't want to spend a lot of time executing your ad strategy.
Read the full guide to creating a Performance Max campaign here.
Expert Bonus Tip: Bid Higher for Selected Search Queries
One of the best kept secrets in the world of Google Shopping is that you're able to target keywords!
This allows you to bid higher for the search queries that are most valuable to you (and lower for the others). It's a pretty advanced technique, but one that's very effective.
Here is how to do it:
- Identify the search queries that are most valuable to your business. You can find these by looking through your search terms report.
- Create an exact copy of your existing Shopping campaign.
- Exclude the list of valuable search queries from one of the campaigns.
- Increase the max CPC in the campaign that doesn't have the negative keywords, and decrease the CPCs in the one that does.
- Change the campaign priority setting of this "valuable" campaign to Low and make sure the other campaign is set to "Medium". That tells Google which campaign to pick if two campaigns have the same products. (This is the tricky part!)
That's it. You might need to go through the previous paragraph a few times to grasp how it works. But when it clicks you'll have access to one of the most valuable Shopping tactics!
Track the changes you make
You need to be sure that you are doing the right things. Increasing your bids does not always bring you more conversions. Decreasing your bids does not always lower your cost per conversion.
There is an easy way to check whether the changes you have made were successful or not. Wait one or two weeks after your adjustment to get sufficient data.
Check your performance for the last 7 or 14 days and compare it to the previous period. Clicking on the date at the top right hand corner of the screen enables you to compare your data for selected performance metrics.

Tracking Google Shopping campaign performance | Google Ads
If you are not sure which bids you have adjusted, you can check them in the Change history tab. What's more, you can even revert your unsuccessful changes with a single click.
![]()
Conclusion
If you were nervous about kicking off your Shopping ads before, you shouldn’t be now! If you get lost, come back to these 12 tips and use them as your guide. It all starts with your campaign structure and how you organize your ads from there.
Read more about How to Improve Your Google Shopping Ads:
- Smart Shopping vs Performance Max: What Are They And Which One Is Better?
- Free Google Shopping Listings - Complete Guide
- 8 Must-Try Google Shopping Feed Optimization Tips: Expert Level
- 10 Rules to Optimize Your Google Shopping Titles
- 8 Tips to Optimize Your Smart Shopping Campaigns